1. PRELIMINARY SETUP 2. THE DELIVERY OPTION DOESN'T APPEAR IN THE APP 3. HOW DELIVERY WORKS ON THE REVO XEF APP 4. WHAT NAMES APPEAR ON ORDERS WHEN RECEIVED IN XEF 5. PRACTICAL EXAMPLE
Delivery is the module in Revo XEF for managing delivery and pickup orders at the establishment.
1. PRELIMINARY SETUP
1. Go to the back-office.
2. Select Settings / DELIVERY.
3. Fill in the following information.
-
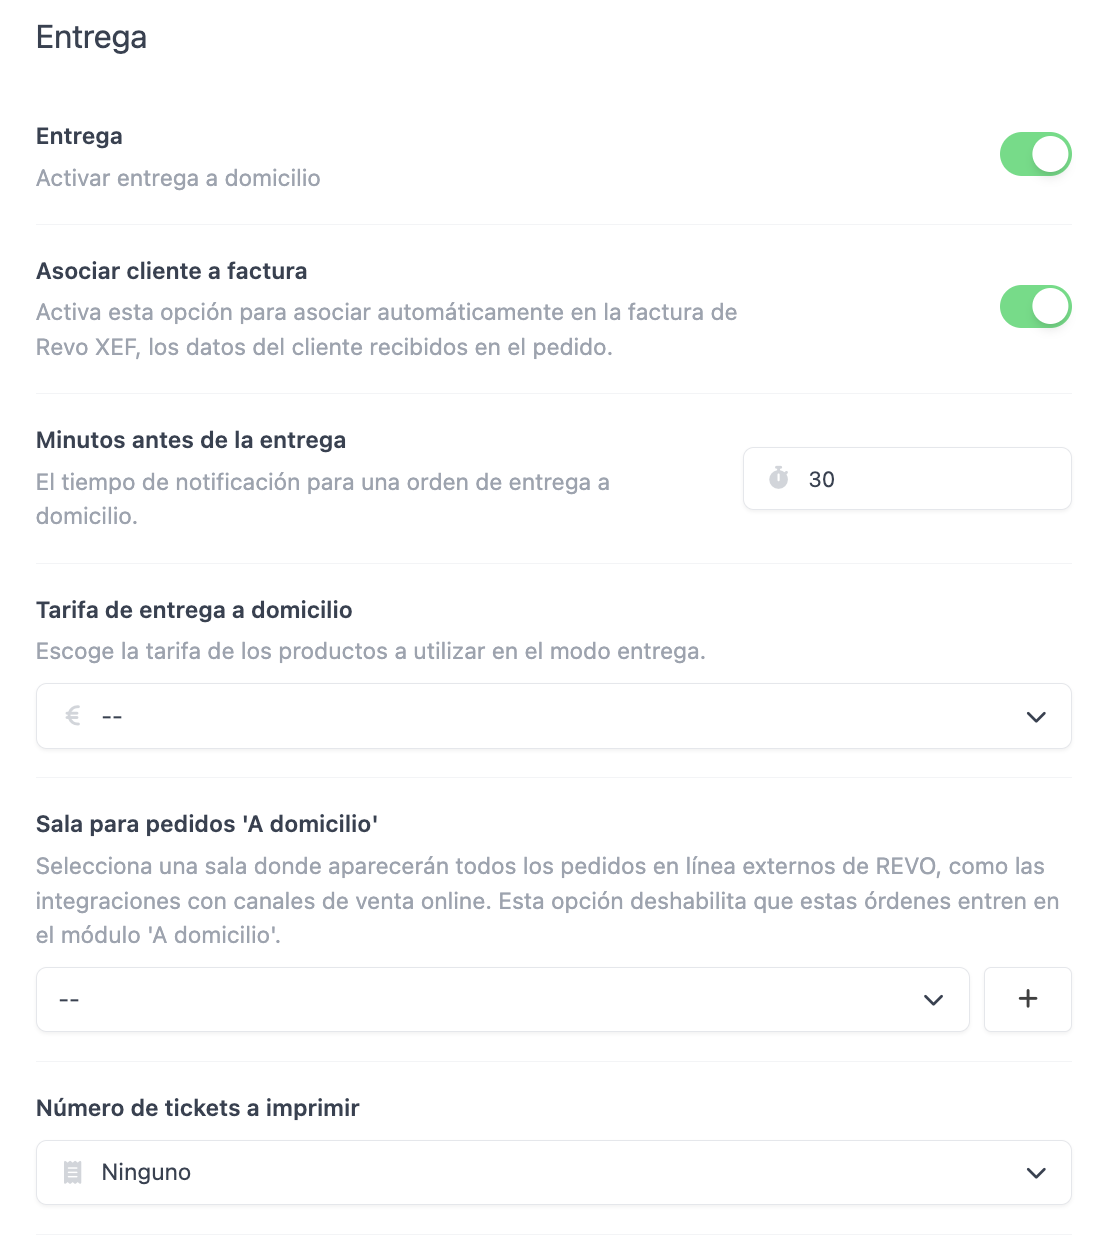
Delivery: Activate the module for deliveries.
-
Associate customer to invoice: Activate this option if you want to associate customer data with the invoice.
-
Minutes before delivery: Time for the order to change from Pending to To Prepare.
Example: if you set it to 15 minutes, the order will change state when there are 15 minutes left until delivery. If you set it to 1 minute, it will change when there is 1 minute left. -
delivery rate: Select the rate for products in delivery mode. It must be created beforehand, more information here.
-
Room for 'Delivery' orders: Select a room for online orders to enter instead of the Delivery module.
-
Number of tickets to print: Select whether you want to print copies of the ticket or not.
-
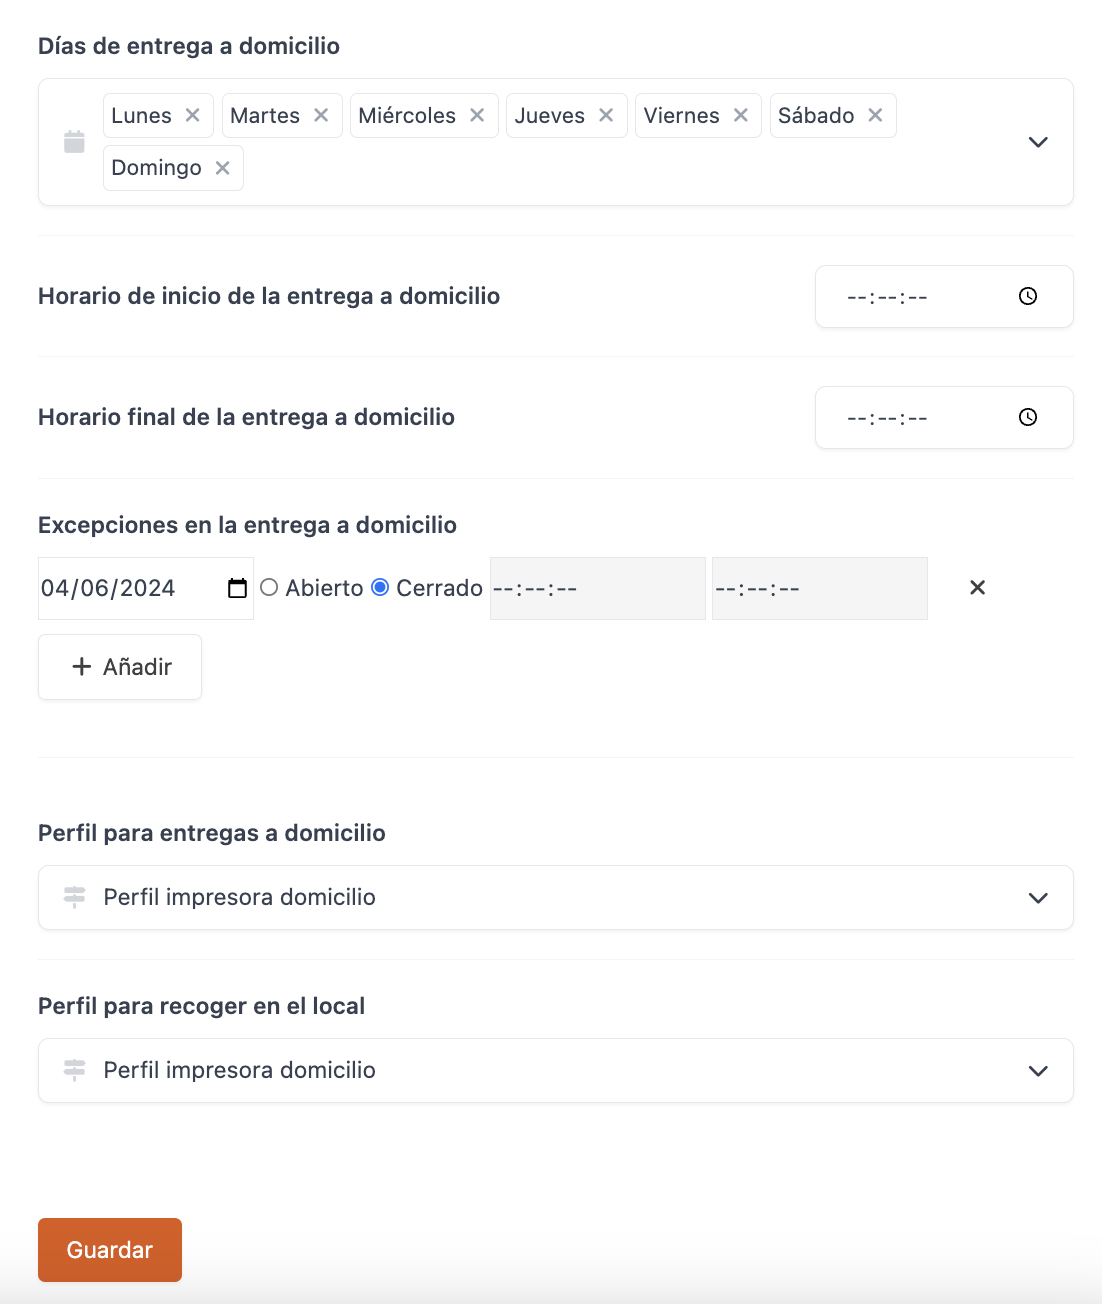
Days of delivery: Select the days of the week for the delivery service.
-
Start time for delivery: Indicate the start time for delivery.
-
End time for delivery: Indicate the end time for delivery.
-
Exceptions in delivery: Add exceptions by clicking on + Add.
Example: close one day a week or during a time slot. -
Profile for deliveries: Select the profile created for deliveries.
-
Profile for pickup in-store: Select the profile created for pickup orders.
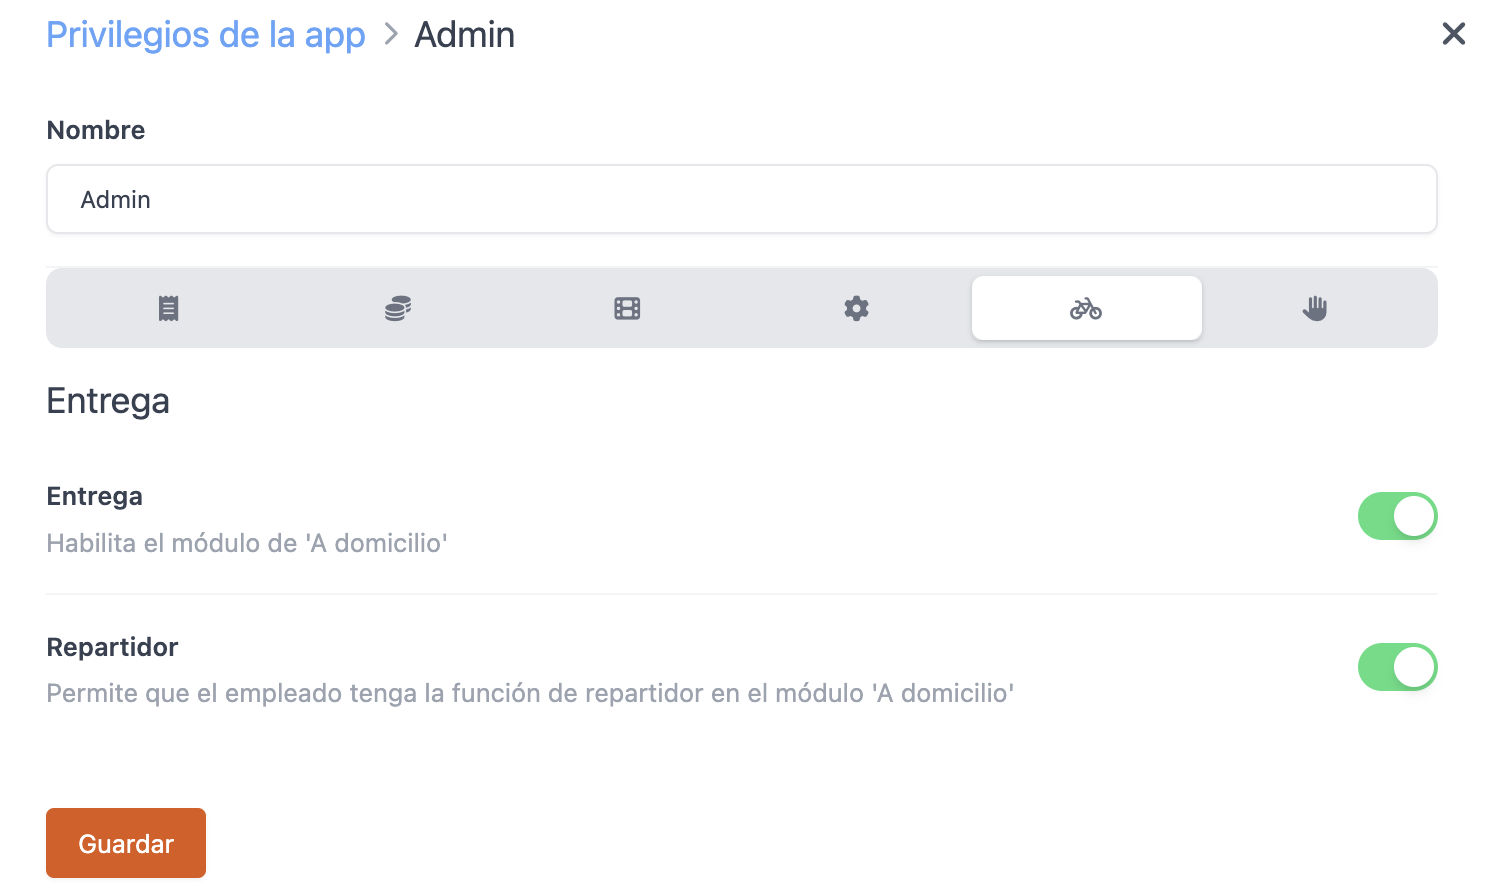
4. Grant the privilege of delivery driver in the back-office and assign it to employees for delivering orders.
5. In the Revo XEF app, go to the menu r, navigate to Preferences, and activate the options that best suit your business:
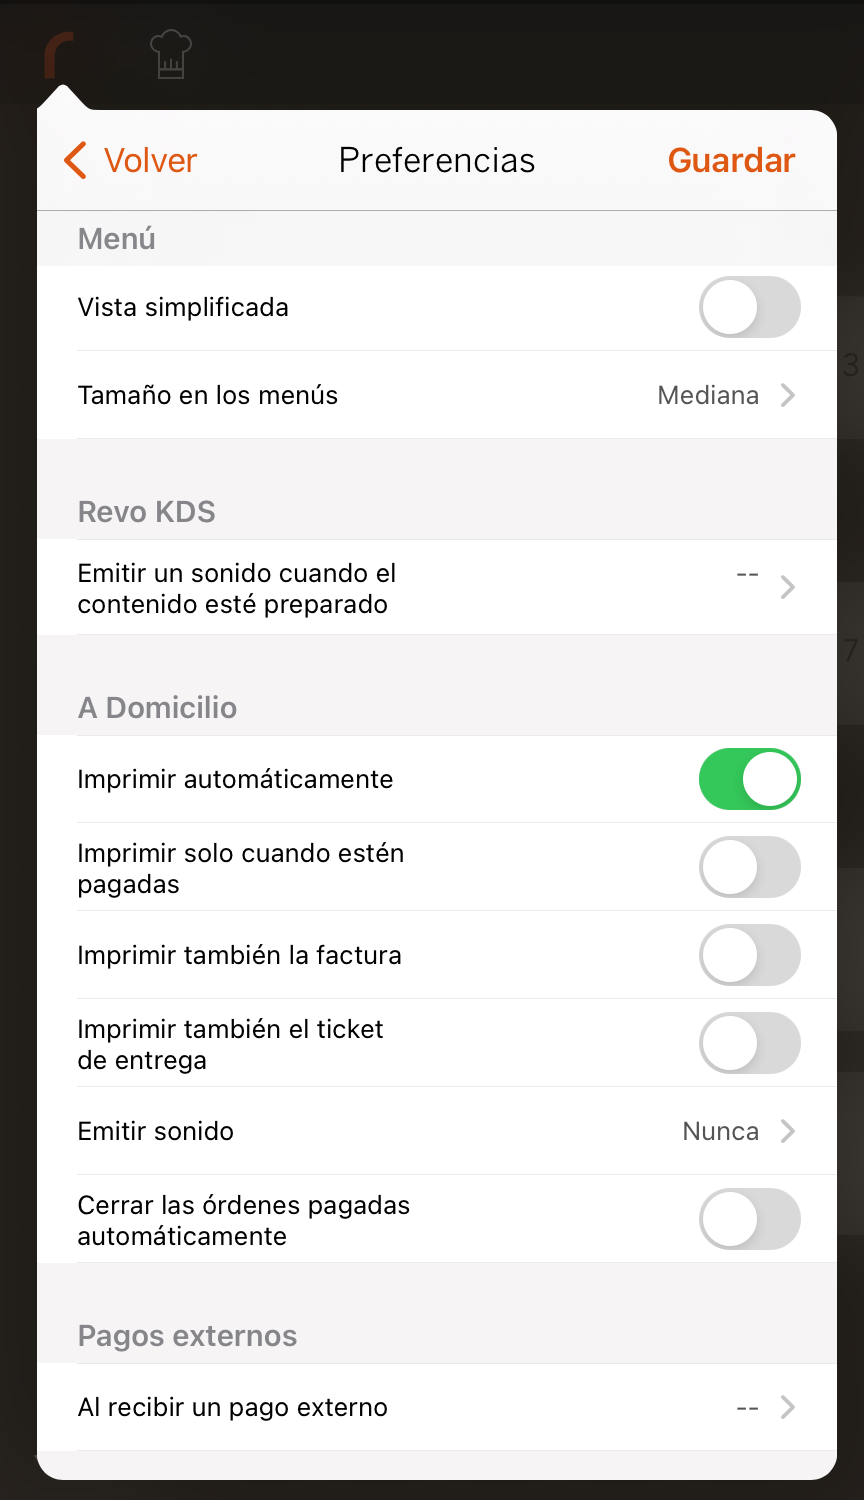
- Print automatically: Activate this option to automatically print orders in the kitchen once the order status changes to 'To Prepare'. It is essential that the products have a printer associated with them.
The following three options will only work when print automatically is activated.
-
Print only when paid: Activate this option to only print paid orders.
-
Also print invoice: Activate this option to also print the invoice.
-
Also print delivery ticket: Activate this option to also print the delivery ticket.
-
Play sound: You can make the iPad play a sound (once or until interaction) when the order is 'Ready'.
-
Automatically close paid orders: Activate this option to automatically close paid orders.
It is very important to have this option activated if you do not manage orders manually, as the accumulation of open orders can slow down the application and cause problems.
It is important that the device with this option activated does not turn off or go into the background so that orders can be automatically closed.
2. THE DELIVERY OPTION DOESN'T APPEAR IN THE APP
This option appears alongside the Virtual button (virtual tables).
Additionally, it's necessary for the employee to have the privilege of Delivery activated.
3. HOW DELIVERY WORKS ON THE REVO XEF APP
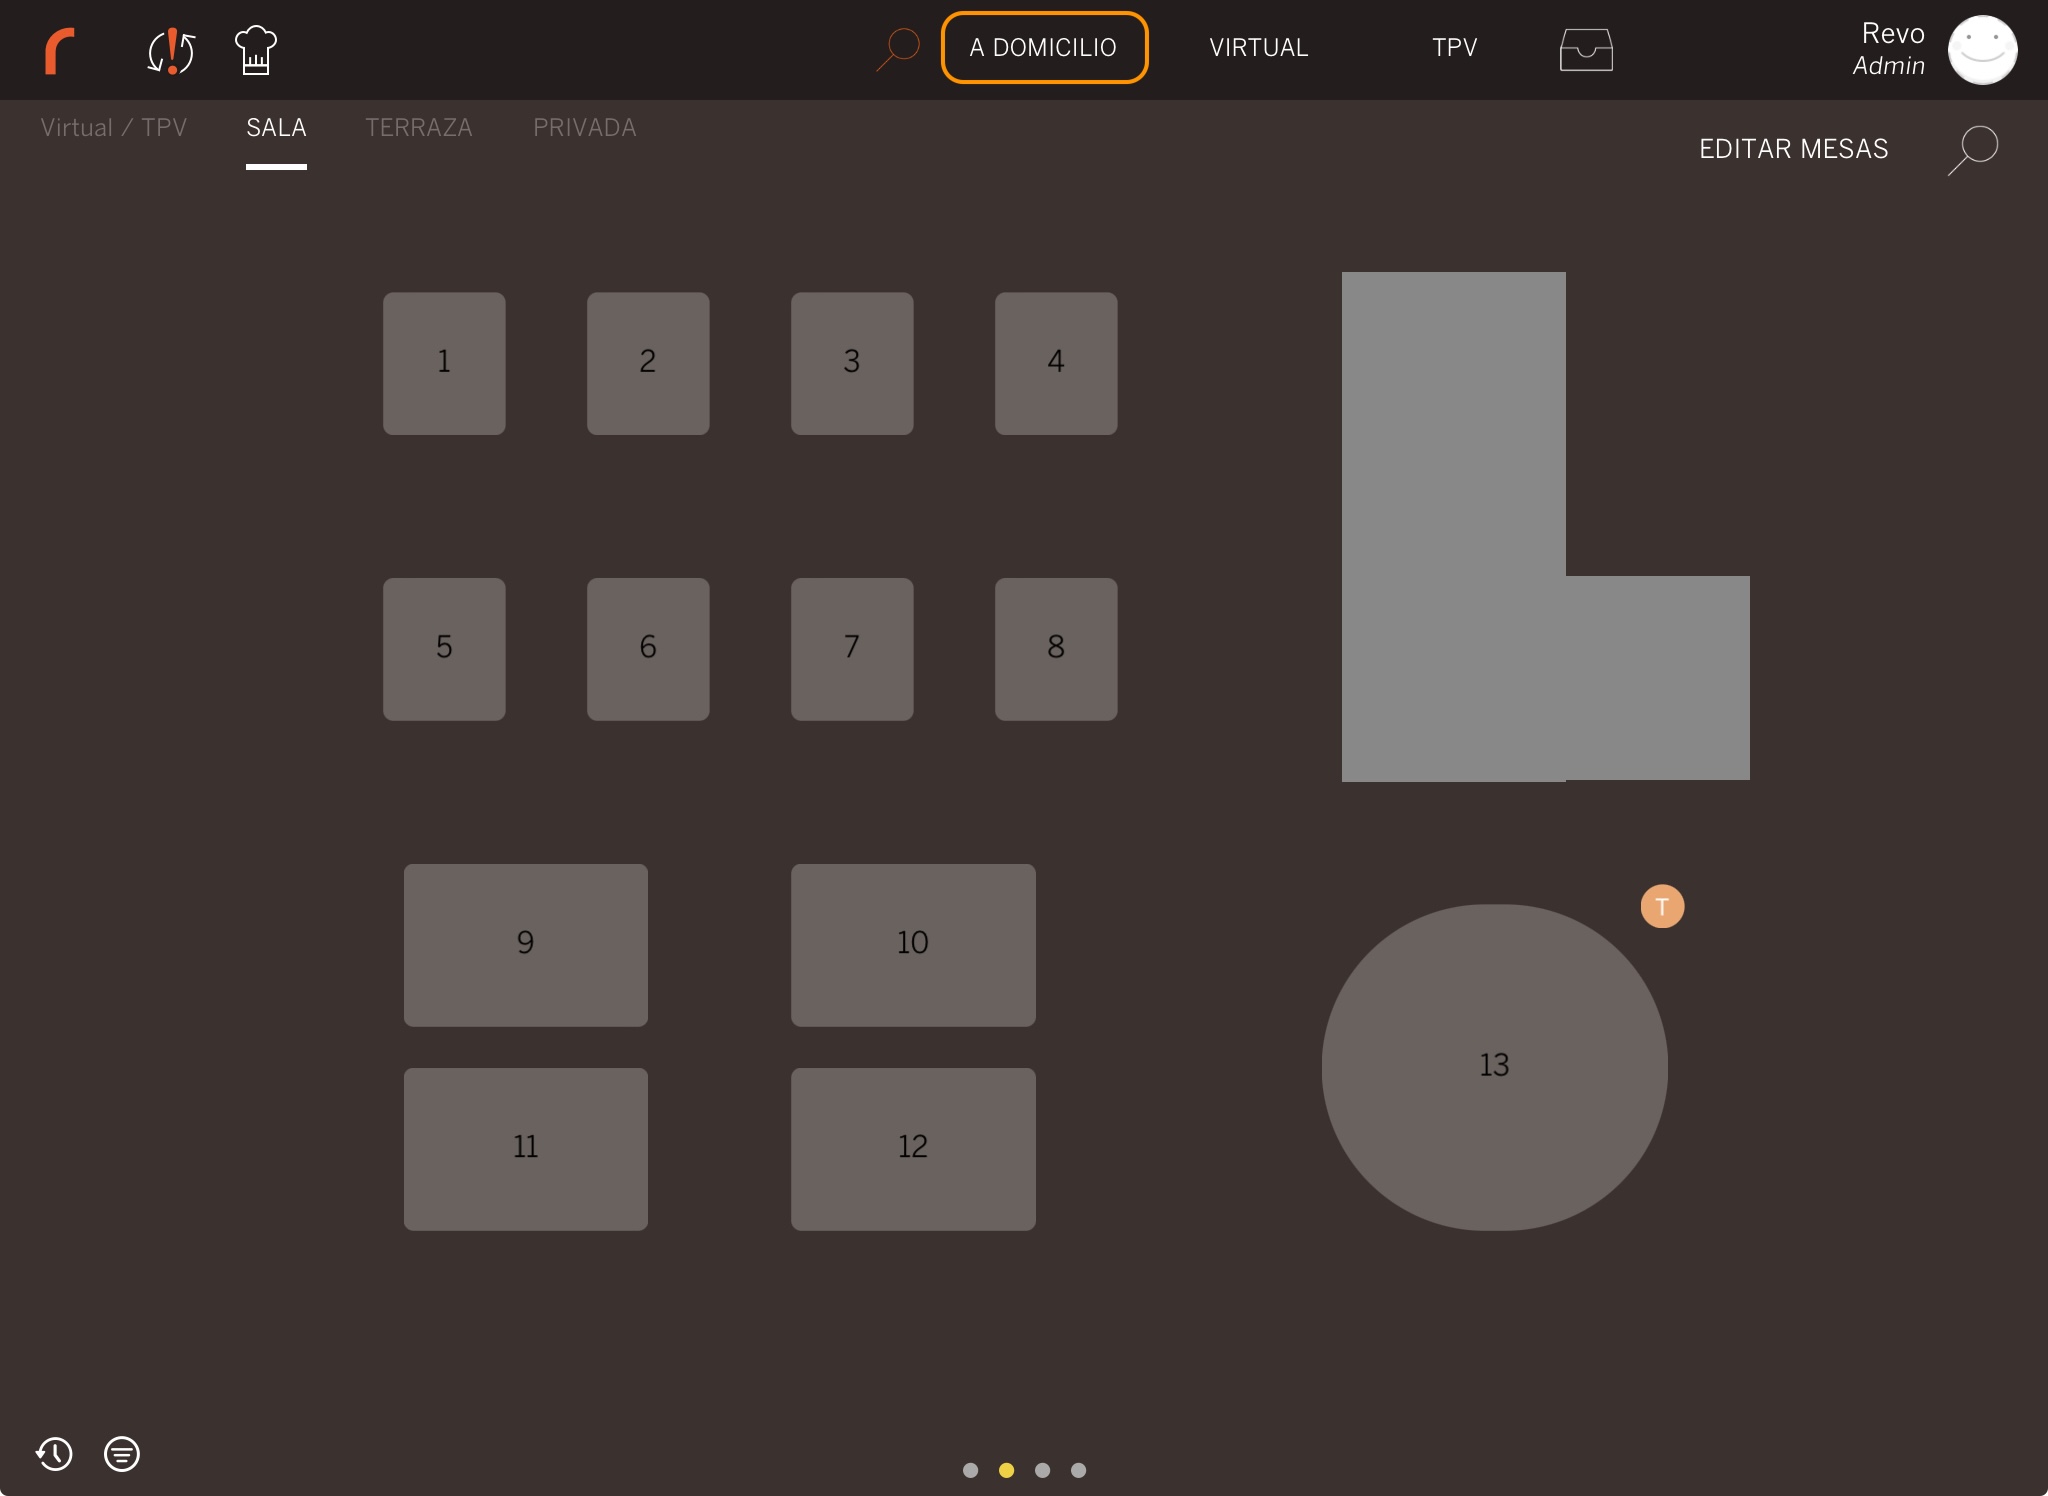
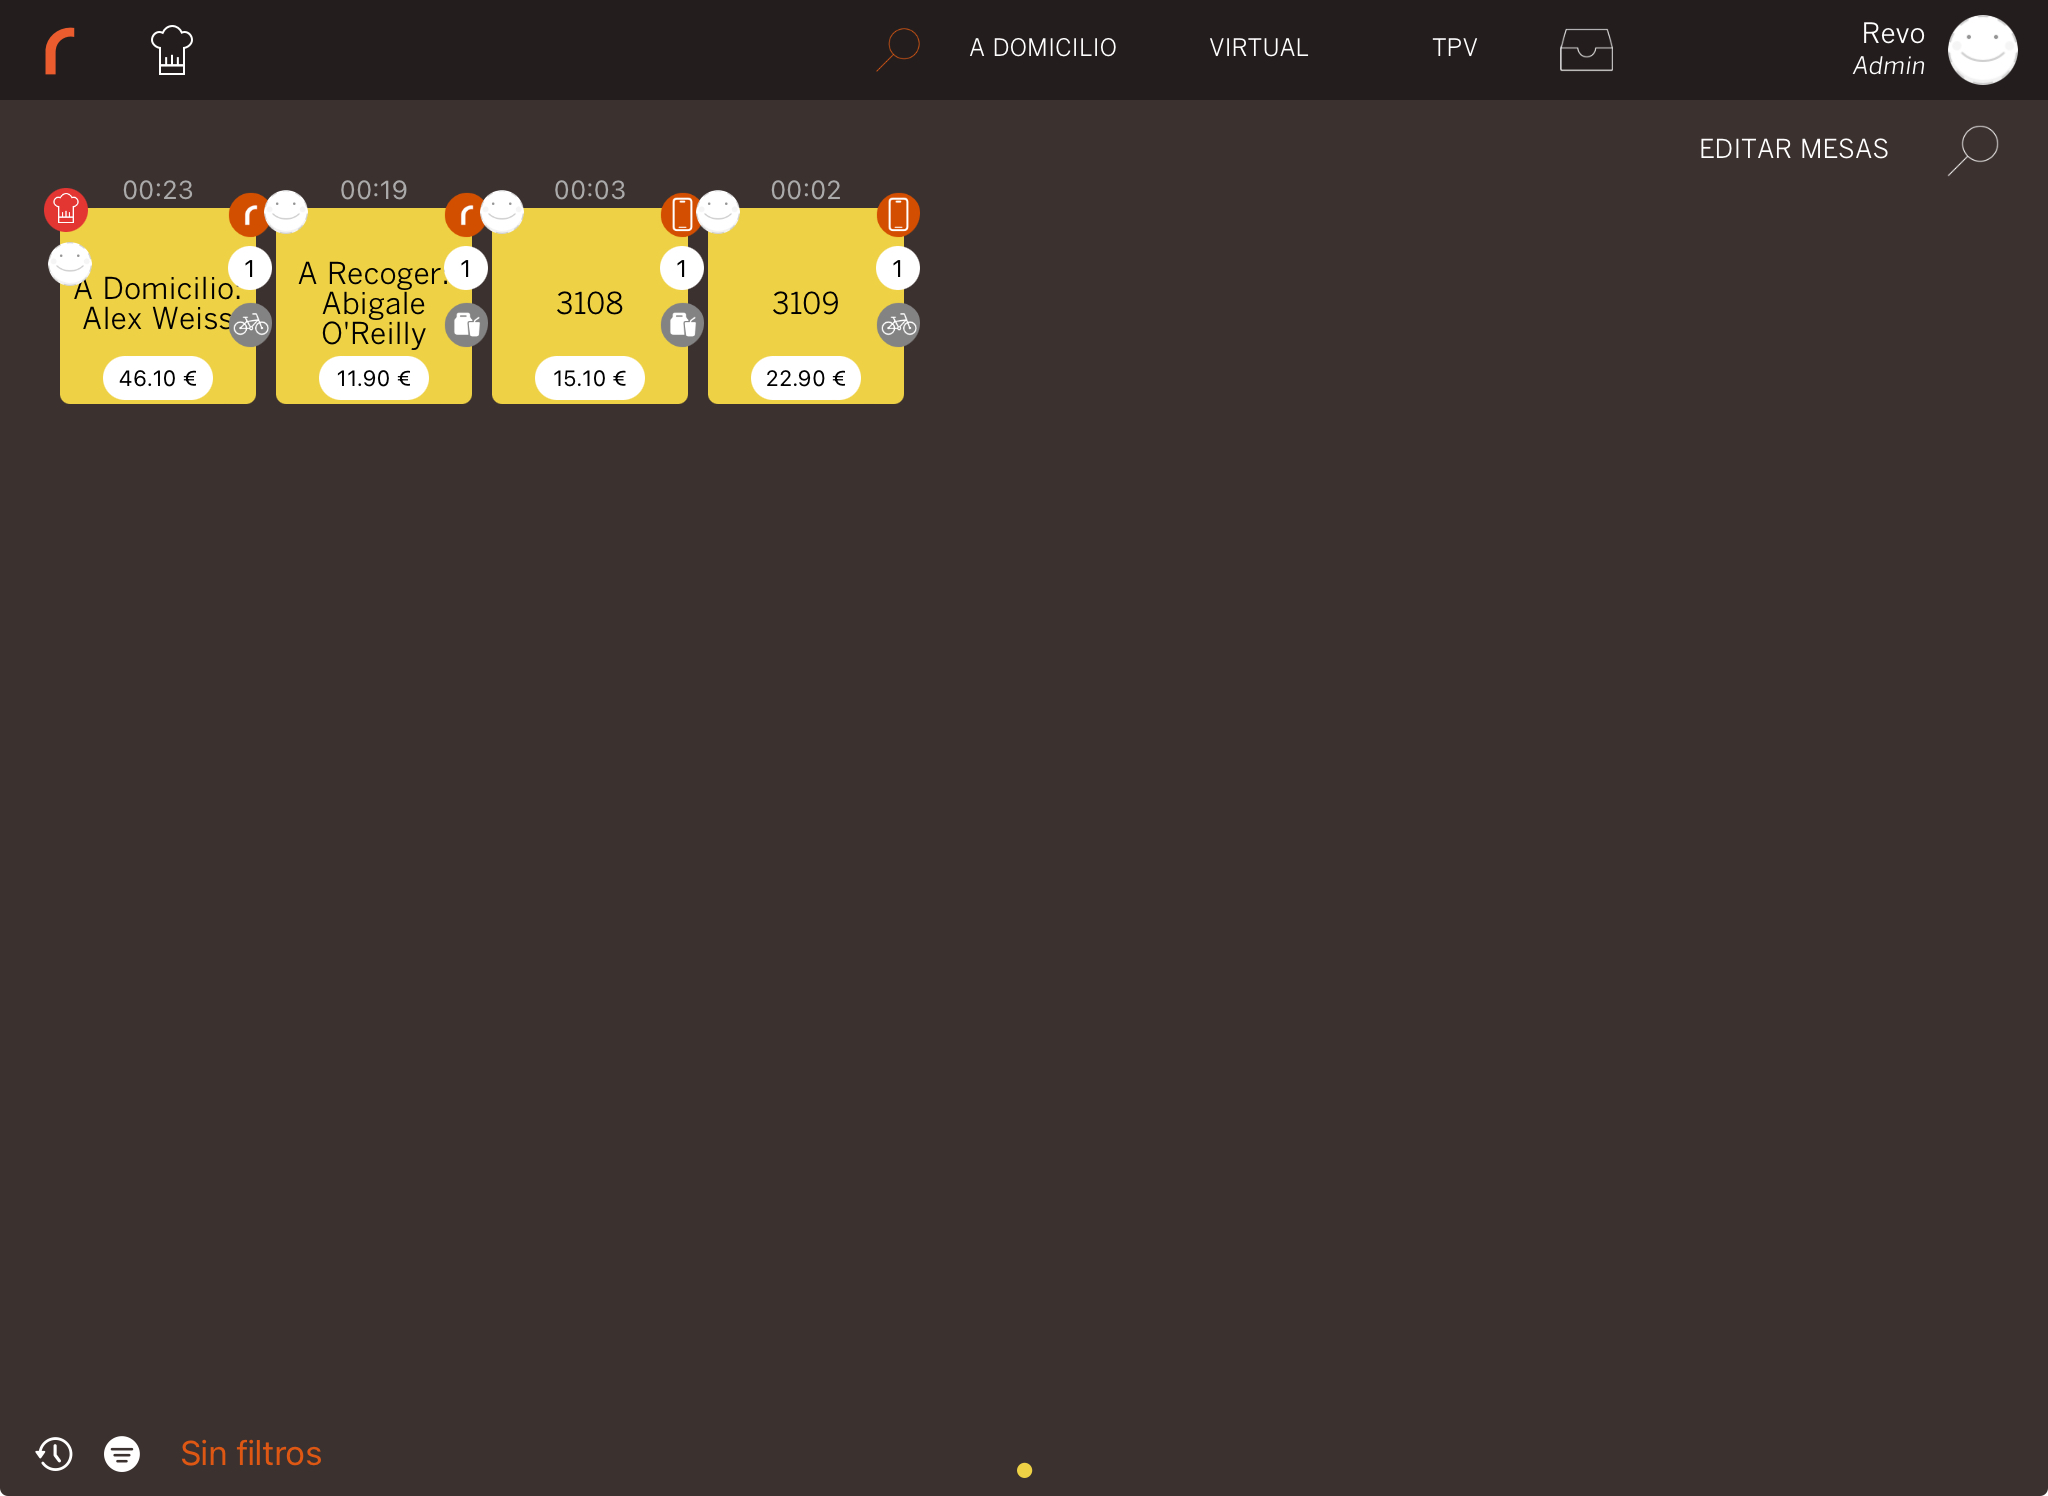
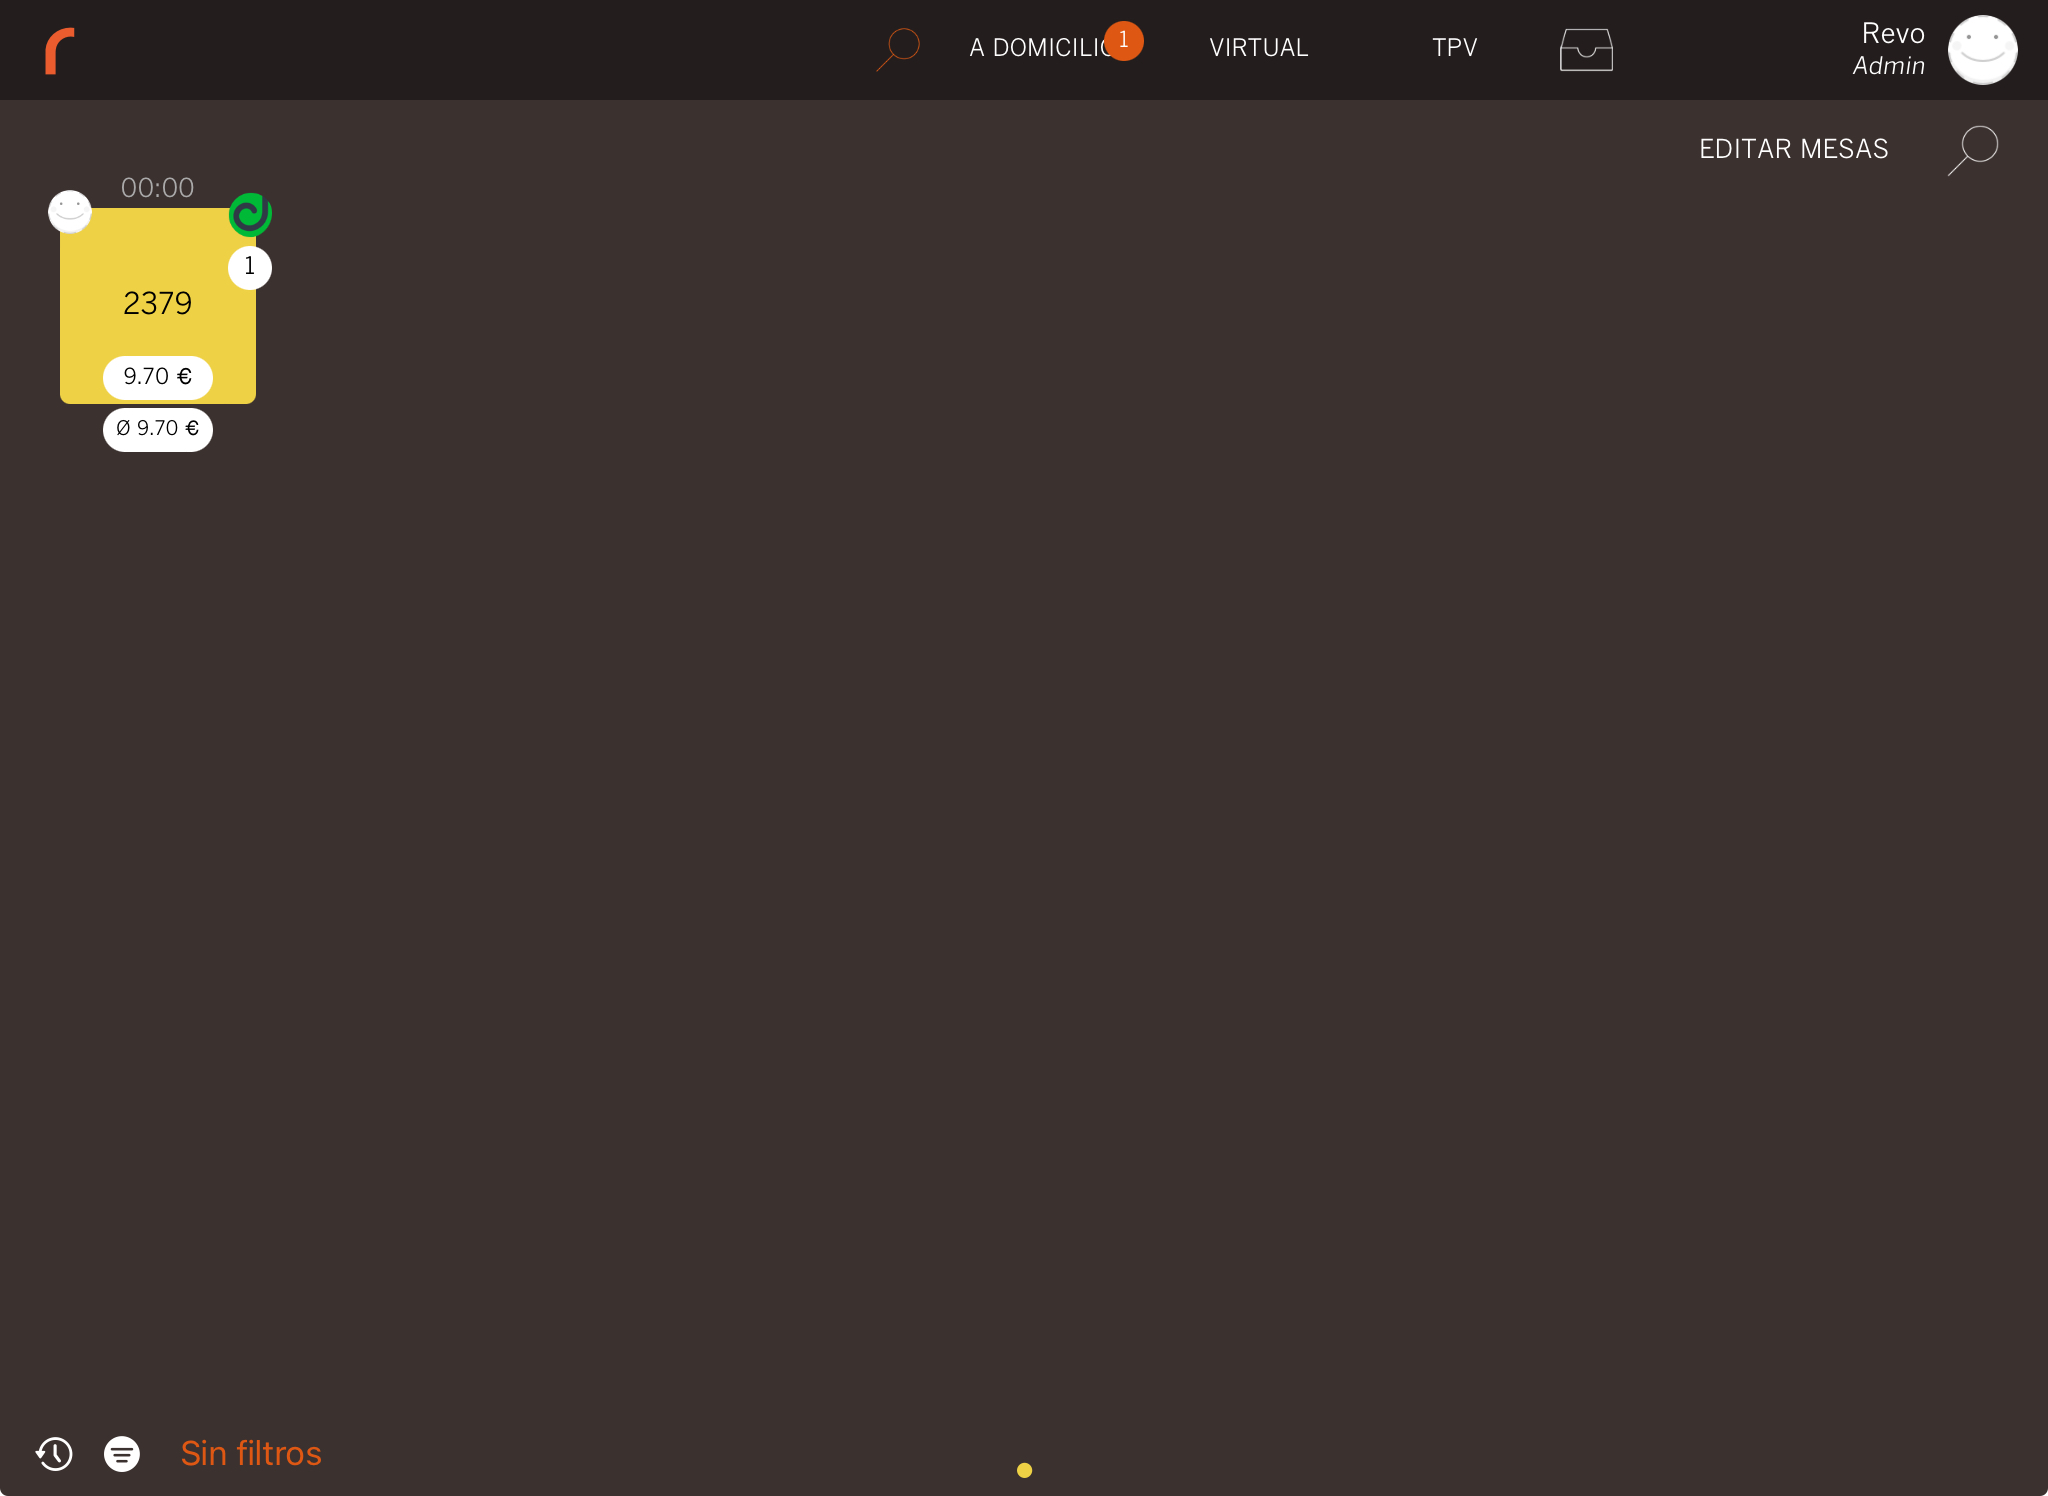
When you activate the module in the back-office, a new button called Delivery appears on the table map screen. Clicking on it allows you to create a new order.
Creating a new order
1. Click on Delivery.
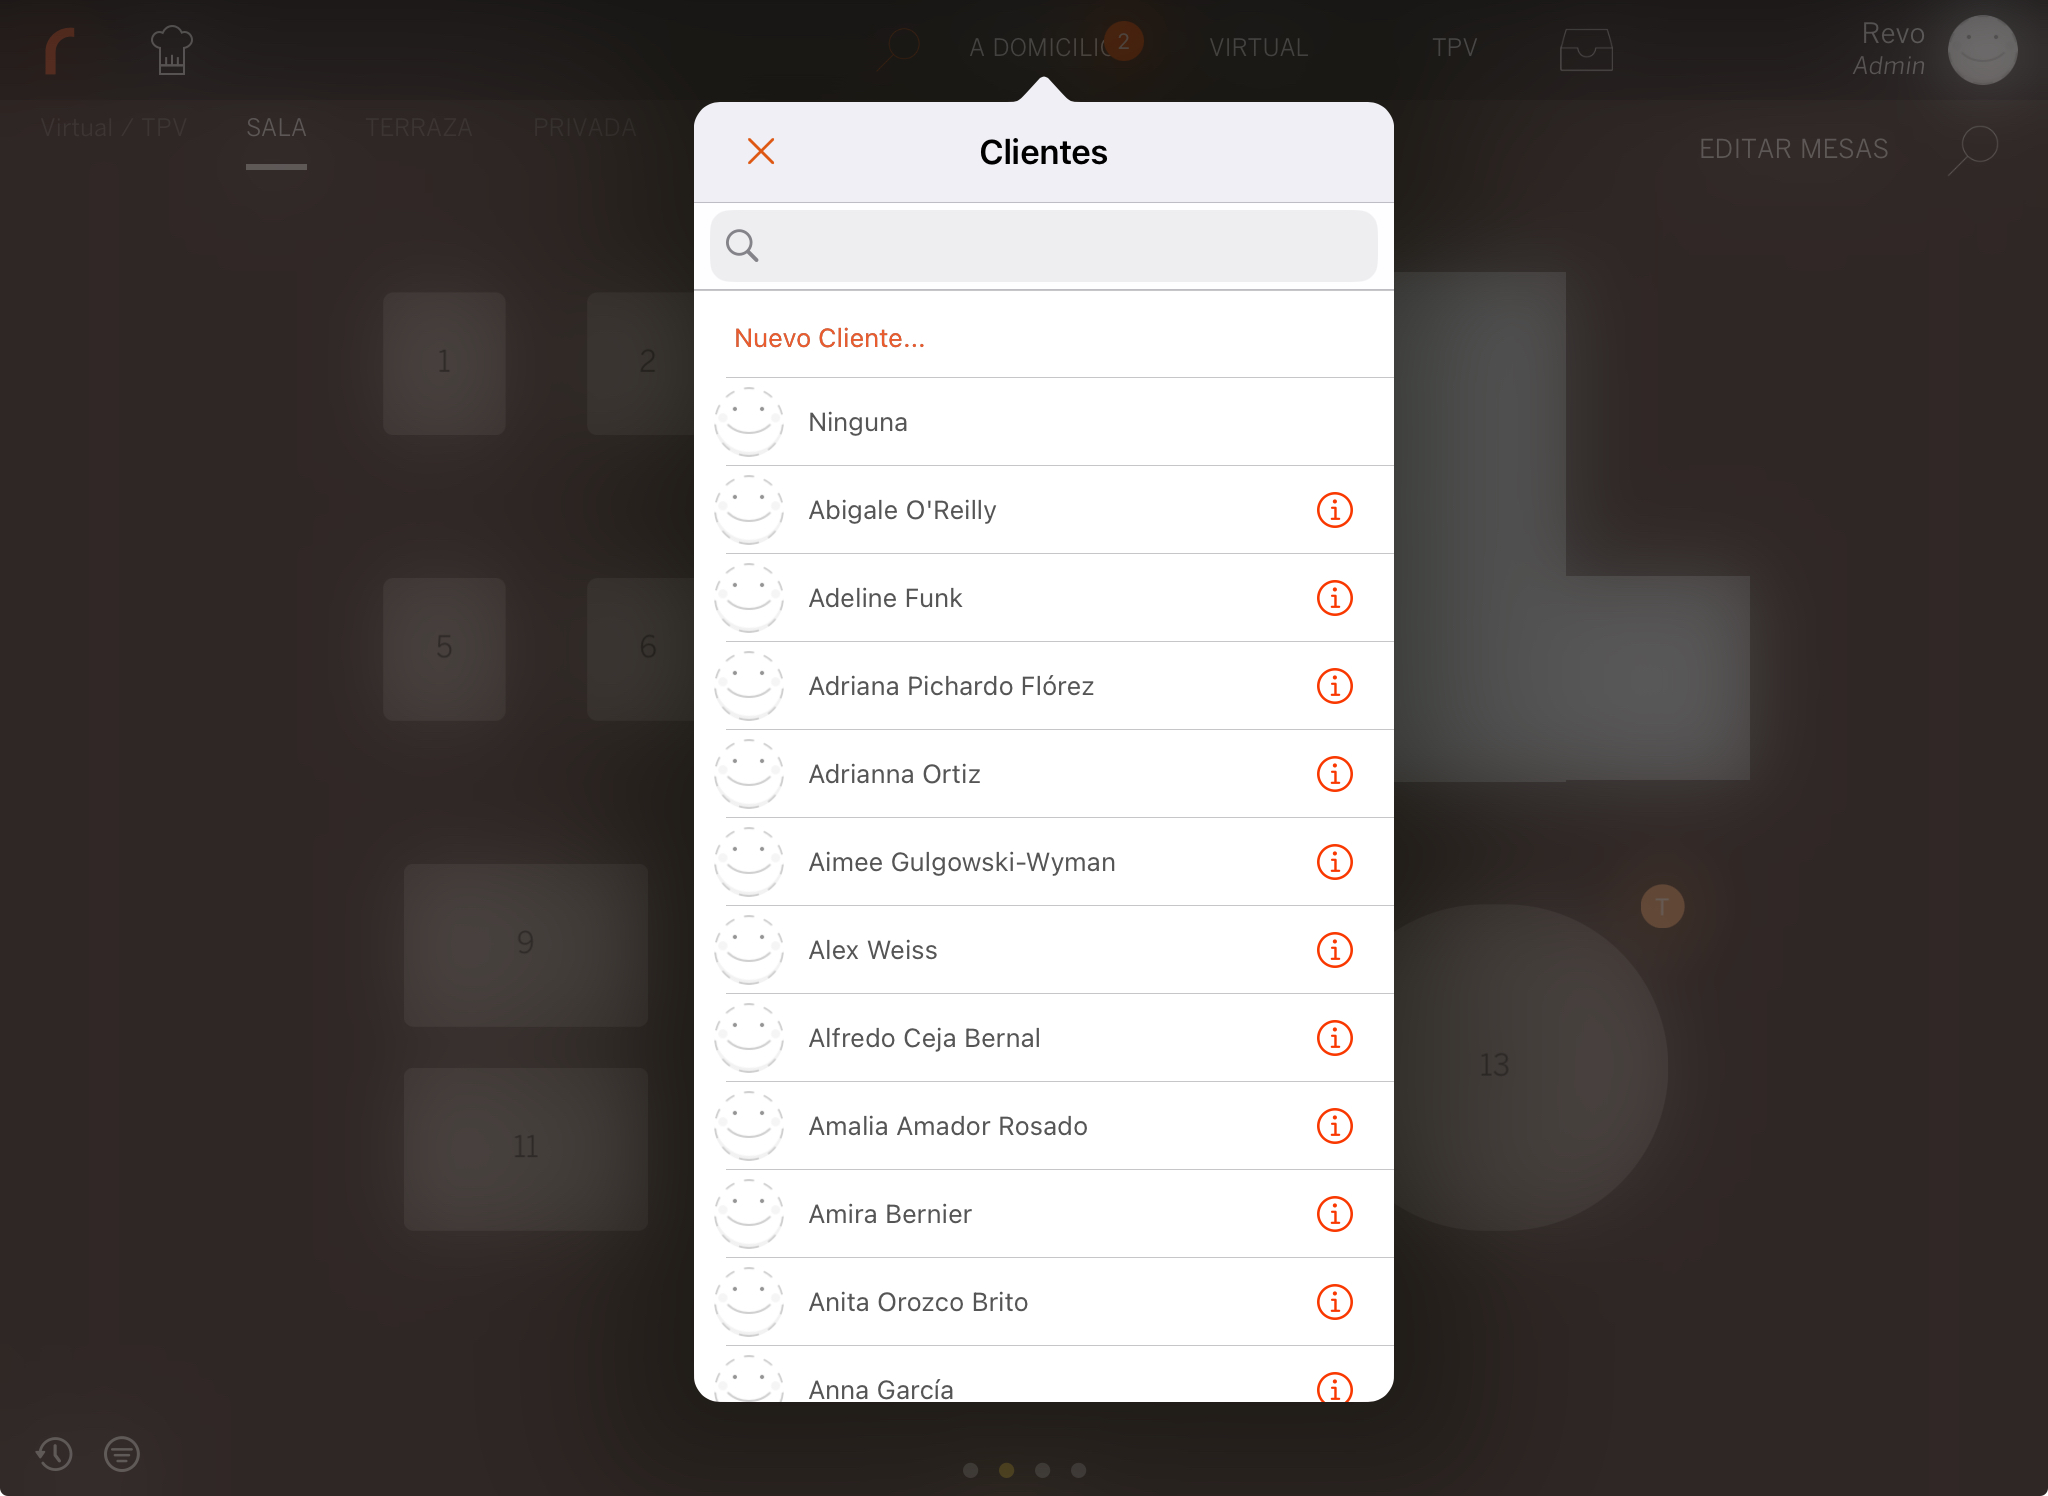
2. A list of customers appears.
- You can use the search bar to find customers. If you start typing the name or phone number and the customer does not exist, clicking on New customer displays the screen for creating a new customer, with the information you have used for the search already entered.
- In addition, clicking on the icon allows you to edit the customer's information.
For example, if their address or phone number has changed.
3. Select a customer from the list or click on New customer….
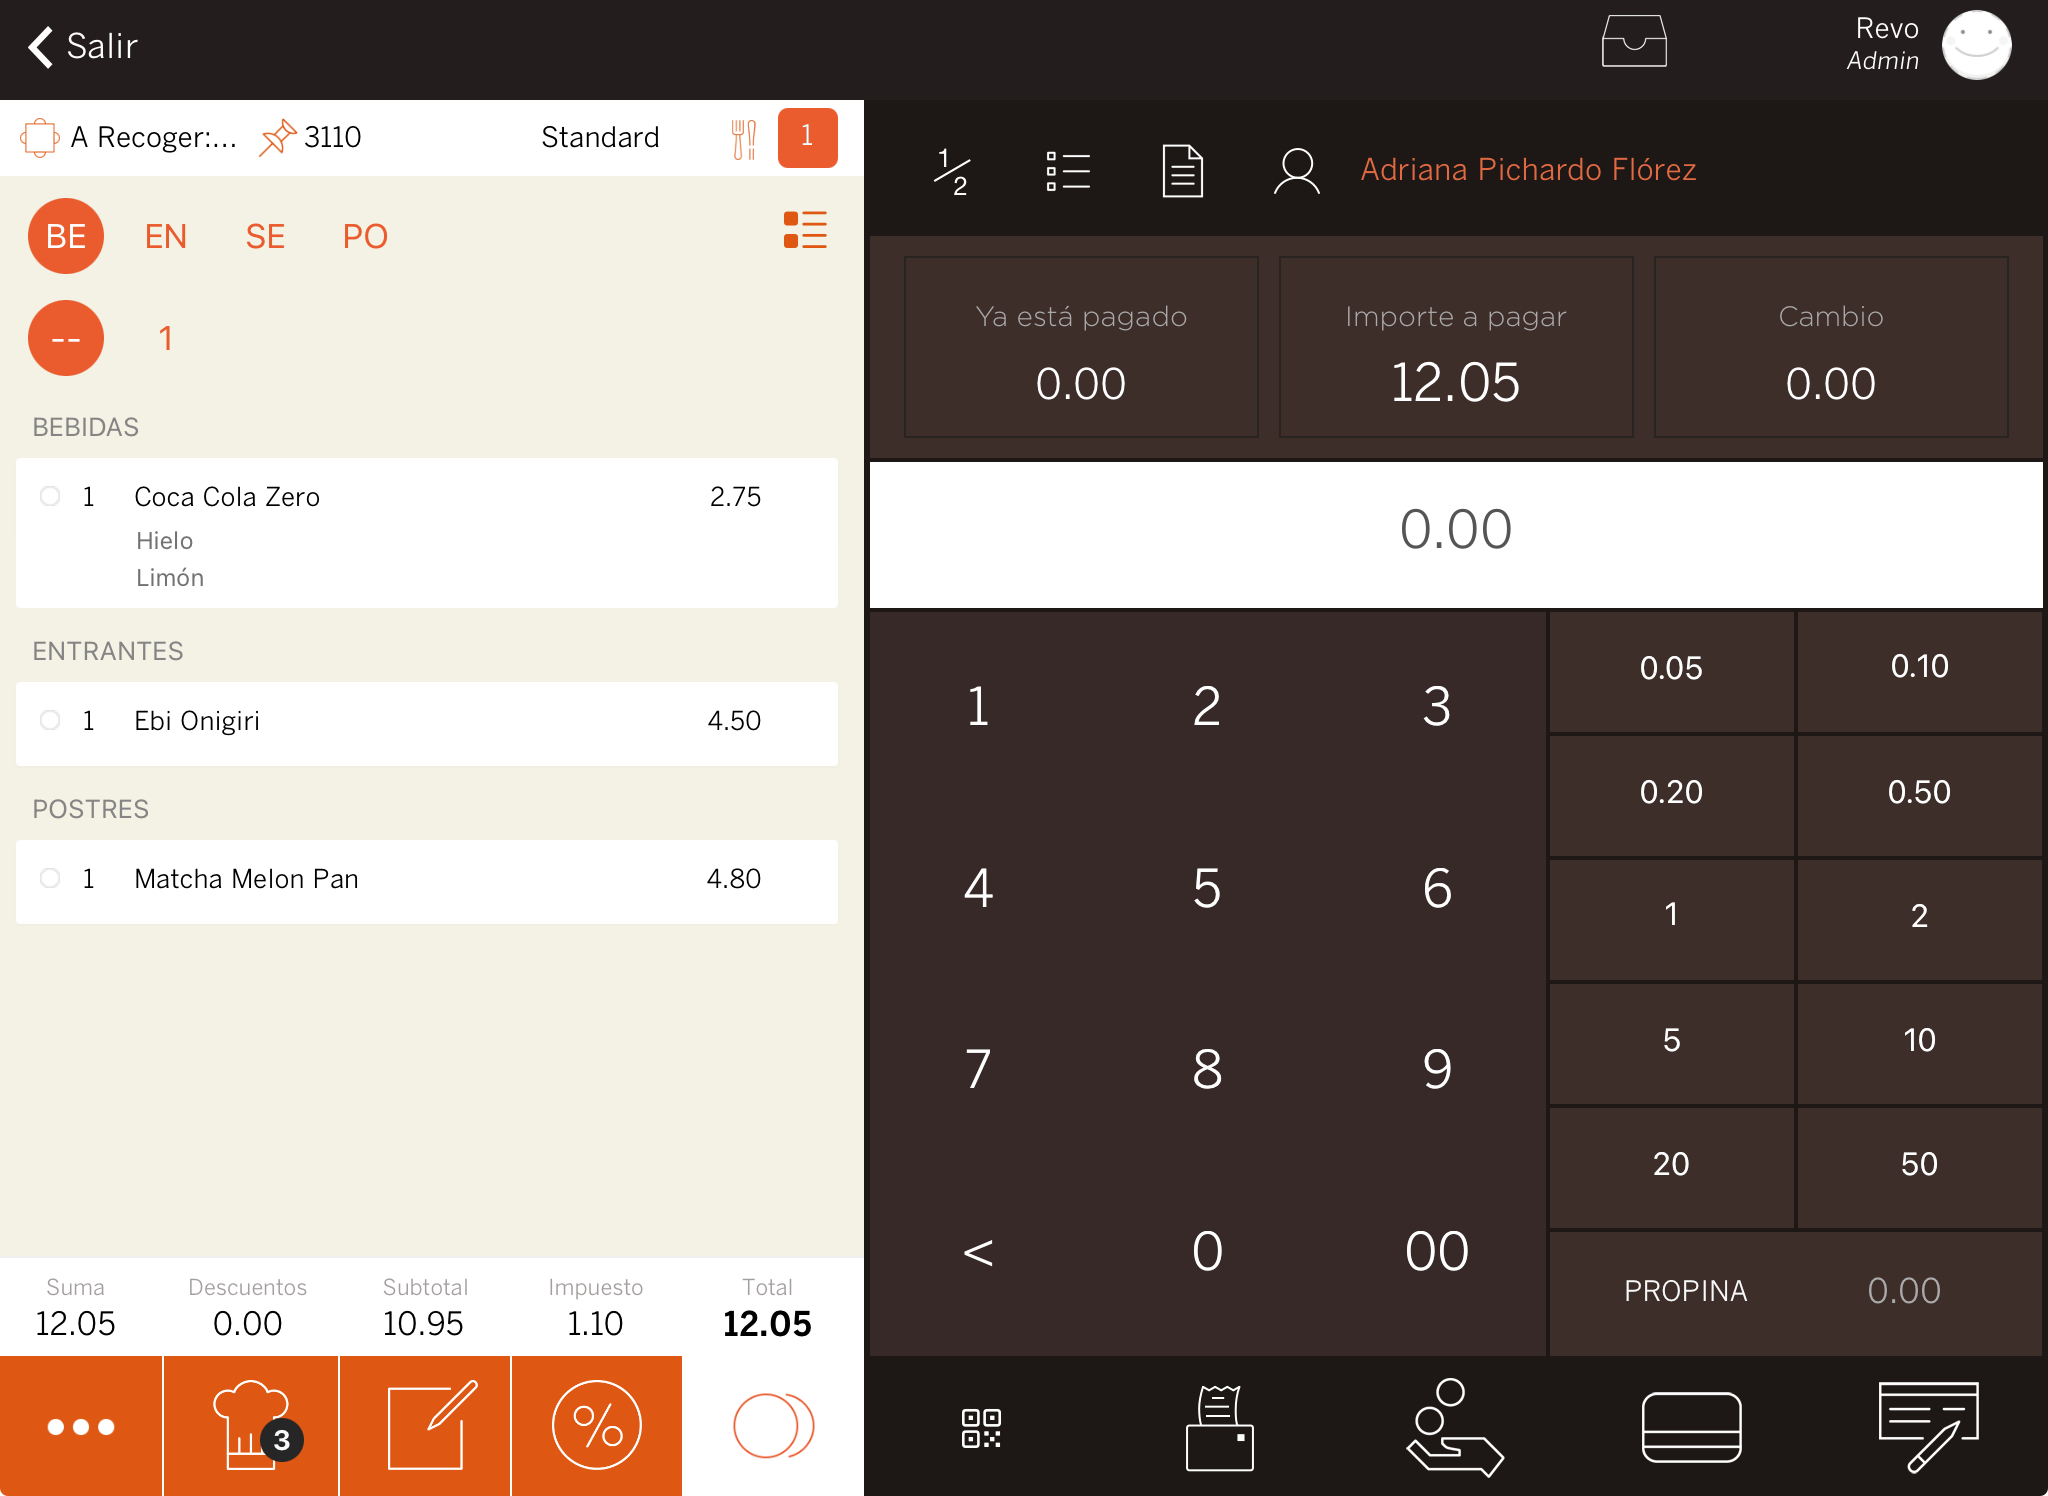
4. On the next screen, you can manage the entire order:
-
Enter the customer's name.
-
Enter the customer's phone number.
-
If necessary, you can enter notes for delivery.
-
Delivery: The order will be managed for delivery. The table name on the preparation ticket will be Delivery.
-
Pick-up: The order will be managed for the customer to pick up at your establishment. The table name on the preparation ticket will be Pick-up.
-
If you select Delivery, enter the address and city.
-
Other addresses used previously.
-
Last orders placed.
-
Select the customer's payment method.
-
Select the approximate date and time when you will deliver the order or the customer can pick it up.
-
Finally, click on Continue.
5. Place the order by entering the products in the order.
6. Click on the chef's hat icon to send the order to preparation, or click on Exit to save the order without sending it.
Exit is used if the order is for later, such as for dinner. This way, the order will remain pending and a notification will appear a few minutes before (by default 45 minutes) as configured in the back-office. When the notification appears, you will need to edit the order and send it to preparation with the chef's hat icon so that the kitchen can start preparing the food.
Managing Orders
The Delivery module has a screen for managing orders. To access it, swipe down from the Delivery button.
On the screen, you will see four tabs indicating the order status: Pending / To Prepare / Preparing / Prepared.
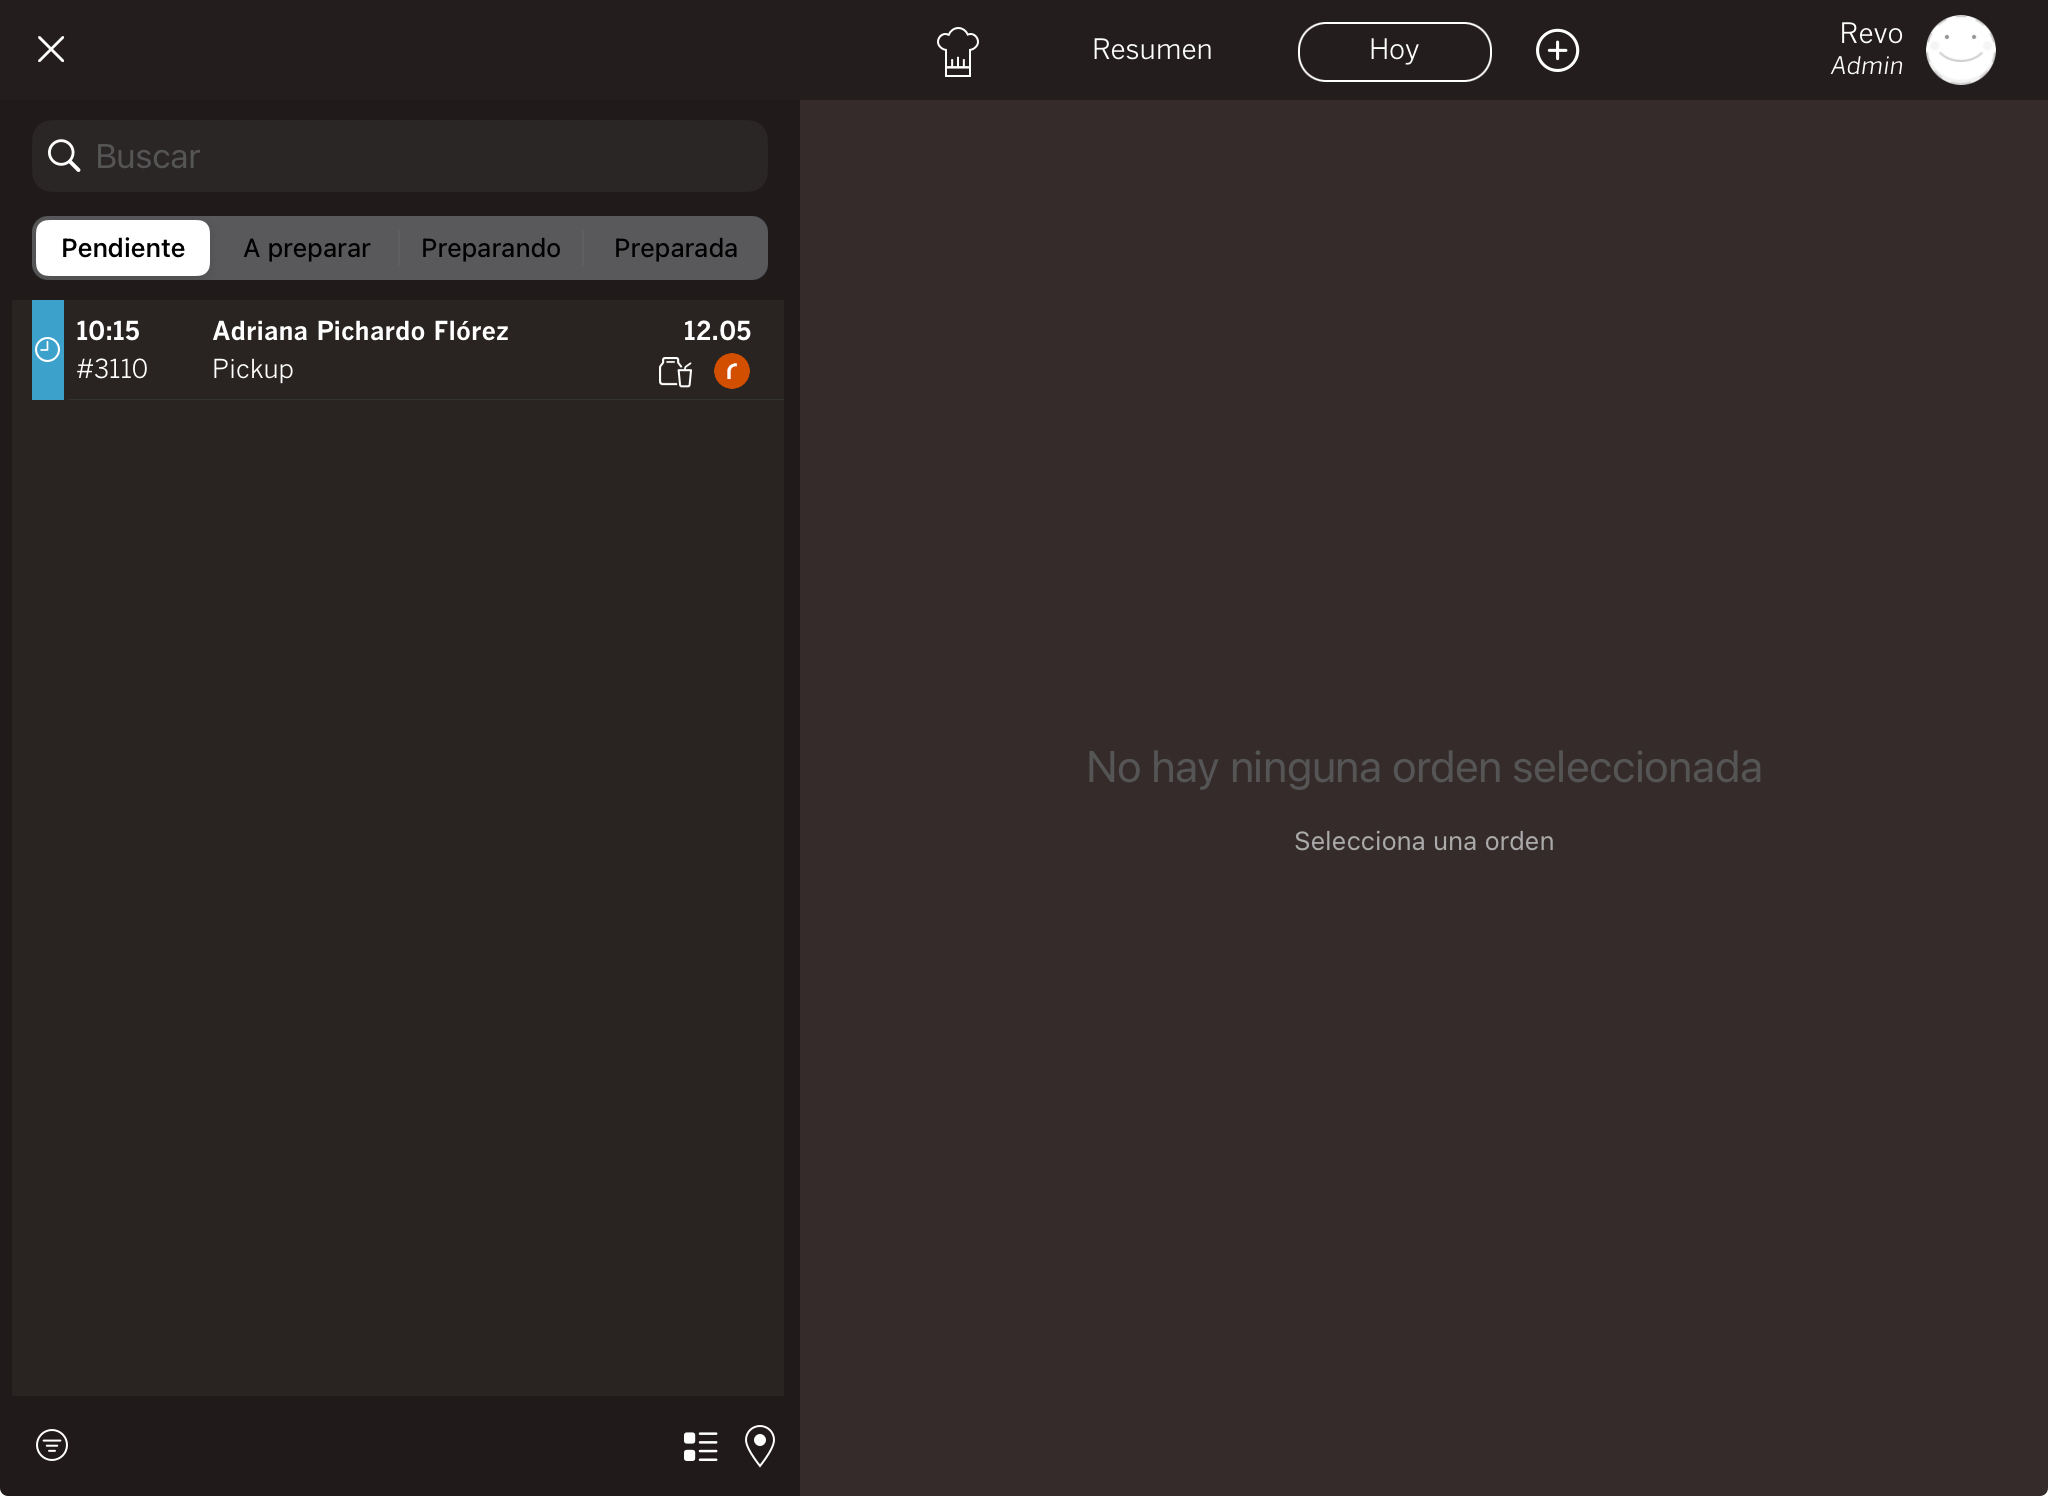
PENDING:
Here, all the pending orders are displayed. These are usually orders that customers have placed for a later time.
For example, an order for 12:15 PM. In the back-office, you have configured 45 minutes as the notification time, so it will remain in Pending until 11:30 AM when it will switch to To Prepare.
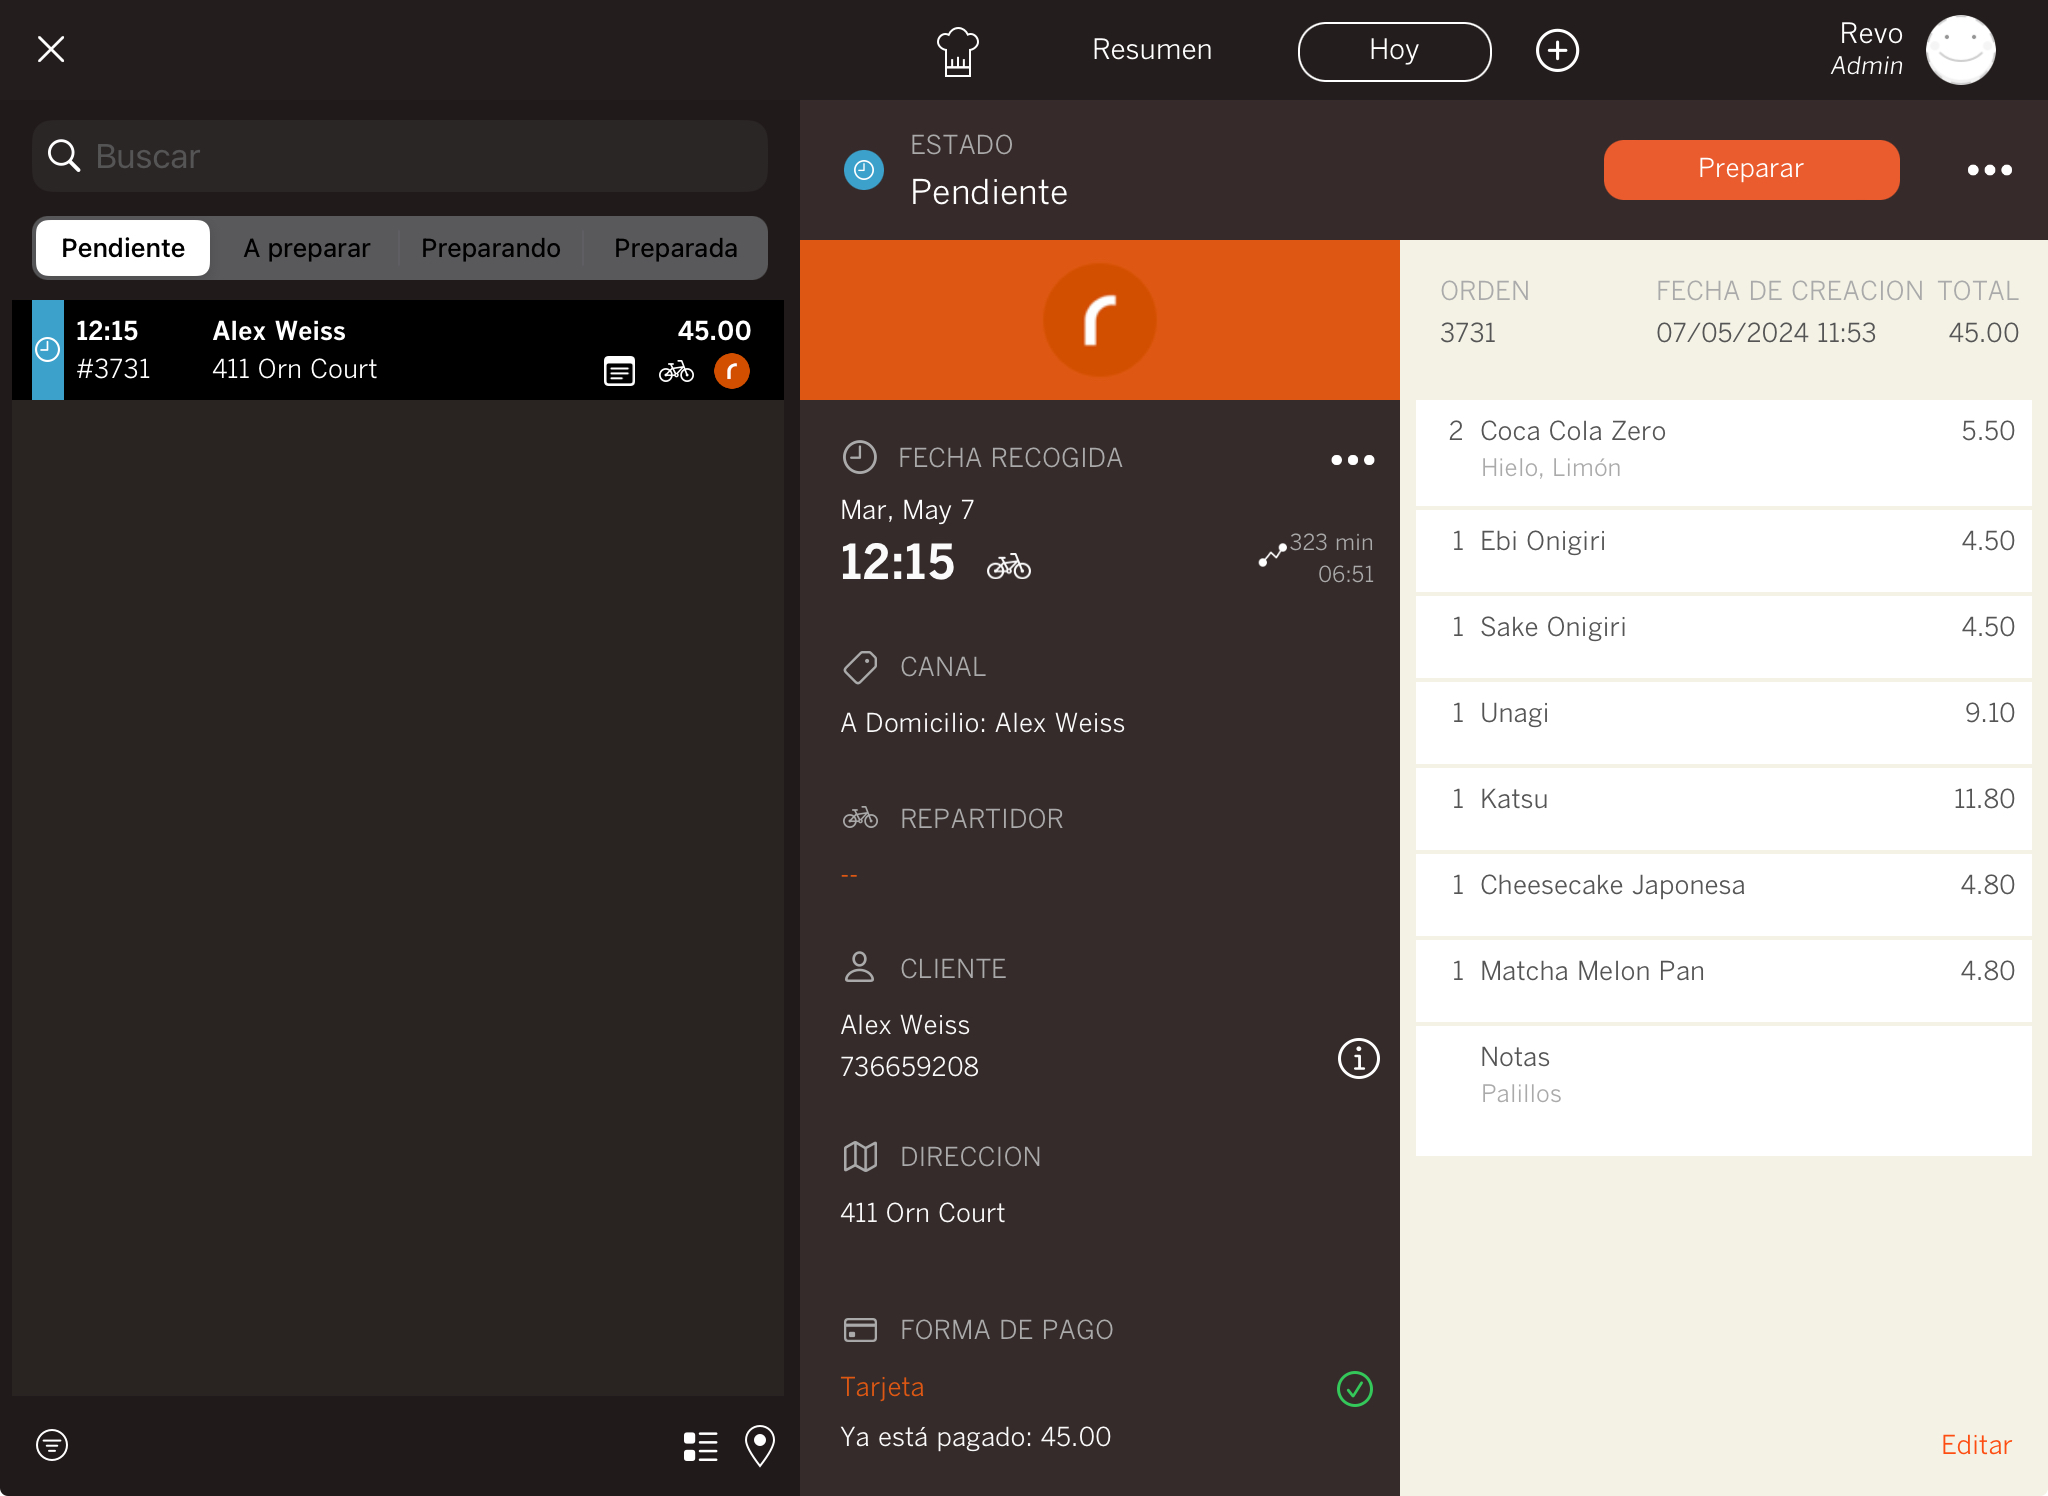
On the left side of the screen, you can see the statuses and the orders in each one. Use the search bar to find an order faster, either by the customer's name or the order number.
On the order, you will see these icons:
- : The order has a note.
- : If this icon appears, the order is for delivery; if it’s for collection, a bag will appear.
-
 : Indicates the entry channel.
On the right side, you will see:
-
Status: Status of the selected order.
-
Prepare: Tap to change the order status to 'Preparing'.
-
: Access the order actions:
- Cancel: If the order has no associated payment, you can cancel it.
- Print Invoice: Reprint the invoice.
-
Pay with Link: If the order is unpaid, display the QR code to the customer for payment.
-
Order Information: Order number, creation date, total, and products.
-
Edit: Access the order if the customer requests a change, or you detect an error.
-
Collection Date : Modify the date, time, and whether it's for delivery or collection.
-
: Modify customer details.
-
Payment Method: Indicates if the order is already paid and allows modifying the payment method. By default, the first one configured in the back-office will appear.
If you have the Play Sound option enabled in the Revo XEF app Preferences, the iPad will play a sound when an order arrives.
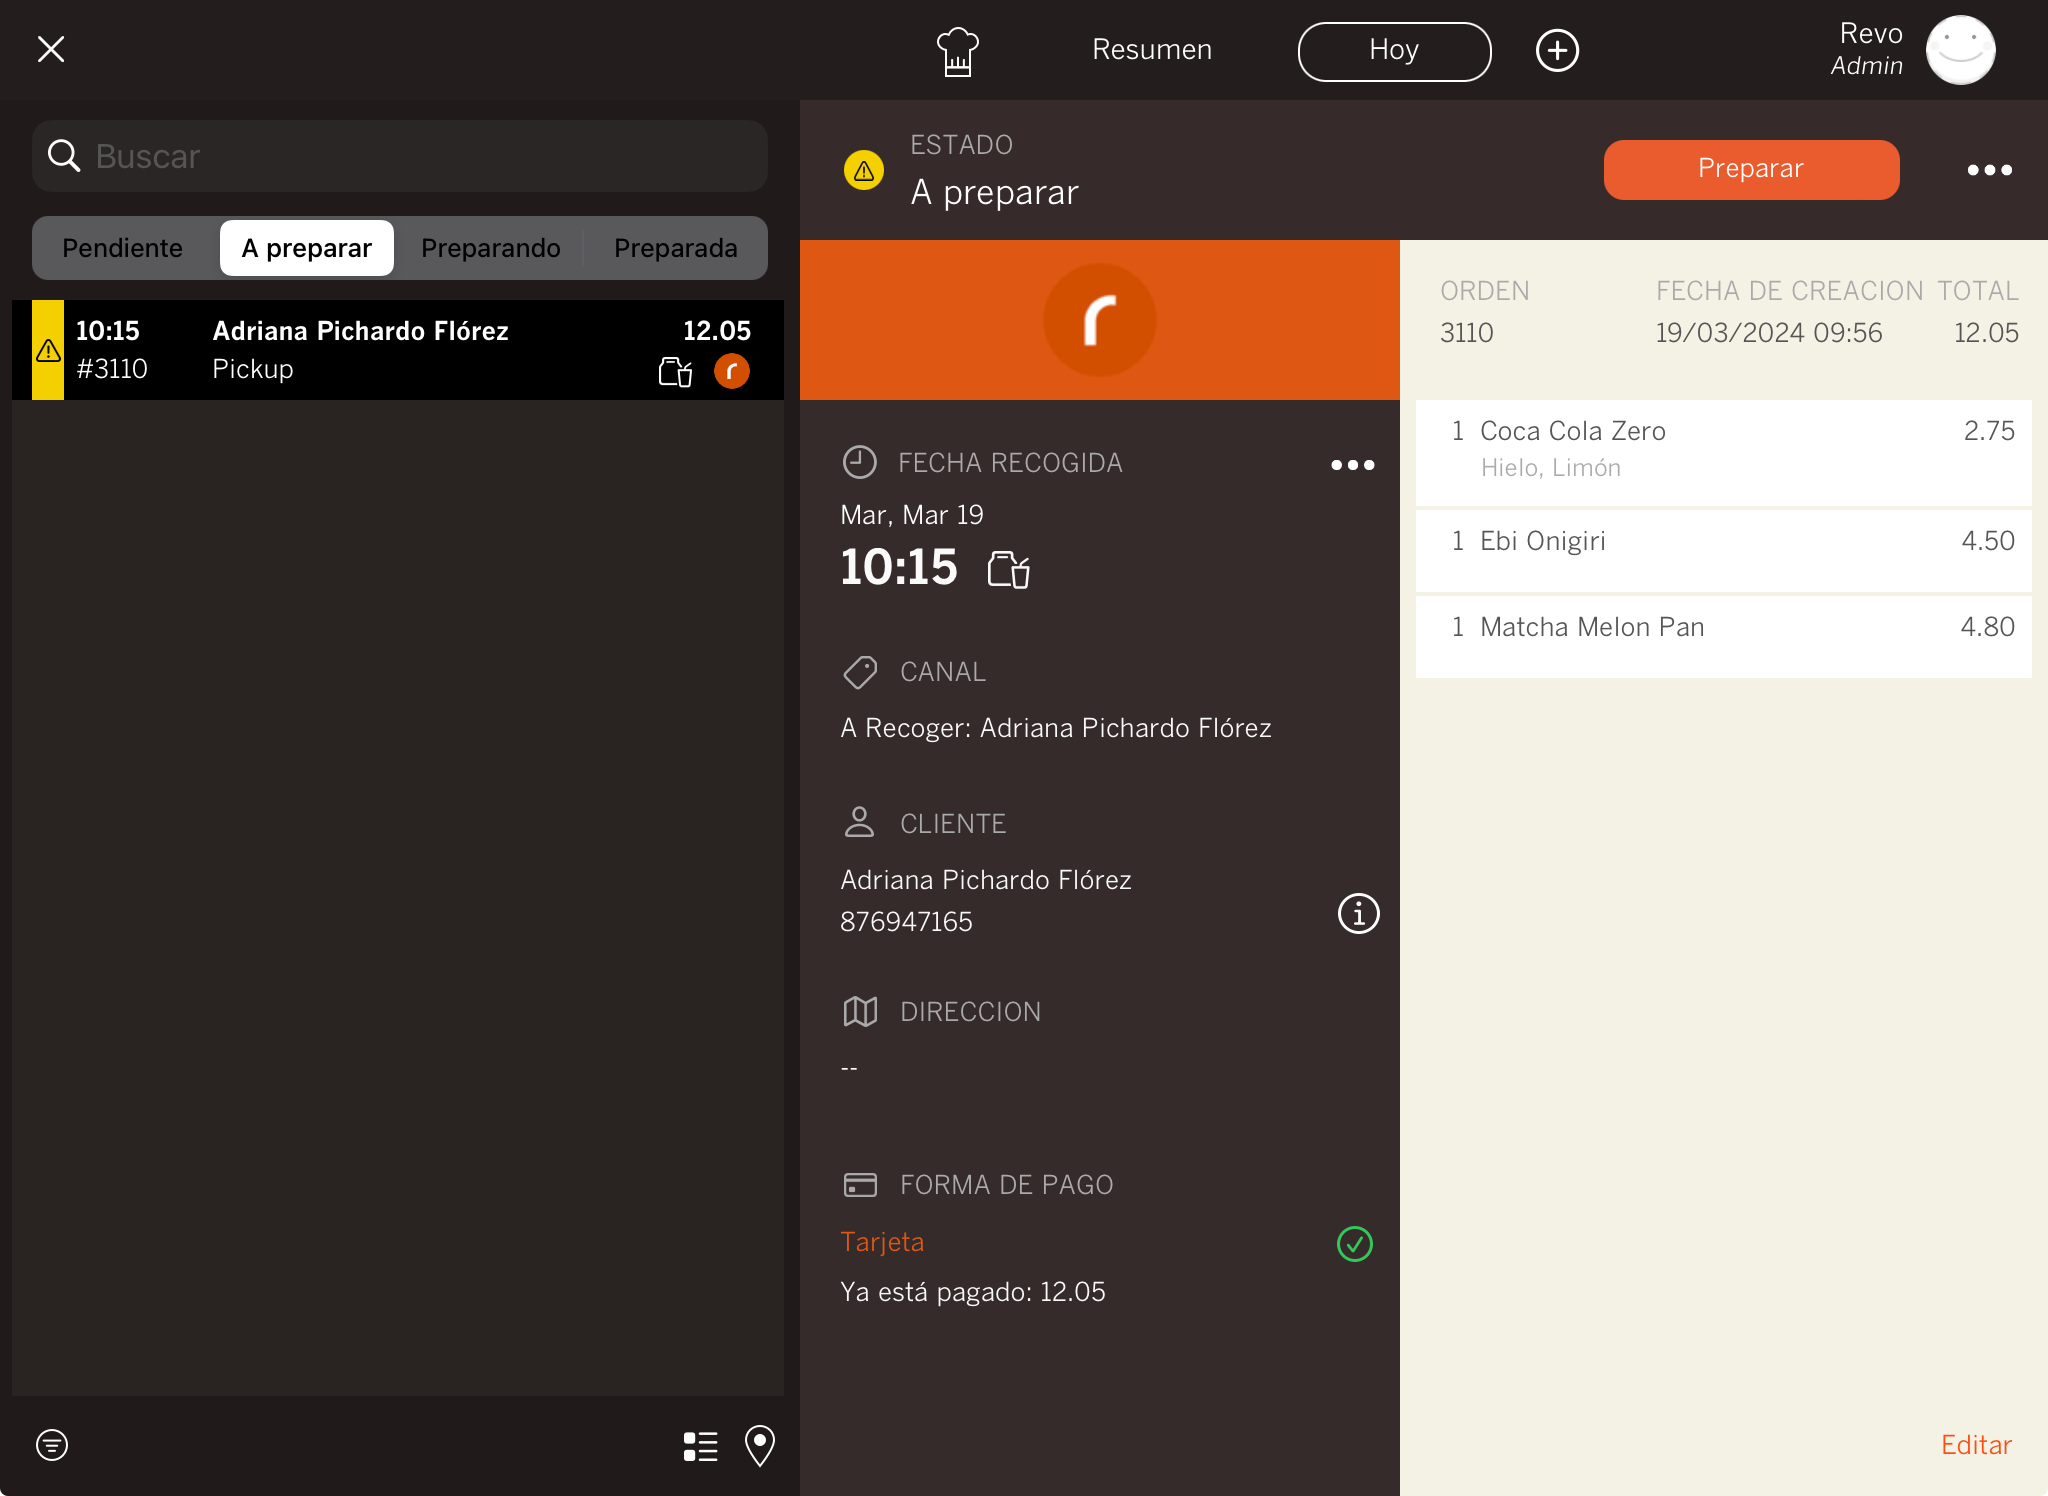
TO PREPARE:
In this section, you see all the orders pending to be sent to the kitchen. They are within the time configured in the back-office. You will receive a notification in the 'Delivery' module when you have pending orders.
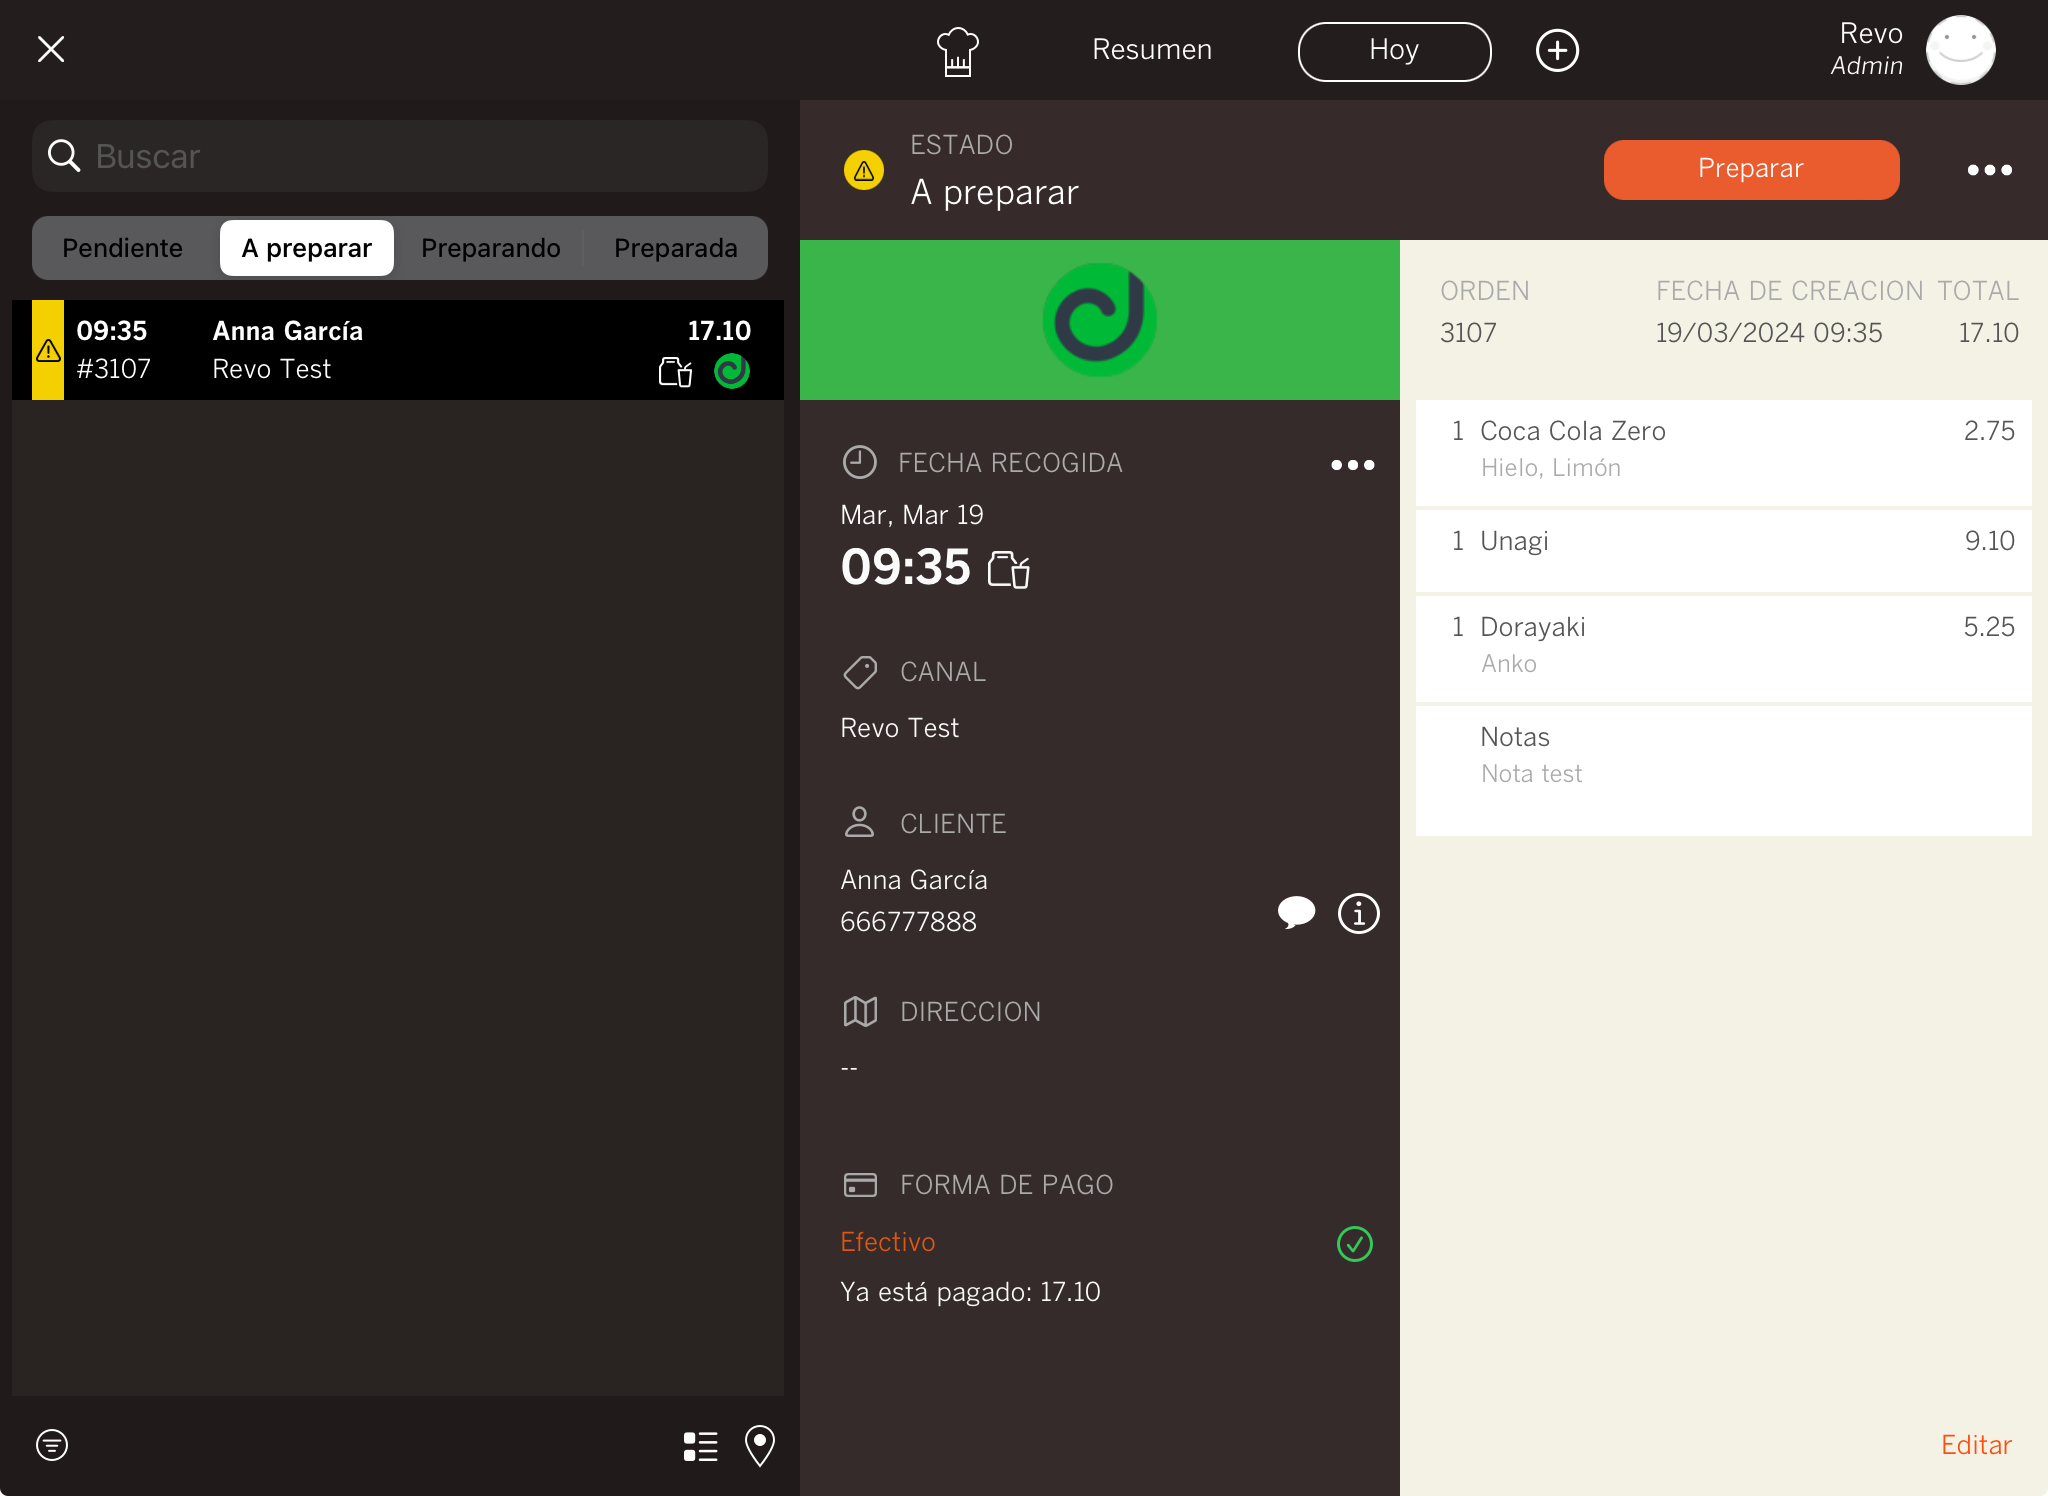
Action to perform: When the order is in 'To Prepare', tap Prepare to print the products in the kitchen and the order will change to Preparing.
Here, you can continue to modify the customer, change the payment method, or edit the order.
If you have the Auto Print option enabled in the Revo XEF app Preferences, the orders will be printed automatically and will change to 'Preparing' without you having to do anything.
Managing Orders
The Home Delivery module has a screen for managing orders. To access it, swipe down from the Home Delivery button.
On the screen, you will see four tabs indicating the order status: Pending / To Prepare / Preparing / Prepared.
PENDING:
Here you will see all the orders waiting. These are typically orders customers have placed for later.
For example, an order for 12:15 PM. In the back-office, you have set 45 minutes as the notification time, so it will stay in Pending until 11:30 AM when it will move to To Prepare.
On the left side of the screen, you can see the statuses and the orders in each one. Use the search bar to quickly locate an order by customer name or order number.
In the order, you will see these icons:
- : The order has a note.
- : If this icon appears, the order is for delivery; if it's for pickup, a bag will appear.
-
: Indicates the input channel.
On the right side, you will see:
-
Status: Status of the selected order.
-
Prepare: Press to change the order status to 'Preparing'.
-
: Access order actions:
- Cancel: If the order has no associated payment, you can cancel it.
- Print invoice: Reprint the invoice.
-
Pay with link: If the order is not paid, show the QR code to the customer for payment.
-
Order information: Order number, creation date, total, and products.
-
Edit: Access the order if the customer requests a change or you detect an error.
-
Pickup date : Modify the date, time, and whether it's for delivery or pickup.
-
: Modify customer data.
-
Payment method: Indicates if the order is already paid and allows modifying the payment method, by default, the first one configured in the back-office will appear.
If you have the Play sound option checked in the Revo XEF app Preferences, the iPad will play a sound when an order comes in.
TO PREPARE:
In this section, you see all the orders waiting to be sent to the kitchen. They are within the time configured in the back-office. You will receive a notification in the 'Home Delivery' module when you have pending orders.
Action to perform: When the order is in 'To Prepare', press Prepare to print the products in the kitchen and move the order to Preparing.
Here, you can continue modifying the customer, change the payment method, or edit the order.
If you have the Print automatically option checked in the Revo XEF app Preferences, orders will print automatically and move to 'Preparing' without you having to do anything.
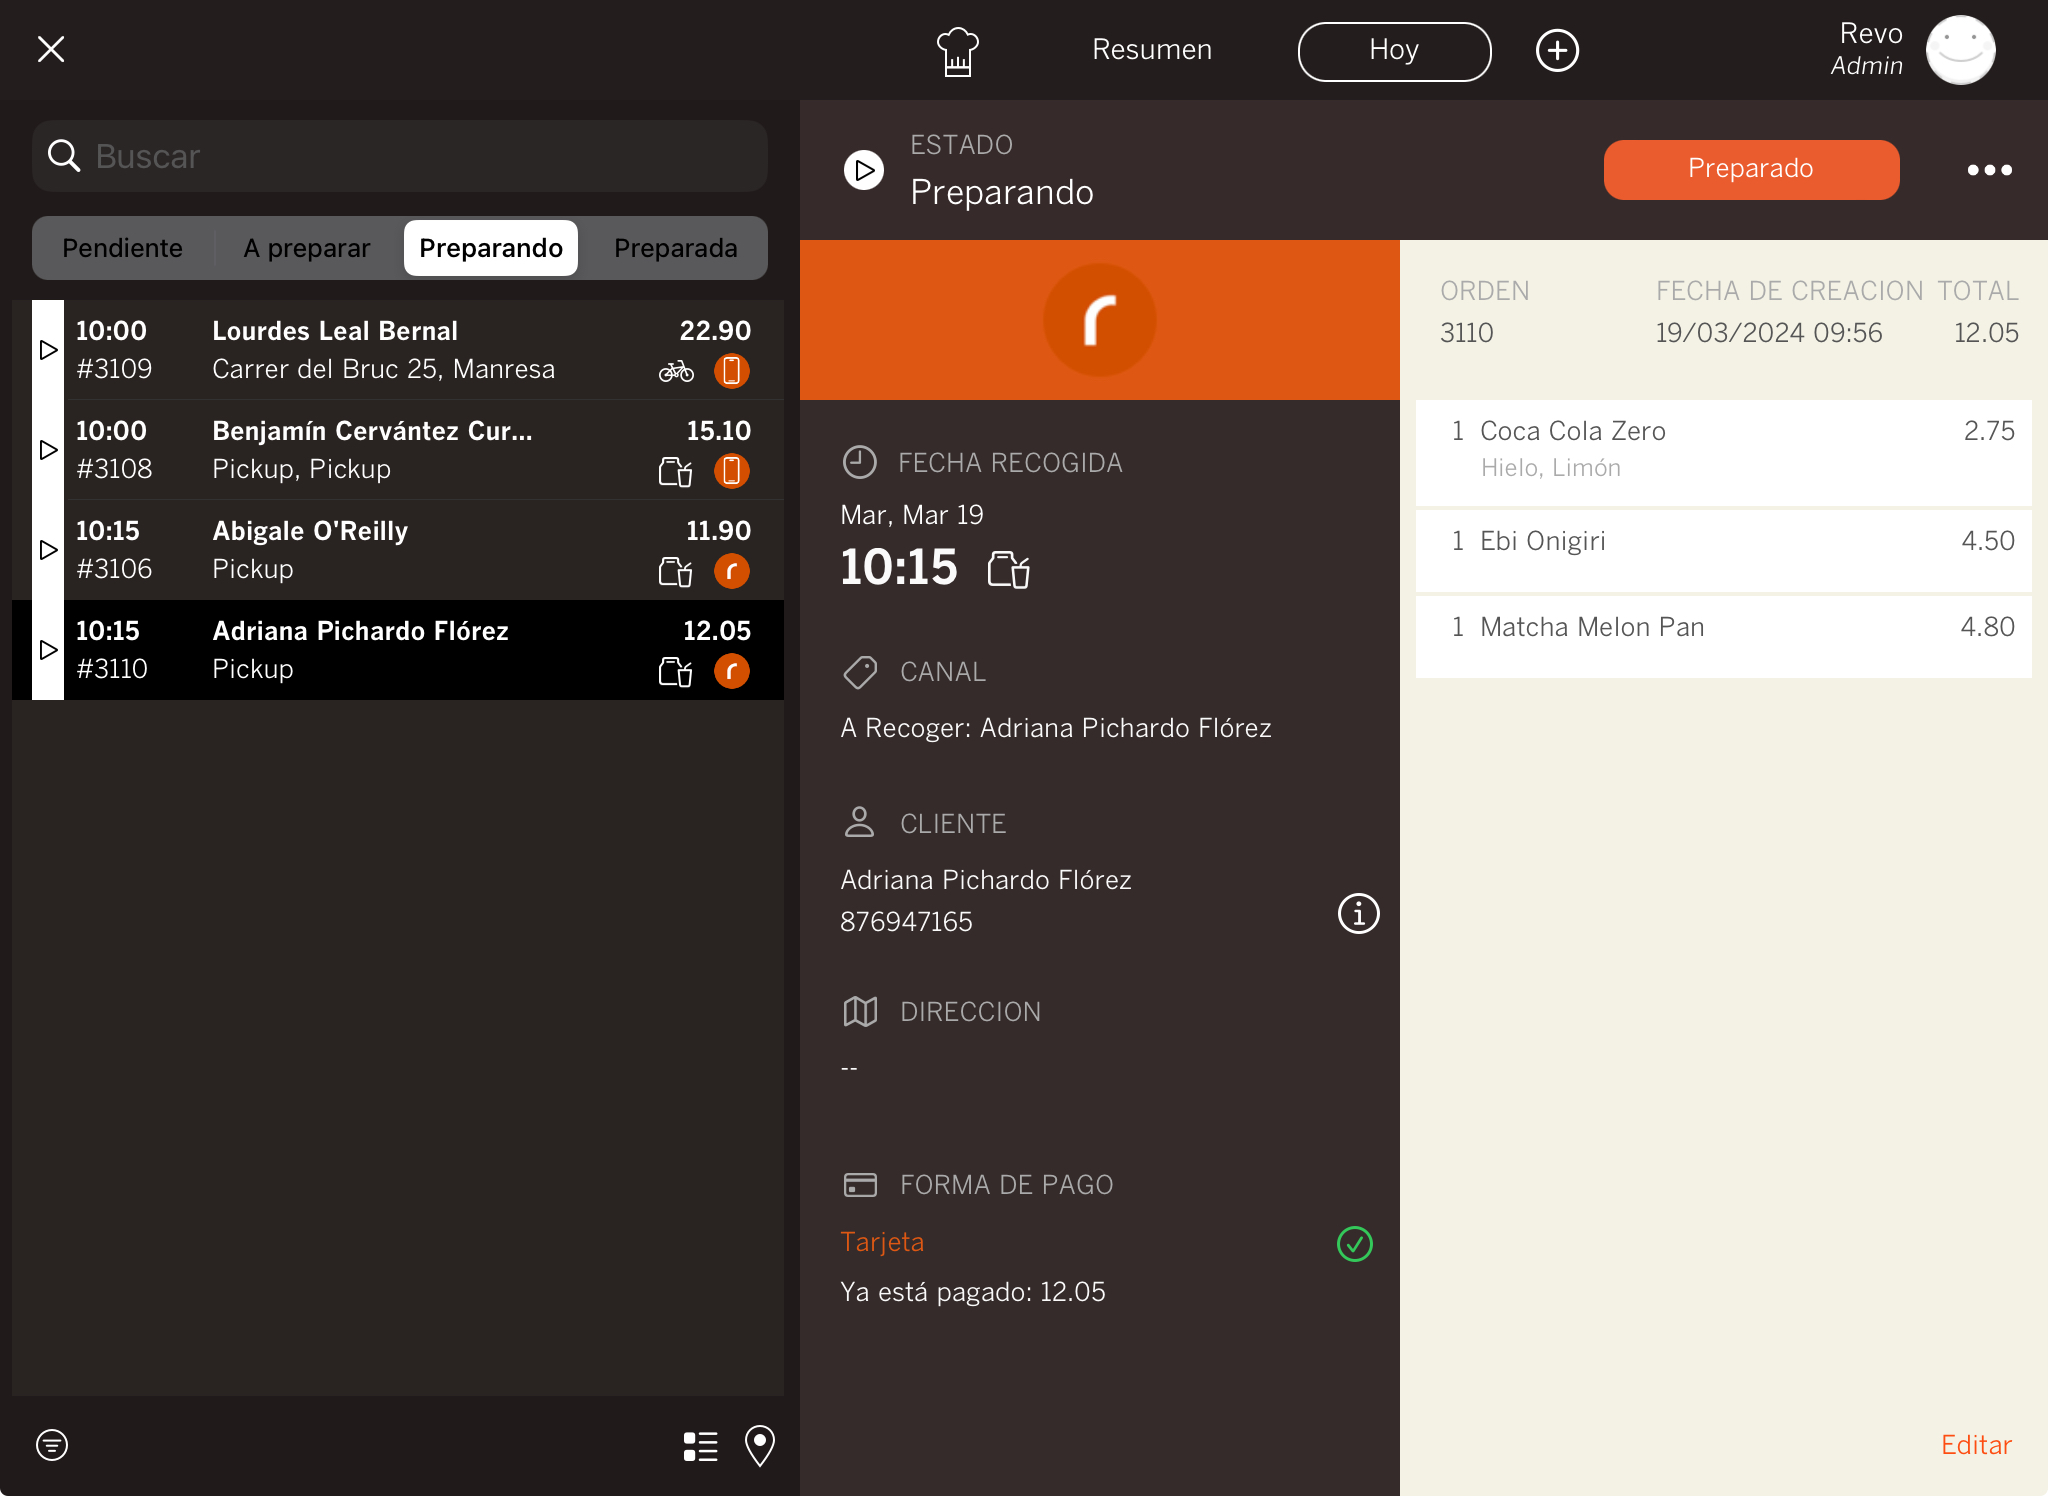
PREPARING:
In this section, you see all the orders that are already being prepared in the kitchen.
Action to perform: When the order is ready, press Prepared to indicate that it is ready and move to Prepared.
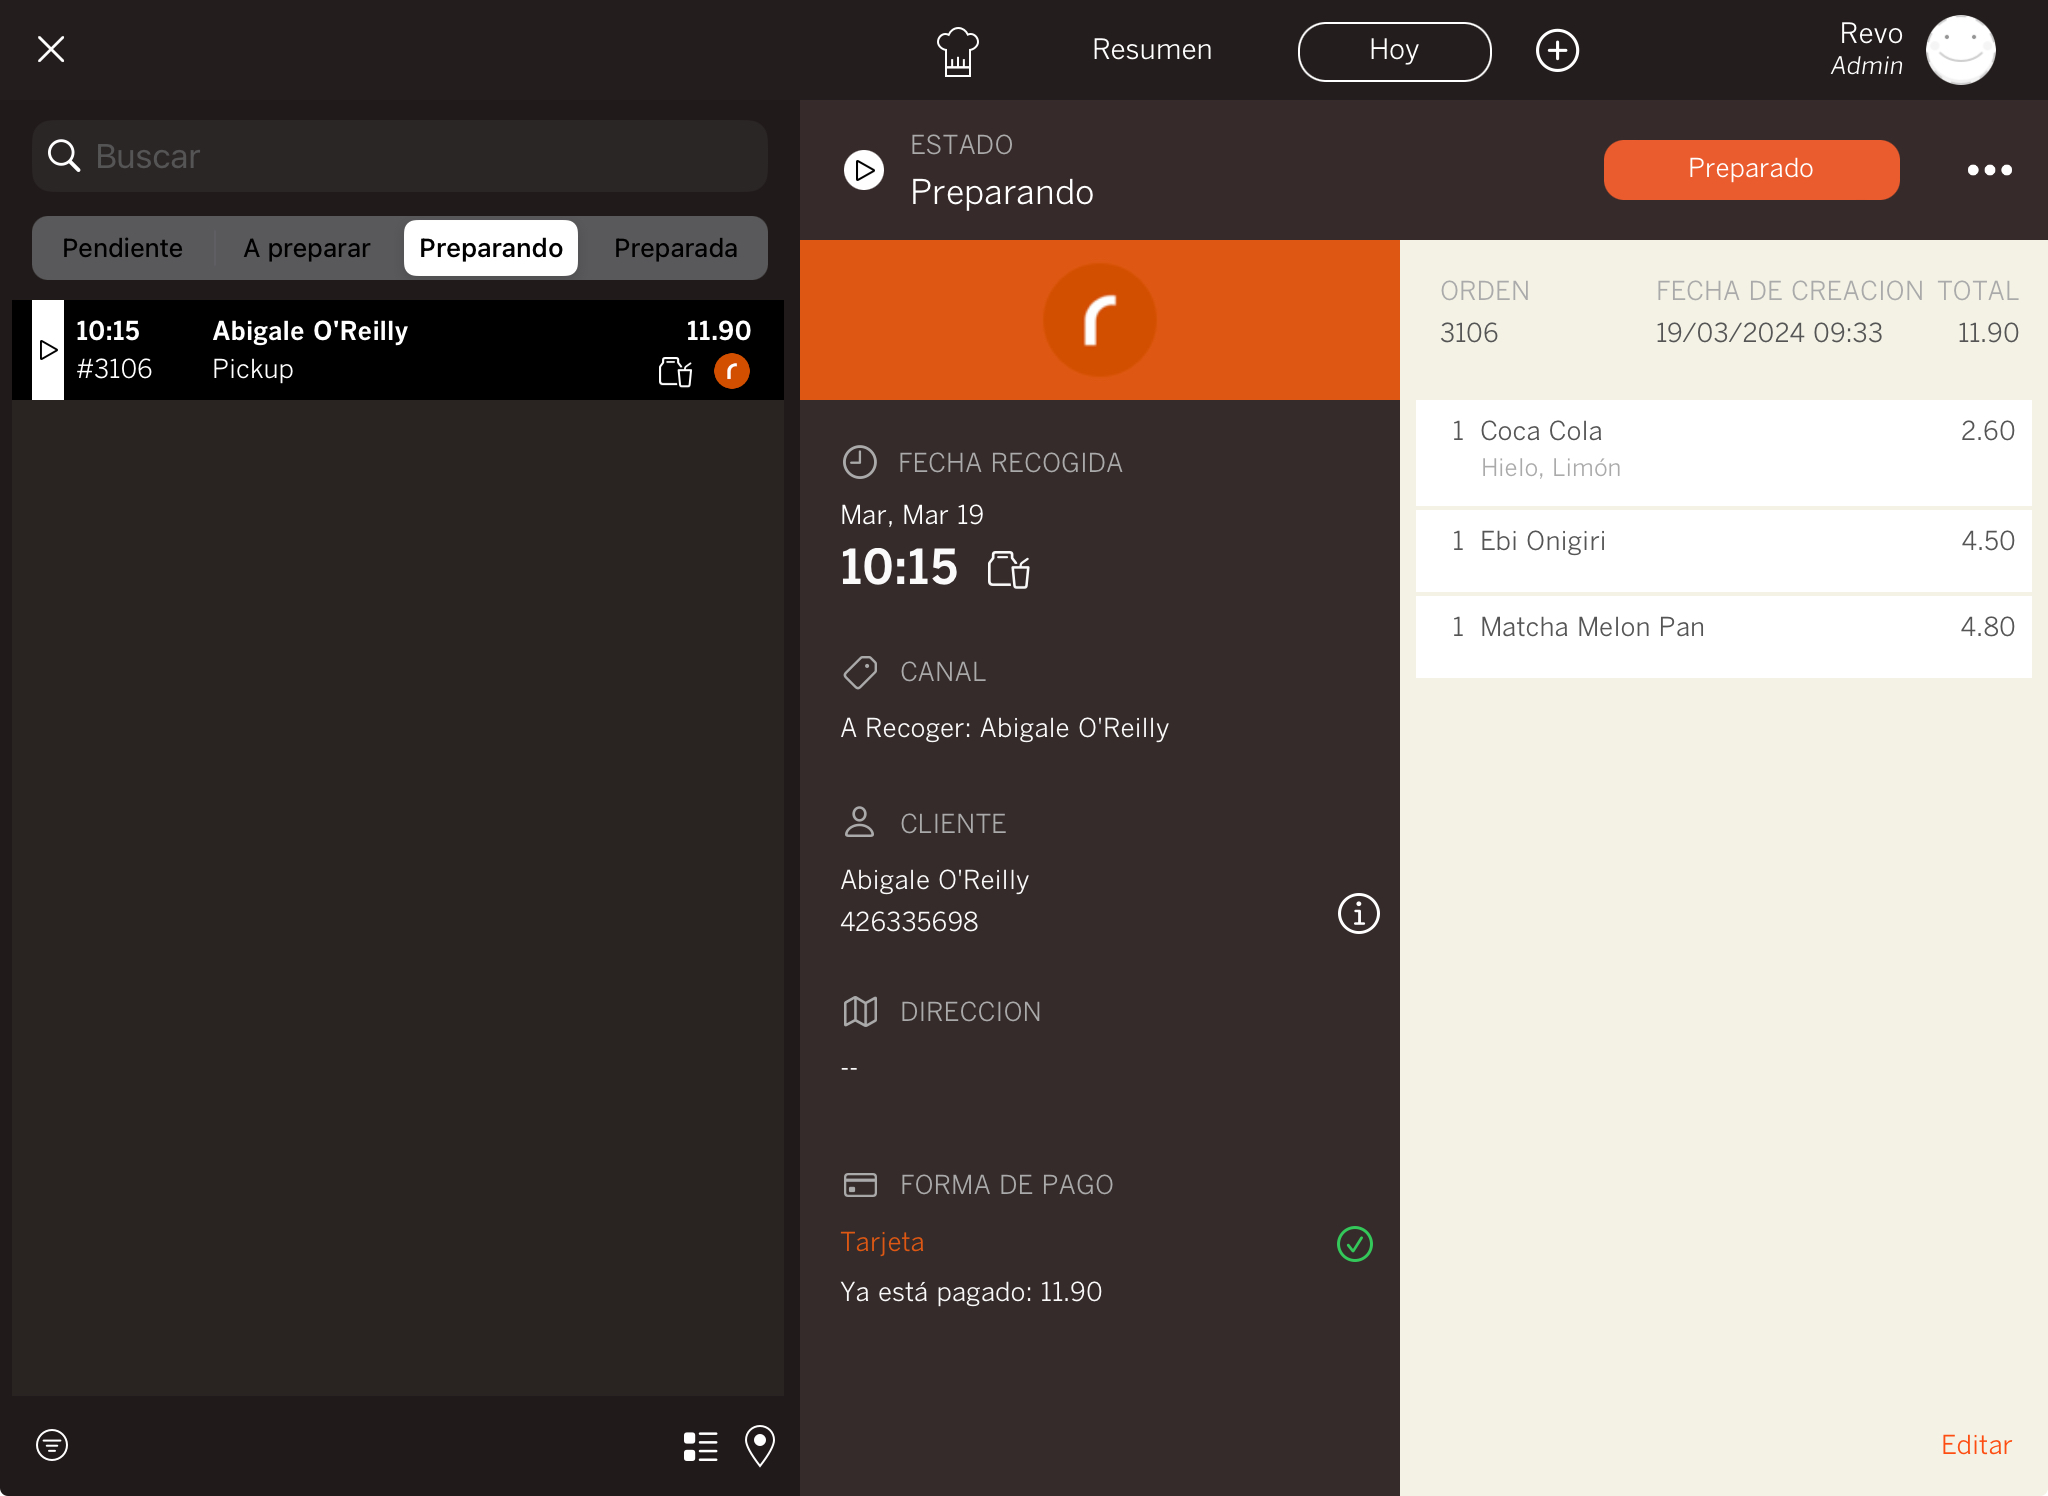
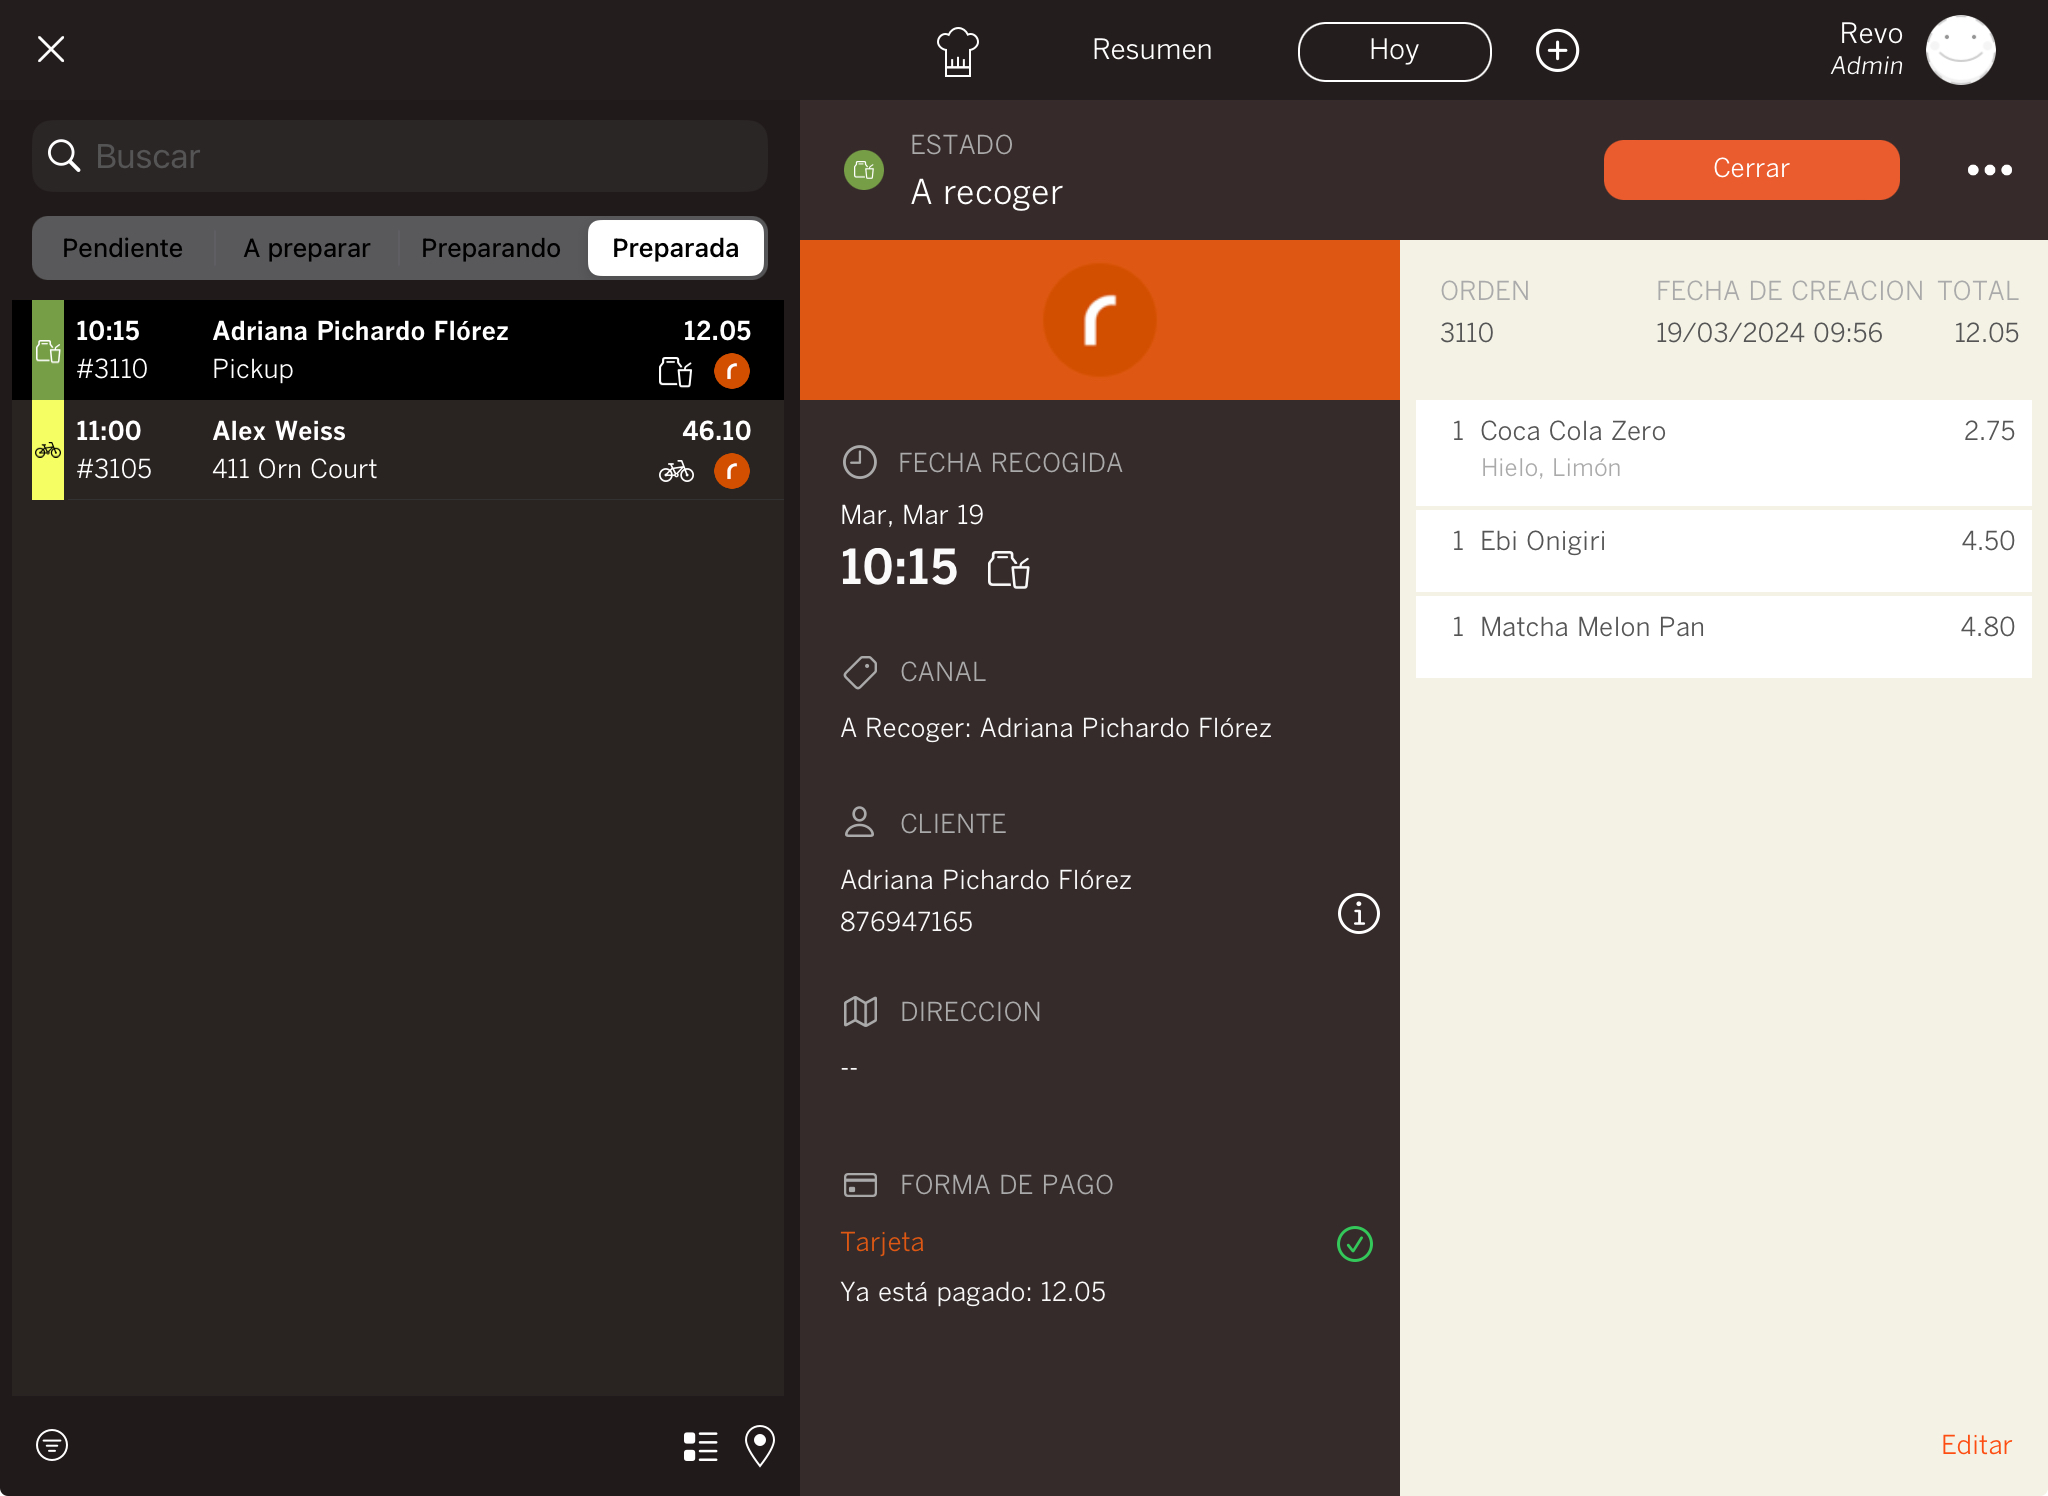
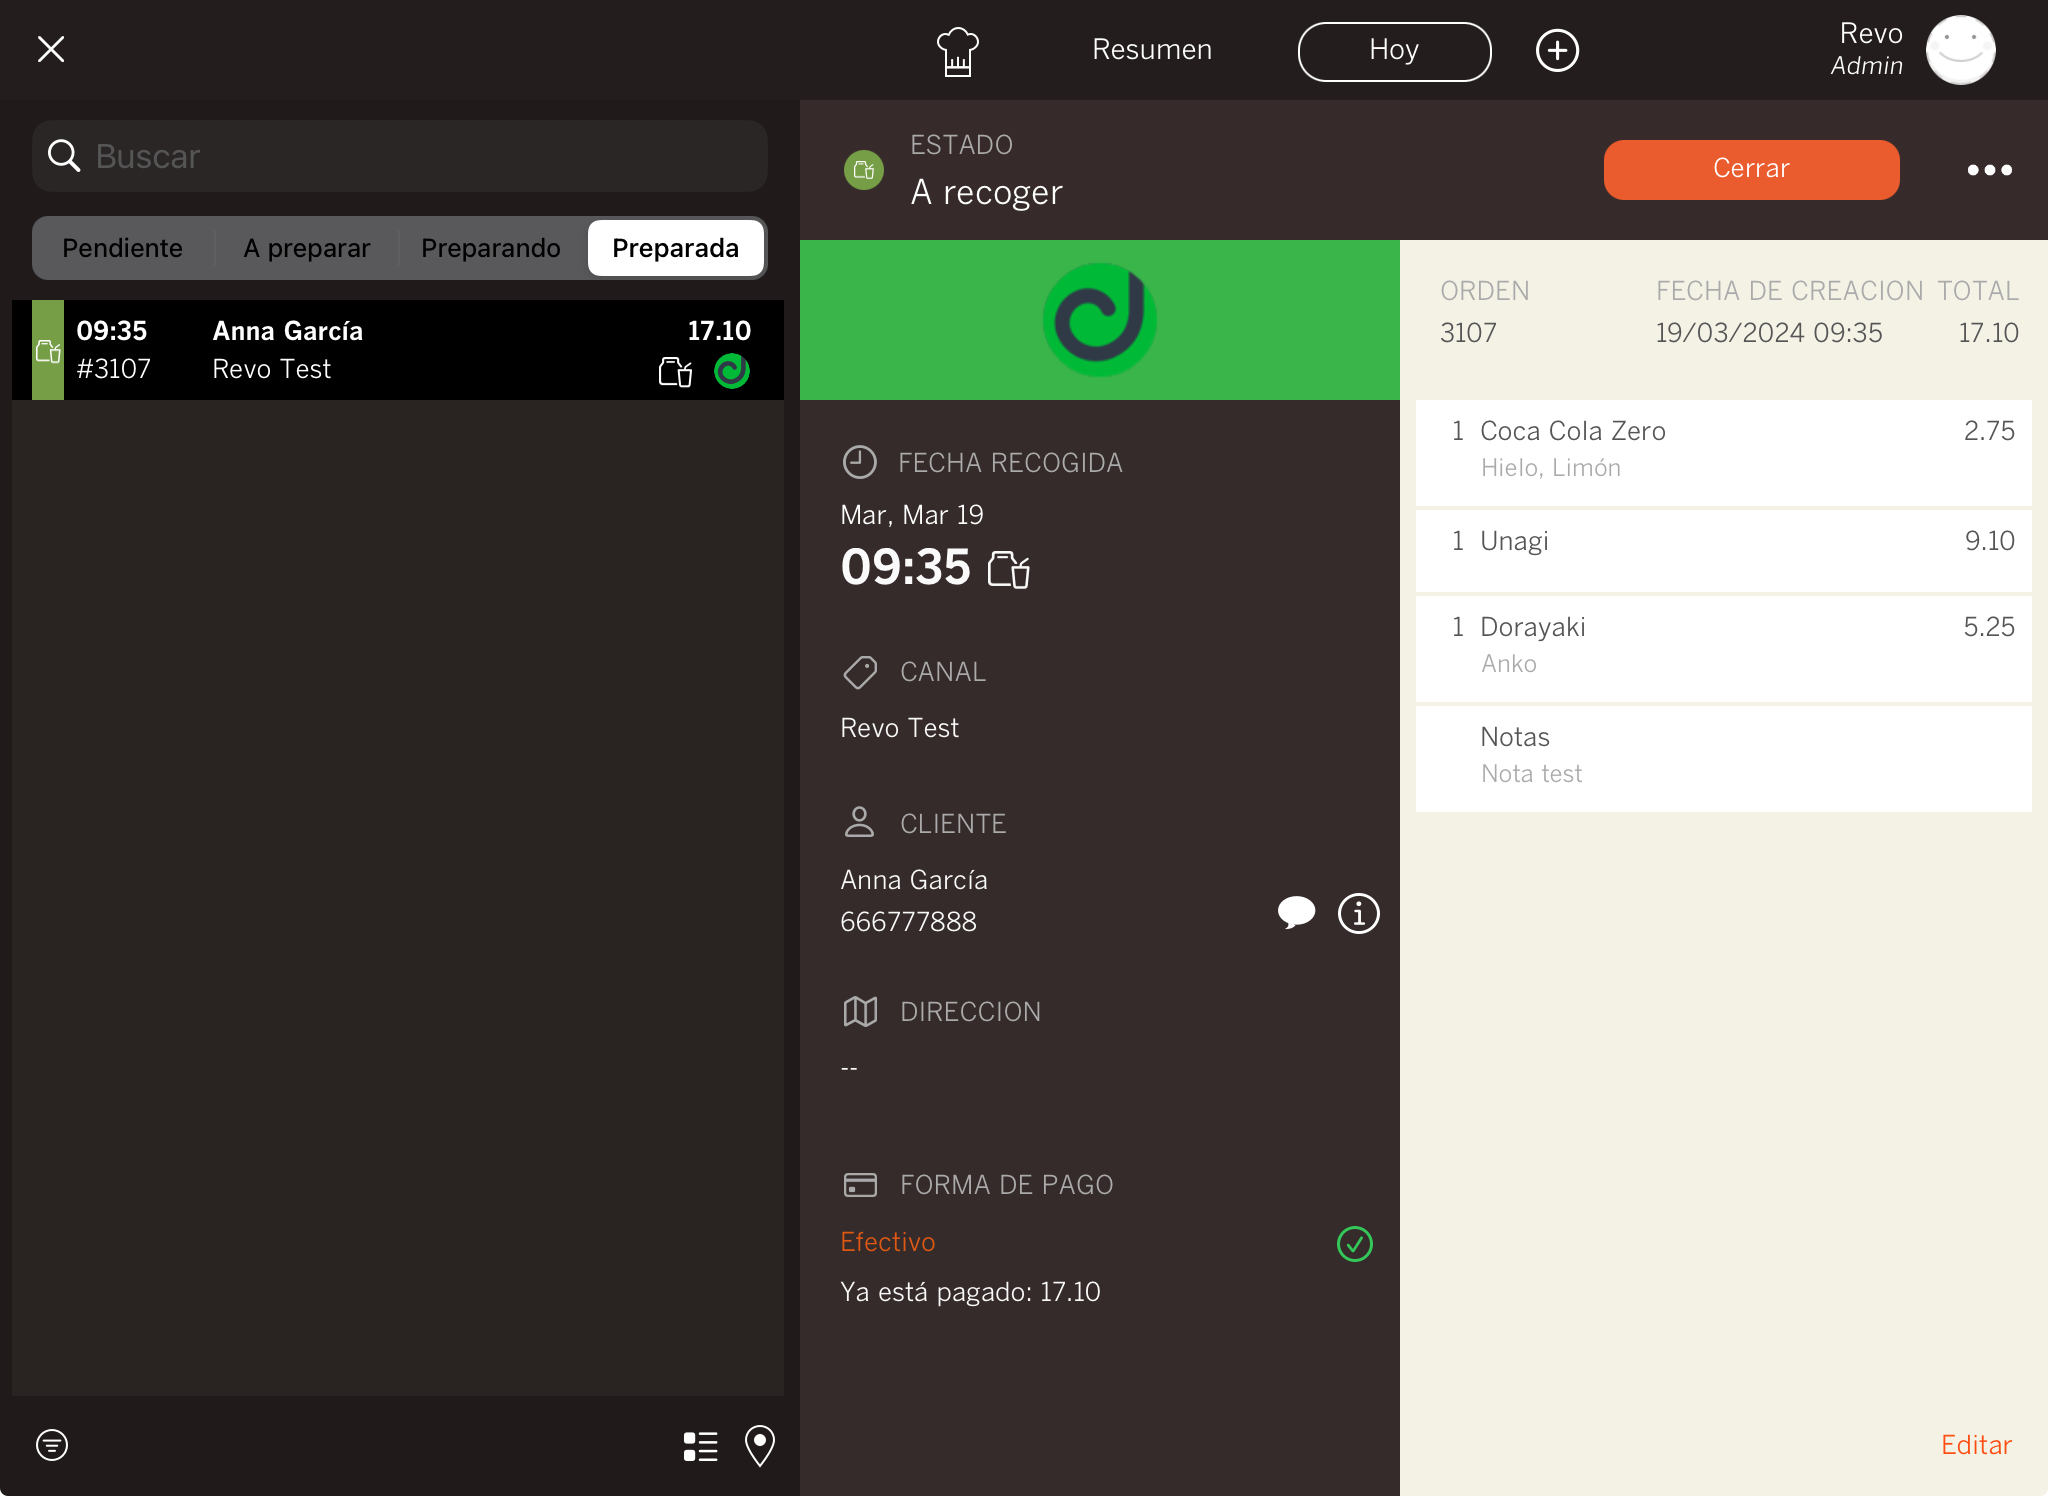
PREPARED:
Here you will see the orders that are ready to be delivered or picked up at the store.
Action for pickup orders: You must close the order once delivered to the customer.
Action for delivery orders: You must assign the delivery person by pressing Deliver.
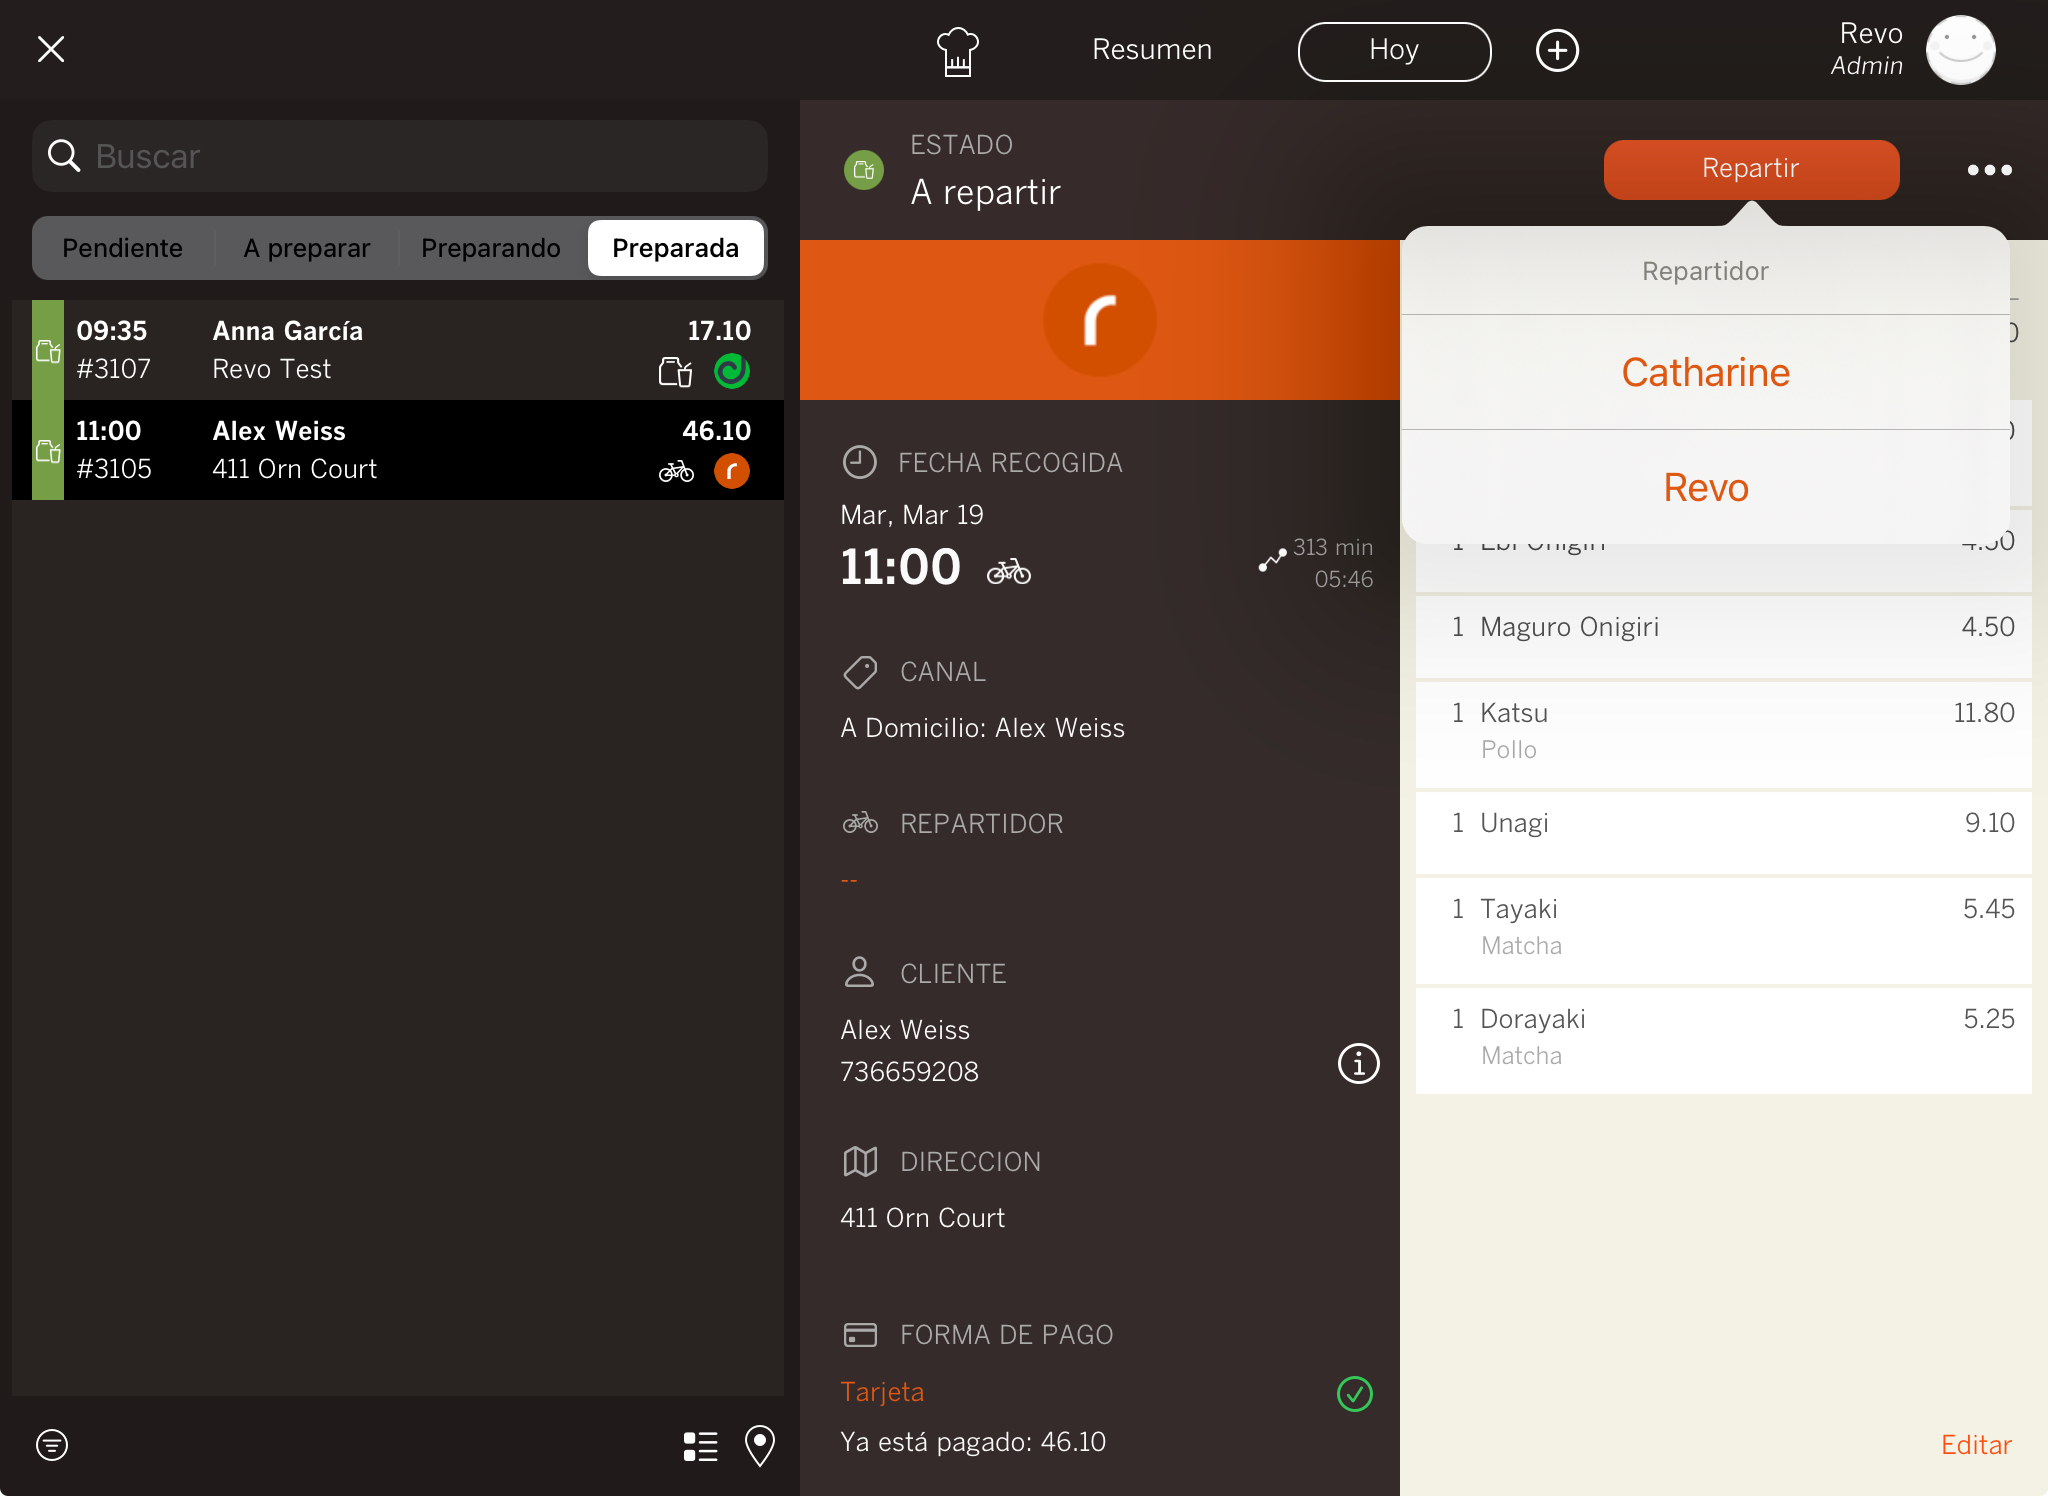
In the back-office → Delivery, you can configure how many copies of the invoice to print. If you select two copies, one will be for the customer and the other for the delivery person. These prints are generated when selecting the delivery person.
Finally, you must close the order.
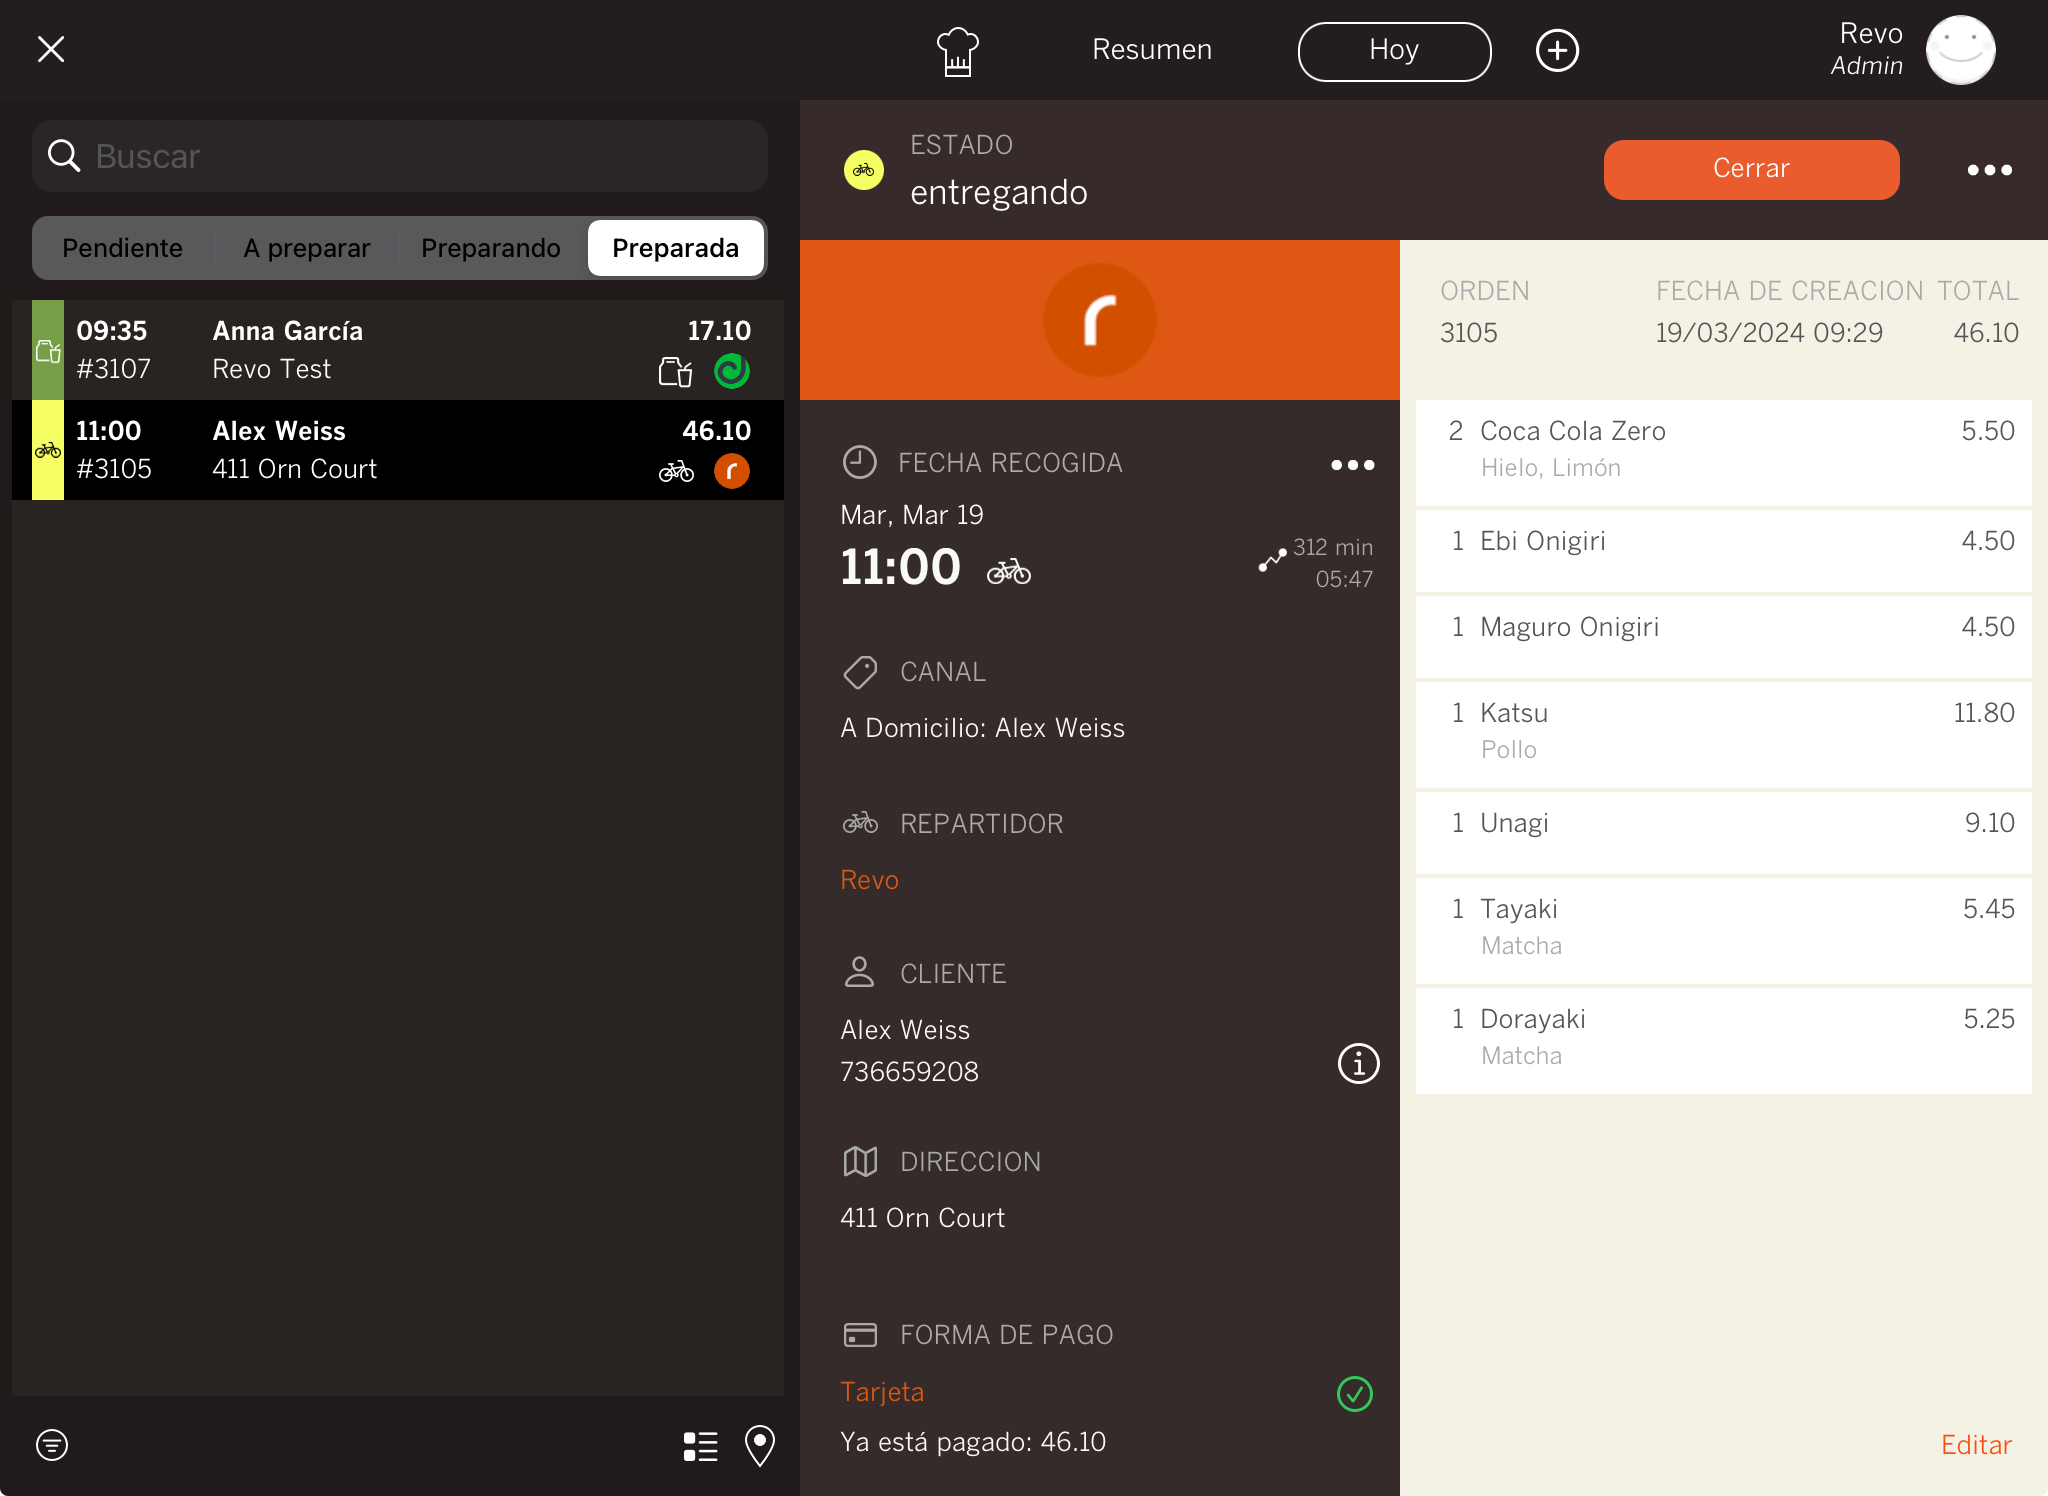
If you have the Automatically close paid orders option active, paid orders will close automatically while the app is active.
Another option is, at the end of the shift, to close all orders of a delivery person and settle accounts, making cash register reconciliation easier.
4. WHAT NAMES APPEAR ON ORDERS WHEN RECEIVED IN XEF
When you receive a home delivery order, whether from the Home Delivery module, Revo SOLO, or an integration (for example: Deliverect, Uber, etc.), you can distinguish them as follows:
-
If you create the orders yourself from the Home Delivery module, you will see the REVO icon in the upper right corner, indicating whether it is Home Delivery or Pickup and the customer's name:
-
If orders come from Revo SOLO or an integration, the integration icon will appear, for example Deliverect, and it will depend on four factors:
-
Without an assigned table or identifying name, the order number will appear:
-
With an assigned table but without an identifying name, the table number will appear:

-
Without an assigned table but with an identifying name, the table name will appear:

-
With an assigned table and an identifying name, the table number will appear:
-
5. PRACTICAL EXAMPLE
Now you'll see how to create a takeaway order for an existing customer.
1. Tap on Takeaway and select a customer from the list.
2. Select Takeaway and confirm the pickup time with the customer.

3. Add the products and tap on Back without adding a payment method, as the customer will pay upon pickup.
4. The order will appear as 'Pending'.
5. If you have the Print automatically option enabled, when the delivery time approaches, the order will automatically move to 'Preparing', be printed in the kitchen, and move to 'Preparing'. If you don't want this option, tap Prepare to do it manually.
6. Finally, when the customer comes to pick up the order, tap Close and the system will ask you to insert the card into the card reader, as the default payment method is Card.
If the orders are paid, you can enable the Close paid orders automatically option to prevent them from remaining open.