1. WHAT IS REVO KDS 2 2. WHAT'S NEW IN KDS 2 3. BENEFITS AND REQUIREMENTS OF REVO KDS 2 4. HOW TO REQUEST/PURCHASE A MICROTOUCH ANDROID MONITOR 5. CONFIGURATION IN REVO 5.1. KDS DEVICES 5.2. CONFIGURATION 5.3. STATES 5.4. STATE FLOW 5.5. PROFILES 5.6. TIME MANAGEMENT 6. HOW THE KDS 2 APP WORKS 6.1. HEADER 6.2. ORDER ACTIONS 6.3. ORDERS 7. CHECKING DISH STATUS IN THE CEGID REVO XEF APP
1. WHAT IS REVO KDS 2
We understand that efficiency in the kitchen is key to a restaurant's success. That’s why we have worked to create a more powerful, agile, and customizable tool.
With Revo KDS 2 (Kitchen Display System), we move away from working with a printer and transform it into a kitchen management system.
By improving its operability and usability, KDS 2 stops acting as just a printer and expands its capabilities, adapting to each dish and the needs of the business.
KDS takes over from the POS in the kitchen, managing the operational workflow there with the same skill as the POS does in the dining area.
And if we add to this, as is the case with Cegid Revo, that KDS is part of a comprehensive suite of technological solutions, success is even greater.
The kitchen display or Kitchen Display System (KDS), being connected to the waiters’ point-of-sale software, ensures smoother communication between the dining area and the kitchen. This technology represents a great advancement in operations: kitchen managers can quickly check the status of all dishes, and cooks can receive, read, and archive orders with just a few clicks—no need to shuffle through papers, reducing stress for teams already working at their limits during peak hours.
Moreover, it is the only paperless method for managing orders, reducing the ecological footprint of any restaurant.
2. WHAT'S NEW IN REVO KDS 2
-
From Printer to Kitchen Management System:
With Revo KDS 2, we have taken the classic KDS to the next level, transforming it into a comprehensive kitchen management system.
Revo KDS 2 is no longer just a printer handling "tickets" but an advanced system that efficiently manages all orders, optimizing each stage of the dish preparation process. -
Larger and More Agile Screen (iOS + Android - MicroTouch):
Now with KDS 2, we can use the app on new MicroTouch screens, which have an optimized size, are fast, responsive, and easy to use.
They adapt perfectly to your workflow, ensuring a smoother experience. Now it's possible to combine iPads with Android Monitors.
Two available Android screen models:
- MicroTouch M1-215IC (22"): Click here for more information about the monitor.
- MicroTouch M1-270IC (27"): Click here for more information about the monitor.
Note: If we want to use the Revo KDS 2 app on an Android monitor, we can only do so on these two models approved by Cegid Revo.
Find more information on how to request/purchase an Android monitor in section 4 of this article.
-
Customized Order Display:
Every kitchen is unique, so now you can customize the order display on each KDS.
Adjust the layout according to your preferences to maximize efficiency and reduce waiting times. -
Unlimited and Customizable States:
Create and customize as many states as you need, including colors, to better manage each stage of your dishes.
Choose the state that best fits your workflow and organize dish production more efficiently. -
Unlimited State Flows:
No two kitchens are the same, so we offer you the possibility to create fully customizable state flows.
Organize the dish preparation process your way by arranging the states as you see fit. -
Complete Activity Log in the Back-Office:
All actions performed within the app are now recorded in detail in the back-office.
This provides complete traceability to monitor kitchen activity and optimize operations more efficiently. -
Dish Summary with Advanced Filters:
The new dish summary feature allows you to filter by states and use advanced filters to obtain clear and detailed information on dish preparation.
This will help you manage your kitchen with greater precision. -
Dish Progression Directly from the App:
Now, you can progress dishes directly from the Revo KDS 2 app.
Simplify the process and improve communication between kitchen staff and service. -
View Dish Status in the Cegid Revo Xef App:
Now, using the Cegid Revo XEF app, waiters can check the status of dishes in the kitchen (KDS 2) at any time.
3. BENEFITS AND REQUIREMENTS OF REVO KDS 2
Benefits:
- Consistent Kitchen: Total control over processes, minimizing errors and extra costs.
- Connected Kitchen: Smooth communication between kitchen and dining area, improving customer service.
- Quiet Kitchen: A relaxed and focused environment for both staff and customers.
- Clean and Sustainable Kitchen: Elimination of paper waste, working in a more eco-friendly way.
- Inclusive Kitchen: Easy adaptation for all chefs, even those less familiar with digital tools.
- Efficient Order Management: Instant sending and clear visualization of each order’s status.
- Complete Overview: Access an advanced summary of all dish statuses.
- Optimization: Improve preparation times and reduce errors.
Requirements to use Revo KDS 2 on iPad and MicroTouch Android monitor:
- Revo XEF: Revo KDS 2 works together with Revo XEF but does not function independently.
- Revo XEF Advance version: To receive orders on KDS 2 devices, you must have the Revo XEF Advance version installed.
- Dedicated iPad and MicroTouch Android Monitor: Install Revo KDS 2 on an iPad/MicroTouch Monitor exclusively for its use.
- Power Connection: Ensure it has access to a power outlet to prevent battery depletion during service.
- Always-On Display: Configure the iPad/MicroTouch Monitor to never turn off, as this could cause connection errors when sending orders from Revo XEF. In Settings on the iPad or MicroTouch Monitor, go to Display & Brightness, then Auto-Lock. Select Never to prevent the iPad/MicroTouch Monitor from turning off while using the app.
- Disable Notifications: We recommend disabling all Notifications in Settings on the device.
- For iPad, download the Revo KDS 2 app from the App Store. For the MicroTouch Android monitor, the KDS 2 app is already pre-installed on the device, and if not, you can download it from Google Play Store.
- Static IP: The iPad and/or MicroTouch Android monitor must have a static IP.
Assign a Static IP:
- Go to Settings on your iPad/MicroTouch Monitor.
- Tap Wi-Fi.
- Tap the information icon of the connected Wi-Fi network.
- Select Configure IP.
- Choose Manual (it should be marked with ).
- Manually enter the IP address, subnet mask (usually: 255.255.255.0), router, and save changes.
- Go to Configure DNS.
- Choose Manual (it should be marked with ).
- Manually enter a DNS address (8.8.8.8) and save changes.
- Return to the previous menu by tapping Wi-Fi.
Recommended: The static IP should be outside the range of dynamic IPs assigned by the router or network management device.
Ensure all devices, including those using KDS, are connected to the same Wi-Fi network.
IMPORTANT:
- We must have only one version of Cegid Revo KDS installed on each device. We must avoid the simultaneous installation of Cegid Revo KDS 2 and Cegid Revo KDS on the same device/account to prevent potential issues.
4. HOW TO REQUEST/PURCHASE A MICROTOUCH ANDROID MONITOR
You can request/purchase a MicroTouch Android monitor by accessing the portal.
Once inside the portal:
1. Enter the Self-Service section.
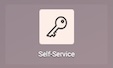
2. Select Order KDS 2 Screens.
3. Choose the MicroTouch monitor model you want to purchase and specify the quantity.
4. Confirm the purchase.
5. CONFIGURATION IN REVO
Important: To receive orders on KDS 2 devices, we need to have Revo XEF Advance installed.
First, we need to activate the Revo KDS 2 license in the Revo XEF account.
Once the license is activated, we will access the back-office of Revo XEF.
Inside the back-office, we will find the following section: KDS 2
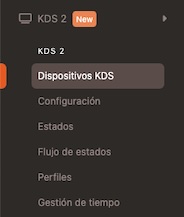
5.1. KDS DEVICES:
In this section, we will create our Revo KDS 2 devices.
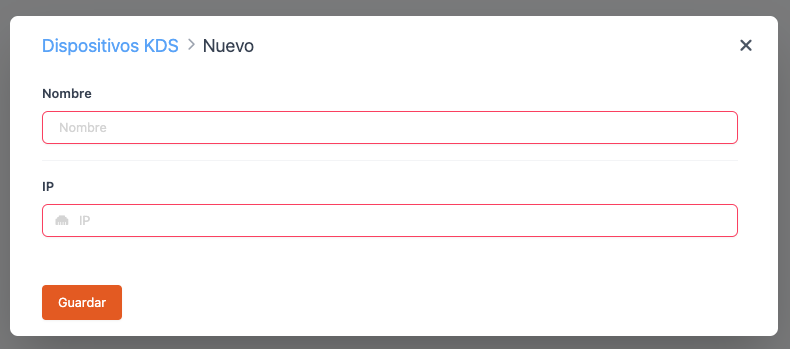
1. Click on + New to create the KDS 2 device.
2. Enter the Name of the device.
3. Enter the device's IP address.
4. Click on Save.
Once the Revo KDS 2 devices are created, it is not necessary to associate them with the catalog. In Revo KDS 2, by default, all products will always be sent to all devices. Later, by configuring the profiles, we will set up which information we want to display on each KDS 2 device.
5.2. CONFIGURATION:
In this section, we will set up the general configuration for all KDS 2 devices.
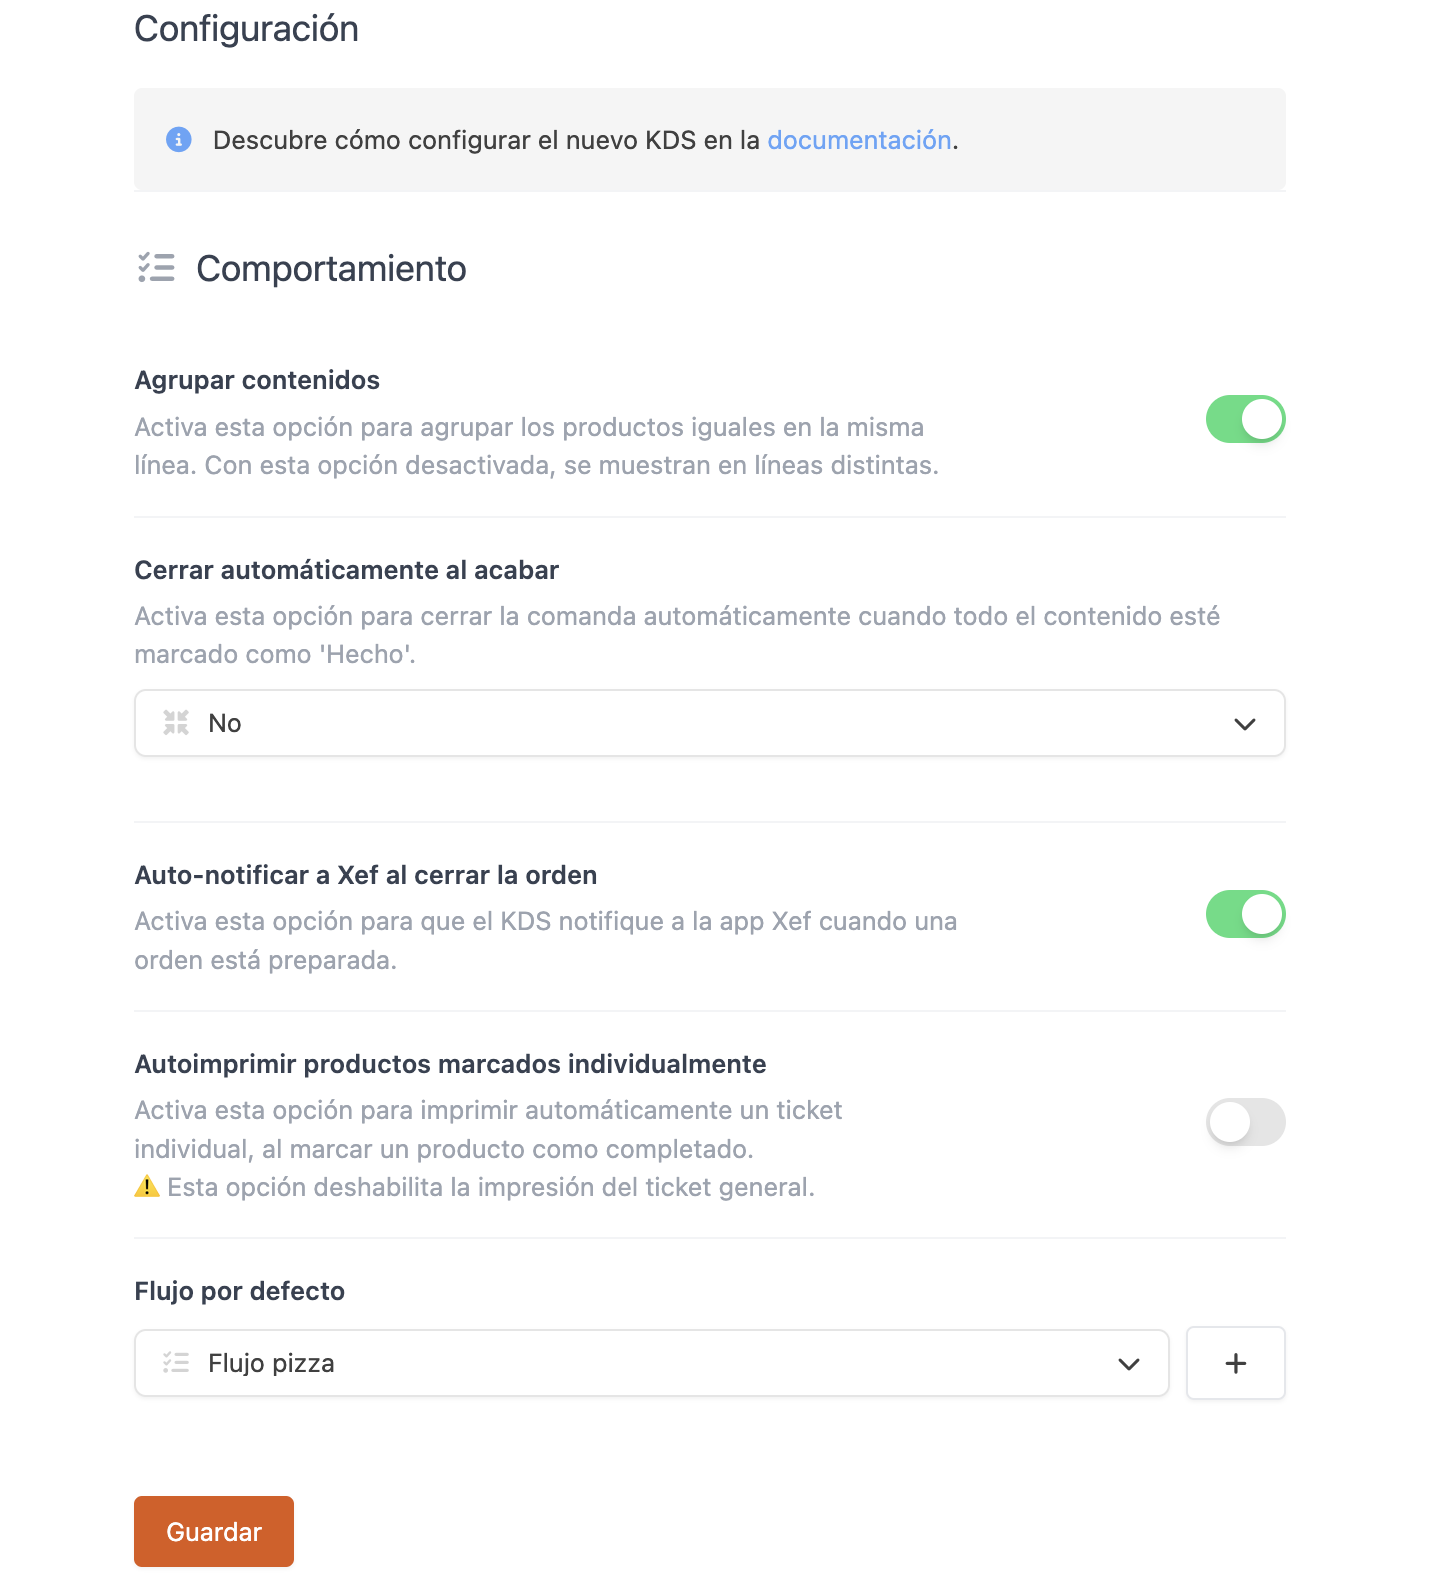
BEHAVIOR
-
Group items: Enable this option to group identical products by default. If disabled, they will be displayed and can be marked individually.
Example: If 2 Shark Burgers are sent, they will appear as 2 Shark Burgers instead of 1 Shark Burger and 1 Shark Burger. This means that if the items are marked as completed, they must be marked when both are done. -
Auto-close when finished: When all dishes in an order are marked as done on a KDS 2 device:
- No: The order will not close automatically but will ask if we want to close it.
- Yes: The order will close automatically on all devices without asking.
- No, and don’t ask anything: The order will never close automatically on other KDS 2 devices and will not ask.
-
Auto-notify Revo XEF when closing the order: Enable this to notify the Revo XEF app when an order is ready.
-
Auto-print individually marked items: With this option enabled, marking an item as completed will automatically print an individual ticket.
This option disables the general ticket printing. -
Default workflow: In this option, we must select the default workflow for the entire product catalog.
When activating Revo KDS 2 for the first time in a Revo XEF account, the default workflow defined in Cegid Revo will always be selected.
5.3. STATES:
In the States section, we can create as many states as we need.
Let’s think about a grill and how the preparation of a good rib-eye steak is orchestrated. The meat starts as an “unfinished” dish, and once on the grill, it moves from “marked” to “in process,” and in the final step, it’s “done.” It is then when the waiter picks it up, and the rib-eye steak shows up on the screen as “finished”...
Now, let’s imagine what happens in a pizzeria. A margherita pizza also starts as a “pending” dish, but after preparing the base, it appears as “base prepared.” Once we add the tomato and cheese, we change its state to “ingredients added” and then indicate that it is “in the oven.” It is when it is taken out that it’s “done,” and as in the grill’s case, the waiter picks it up, and the pizza shows up on the screen as “finished.”
Therefore, to achieve this type of structure, we must first create the states and later create the state flows, which will be the order of states we want the dishes to follow.
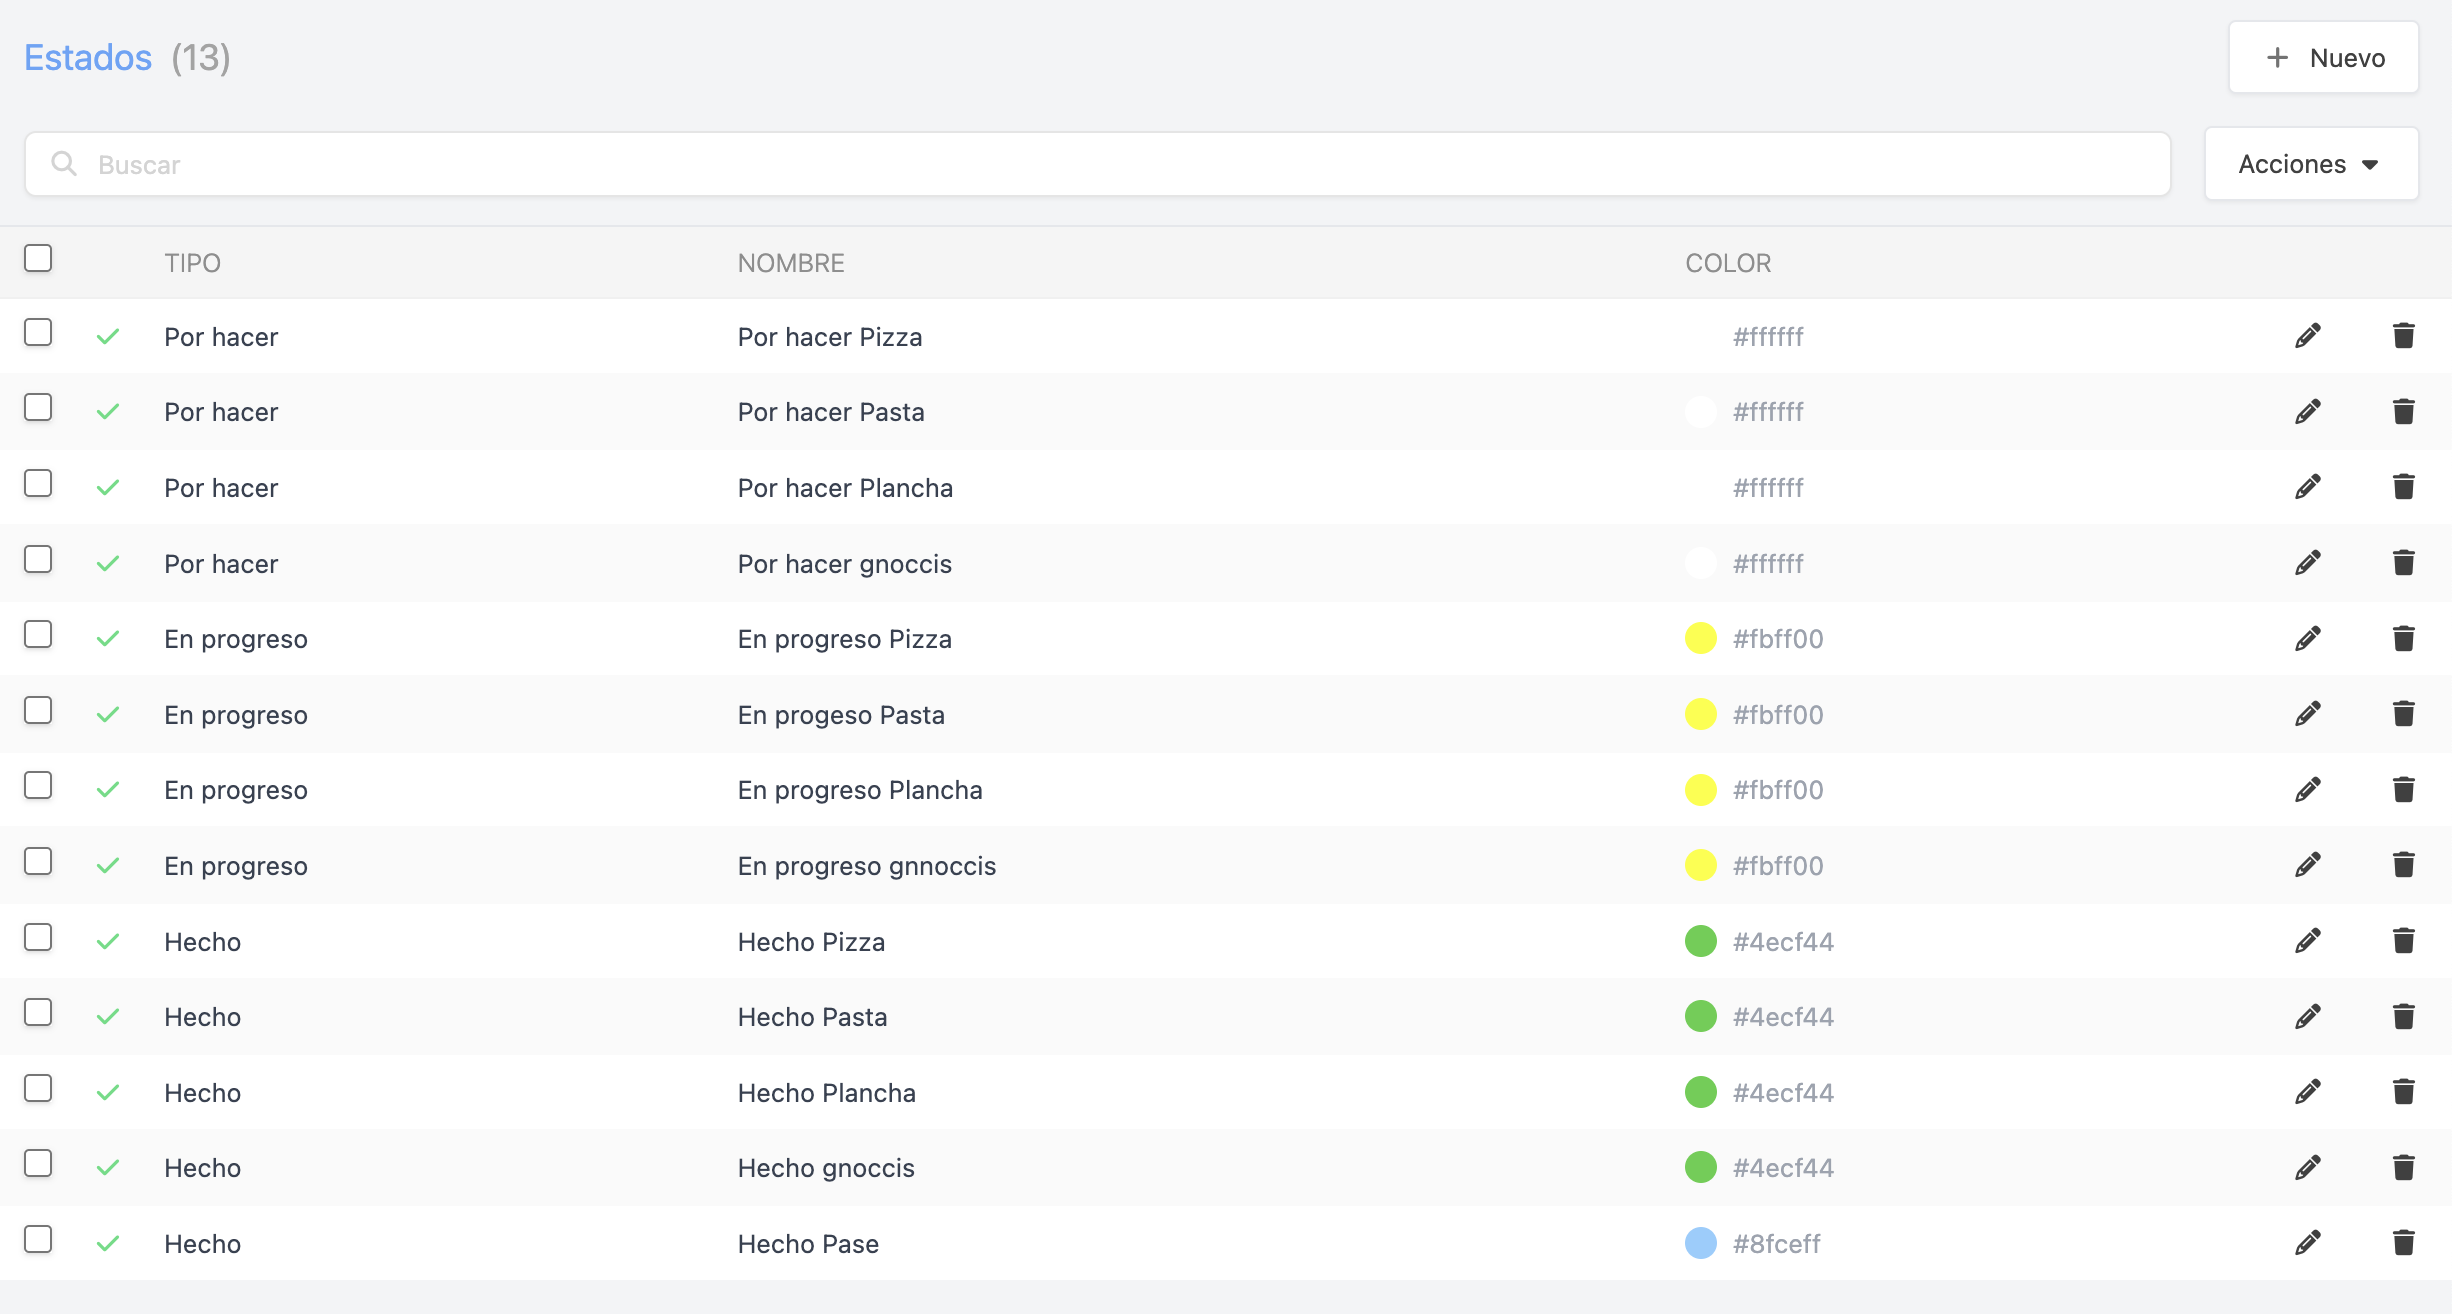
To create a state:
1. Click on + New.
2. Fill in the following information:
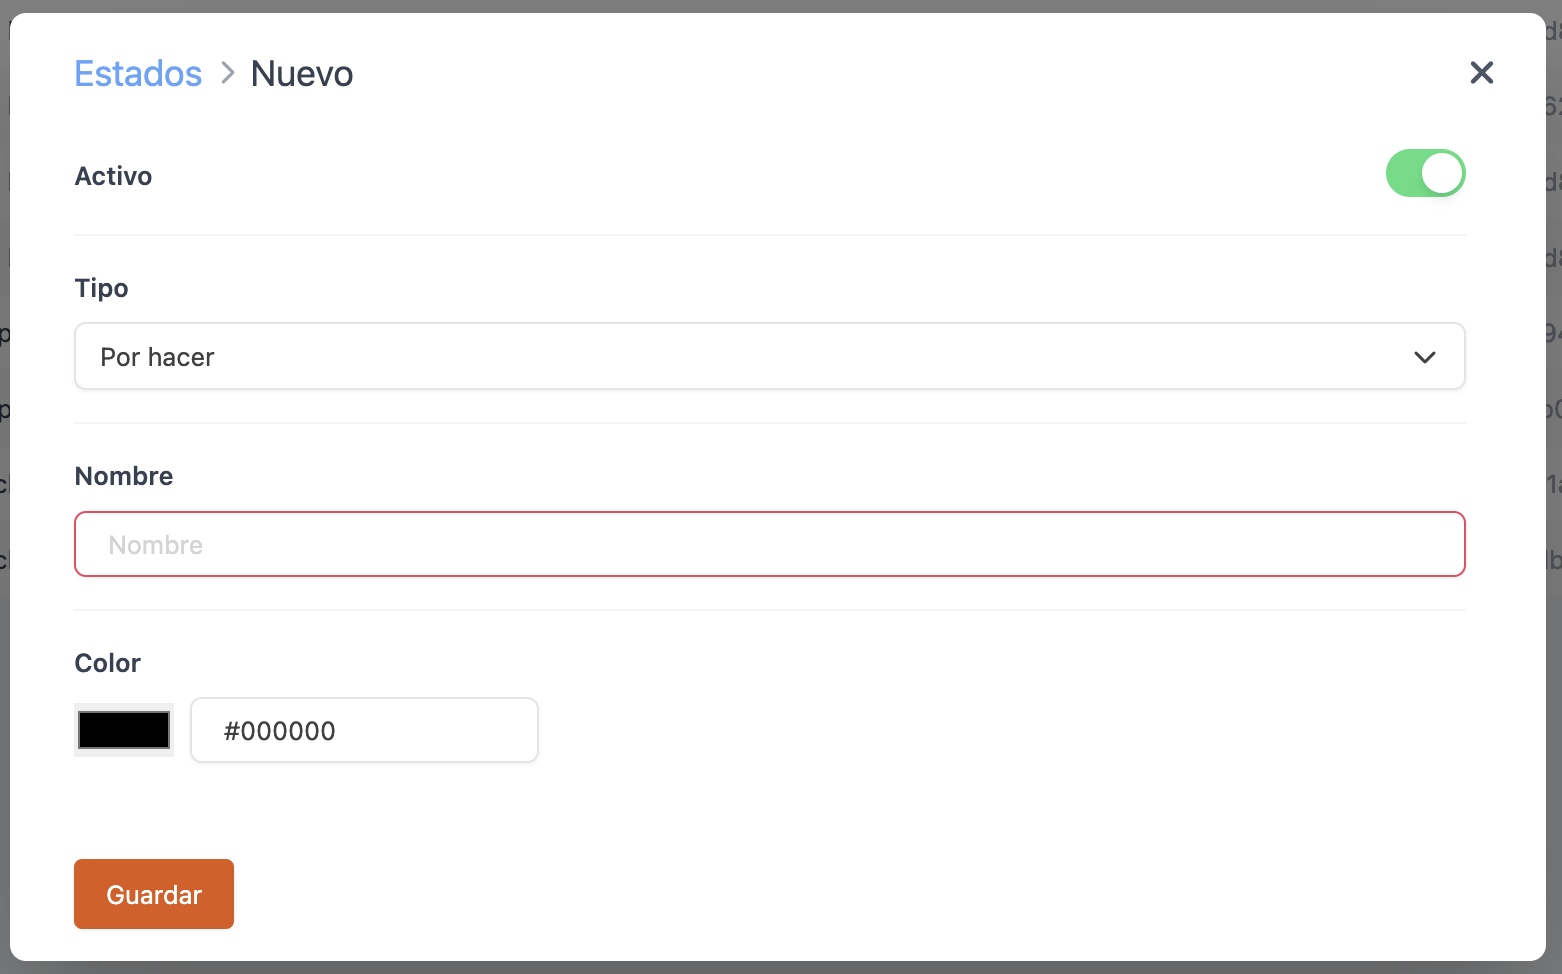
- Active: Activated.
-
Type: Select the type of state.
- Unfinished
- In progress
- Done
- Name: Enter the name of the state.
- Color: Specify the color you want to define for the state (The color that will be shown when marking the dish).
By assigning a different color to each state, chefs can quickly understand what needs to be done and what the others are working on.
3. Click on Save.
When activating Revo KDS 2 for the first time in a Revo XEF account, three default states will always be created, one for each type. These three states will be associated with the default flow, which is also predefined by Cegid Revo.
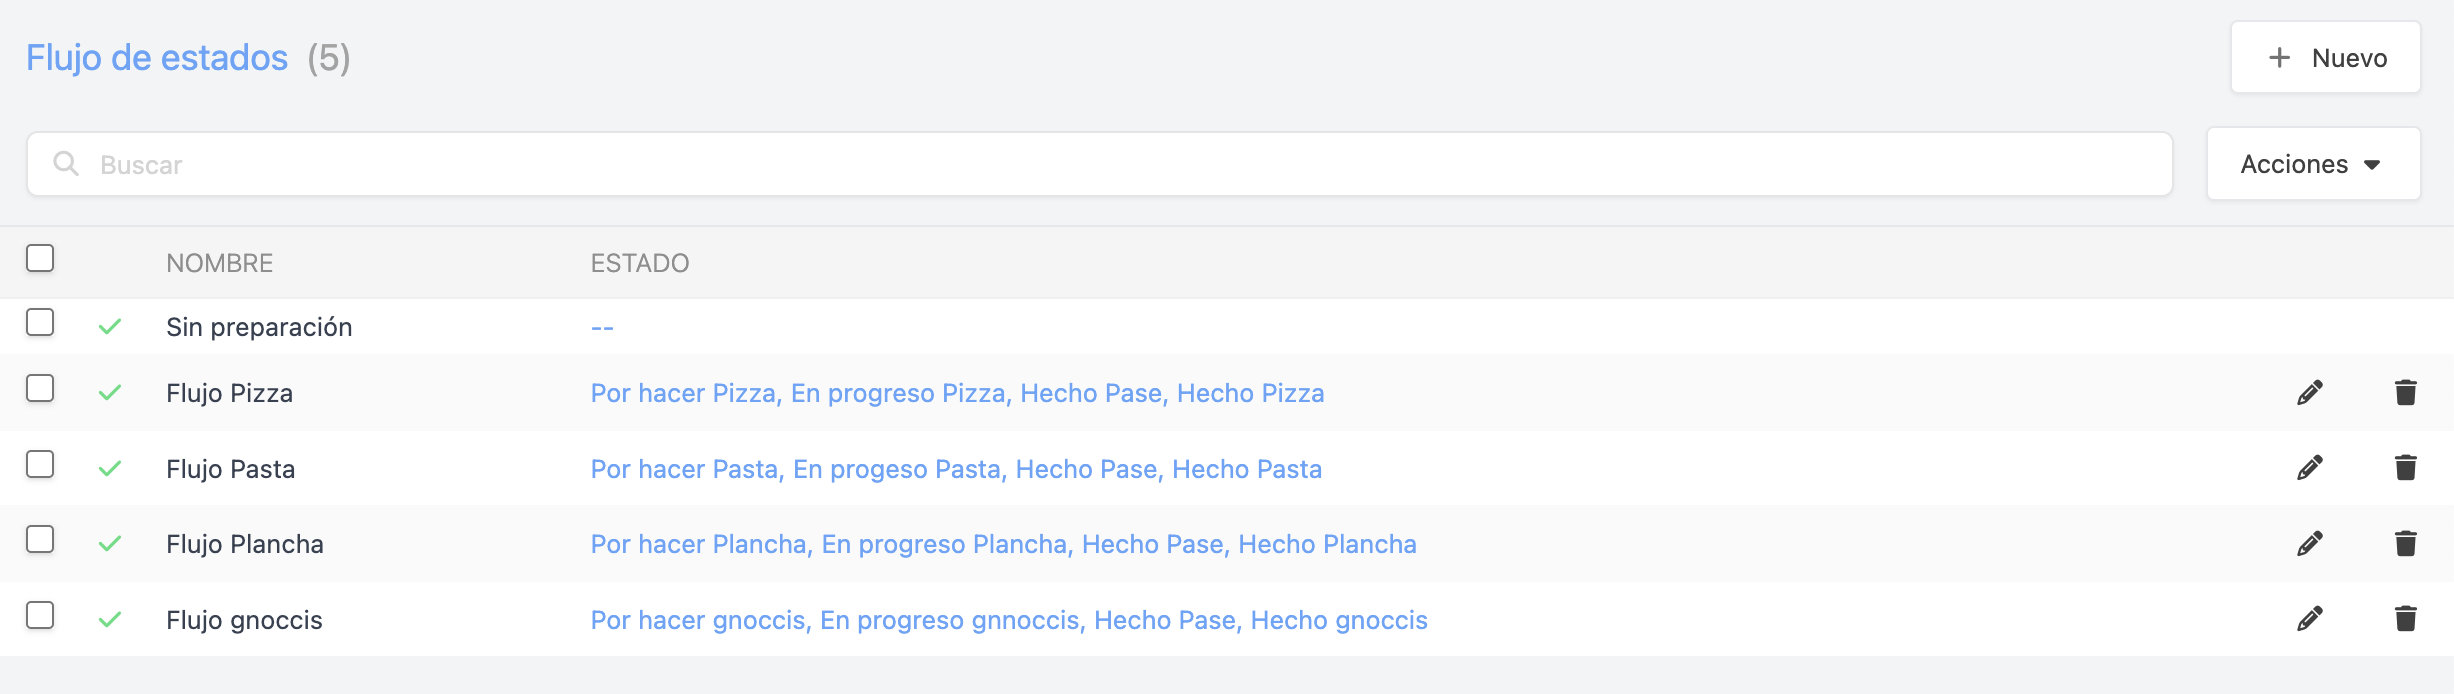
5.4. STATE FLOW:
In this section, we can create state flows.
A State Flow is the defined order of states that our dishes will follow.
As we know, each dish follows its own stages of preparation, its own flow, with different timings. But they all have something in common: they are preparations that consist of several steps, often done in sequence, and form a composition that, when managed well with the help of technology, aims to achieve better results.
State management is the essence of Cegid Revo’s KDS 2, which differentiates itself from basic kitchen screens by allowing customization for each dish, staying true to their preparation processes. This way, we can indicate and visualize the stage each dish is at and use filters to see how many and which ones are at each step of the process.
As mentioned earlier, in the general configuration, we have selected/defined a default flow that all products in our catalog will follow. However, if we want certain products to follow a completely different state flow, that’s no problem, we can configure it. We explain this below, but first, let’s create a state flow. To do so:
1. Click on + New.
2. Fill in the following information:
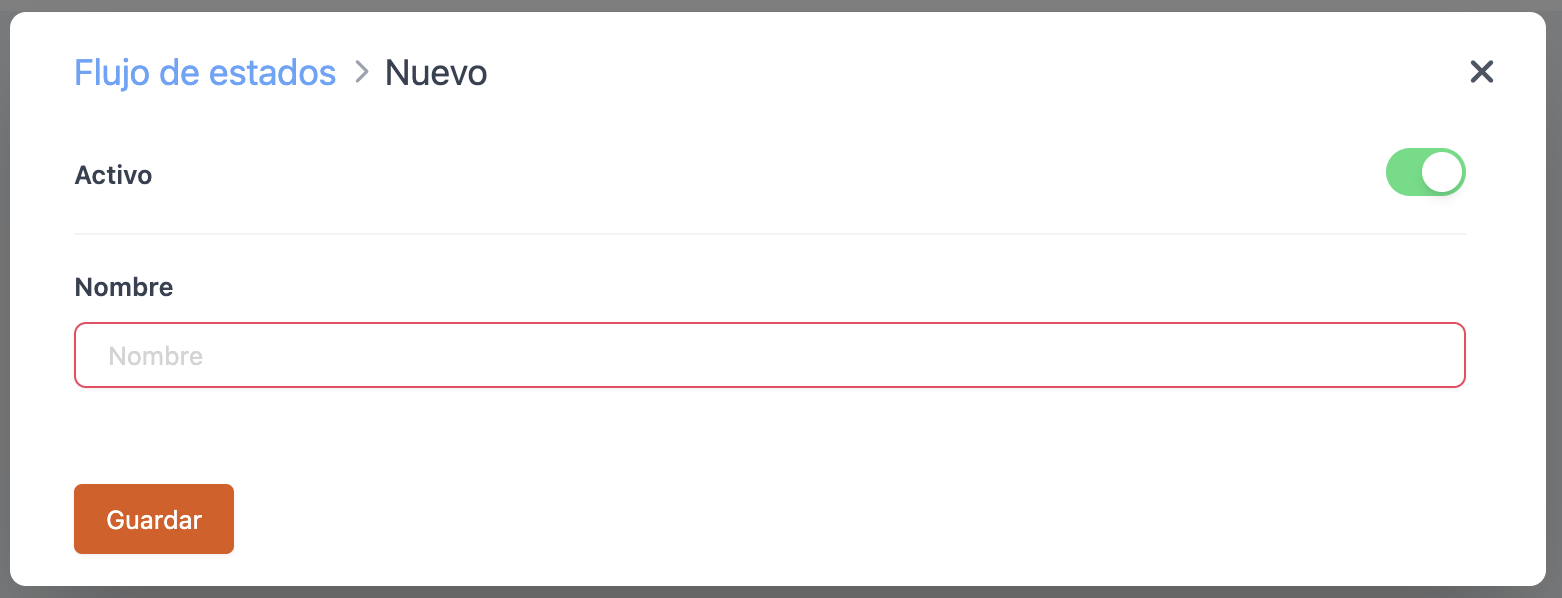
- Active: Activated.
- Name: Enter the name of the state flow.
3. Click on Save.
4. Once the state flow is created, we need to associate the states we want to our flow.
4.1 To do this, click on --:
4.2 Select the state.
4.3 Click on Add.
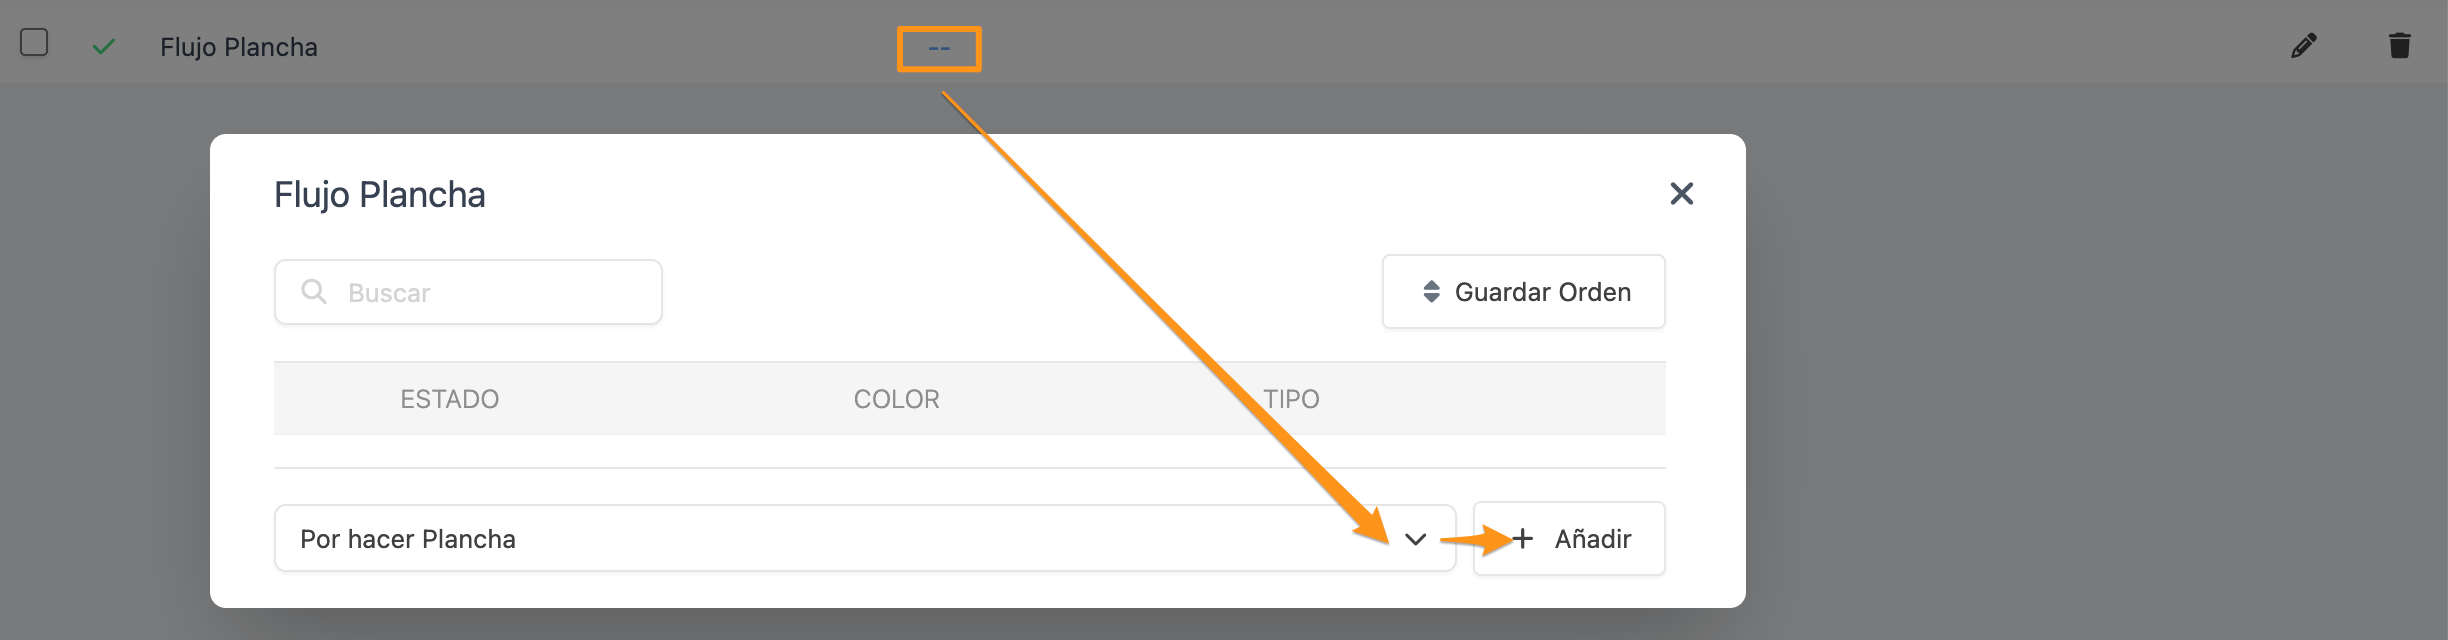
4.4 Once we’ve added the states to the flow, we can also change the order of the states using the following button: .
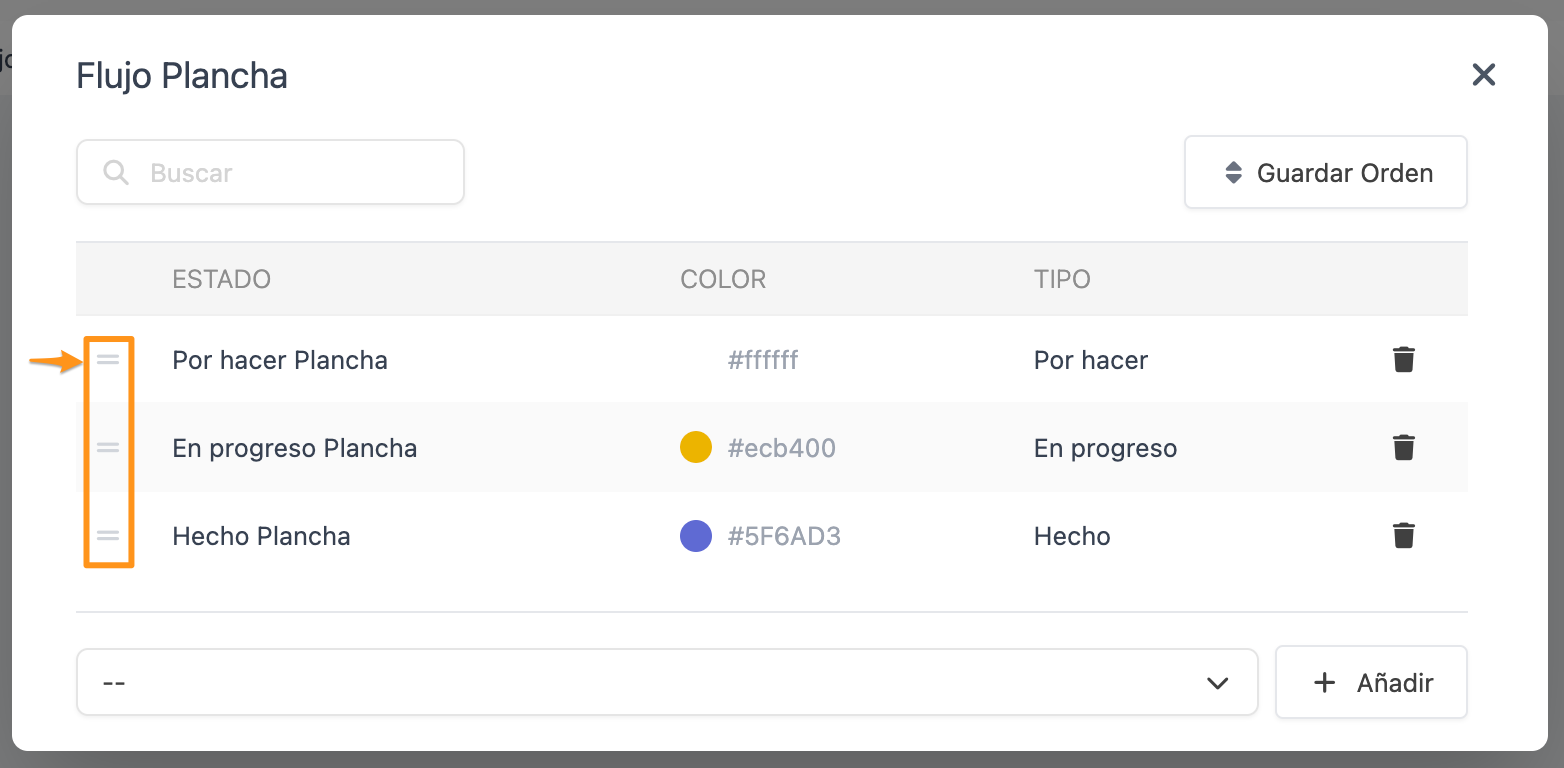
4.5 If we’ve changed the order of the states, to apply the changes, click on Save Order.
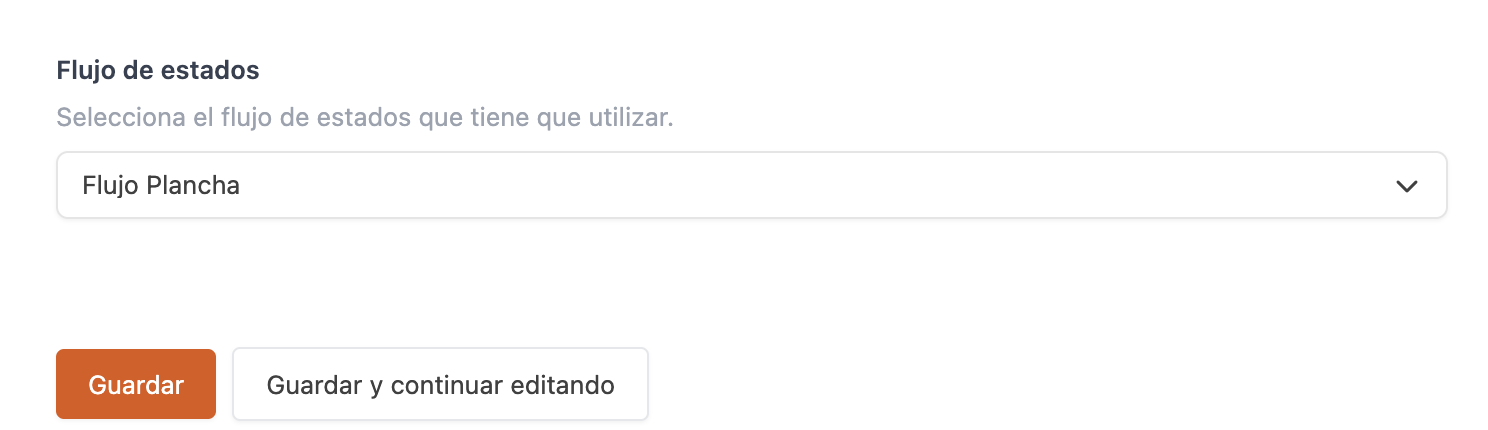
5. Once our state flow is created, we have two places where we can assign it:
-
1. In the general configuration.
In this case, we can change it if we don’t want to use the flow defined by Cegid Revo. -
2. In a group/category/product.
As mentioned earlier, if we want certain products to follow a completely different state flow from the general configuration, we’ll follow these steps:- 2.1 Go to our Revo XEF catalog Groups.
- 2.2 Find the group/category/product where we want to associate the new state flow and Edit by clicking on .
- 2.3 Once the edit window opens, locate the State Flow field and select the flow we want to associate with that group/category/product.
- 2.4 Click on Save.
When activating Revo KDS 2 for the first time in a Revo XEF account, two state flows will always be created by default:
- No Preparation: This flow doesn’t contain any states and no states should be added. If we associate this flow to a group/category/product, those products will not be shown on any Revo KDS 2 device, as by default, all catalog products will use the default flow defined in the general configuration. This is useful when we don’t want certain products to be displayed on the KDS, for example, drinks. It’s like a "No Printer" in the case of printers.
- Default: This is the flow that comes selected by default in the general configuration of Revo KDS 2. It contains the three default states defined by Cegid Revo.
5.5. PROFILES:
In this section, we can create Profiles for Revo KDS 2.
In the profiles, we can make different configurations for each KDS device and set which states we want to display on each of them.
For better organization of operations, we can configure all screens simultaneously or choose which states to show on each device, adapting to the specific needs of each section (fish, meat, cold starters, hot starters...) and simplifying the daily routine of restaurants that operate with multiple sections.
For example, a restaurant with five KDS: one for the cold section, another for the hot section, a KDS for the waiters who pick up the plates in the kitchen, one for the drinks at the bar, and another for the service manager. Each one can see the relevant states: in the cold section KDS, they can see which plates are "to prepare" or have "ingredients added" and, in the passing KDS, they can see which are "ready to serve" and "served".
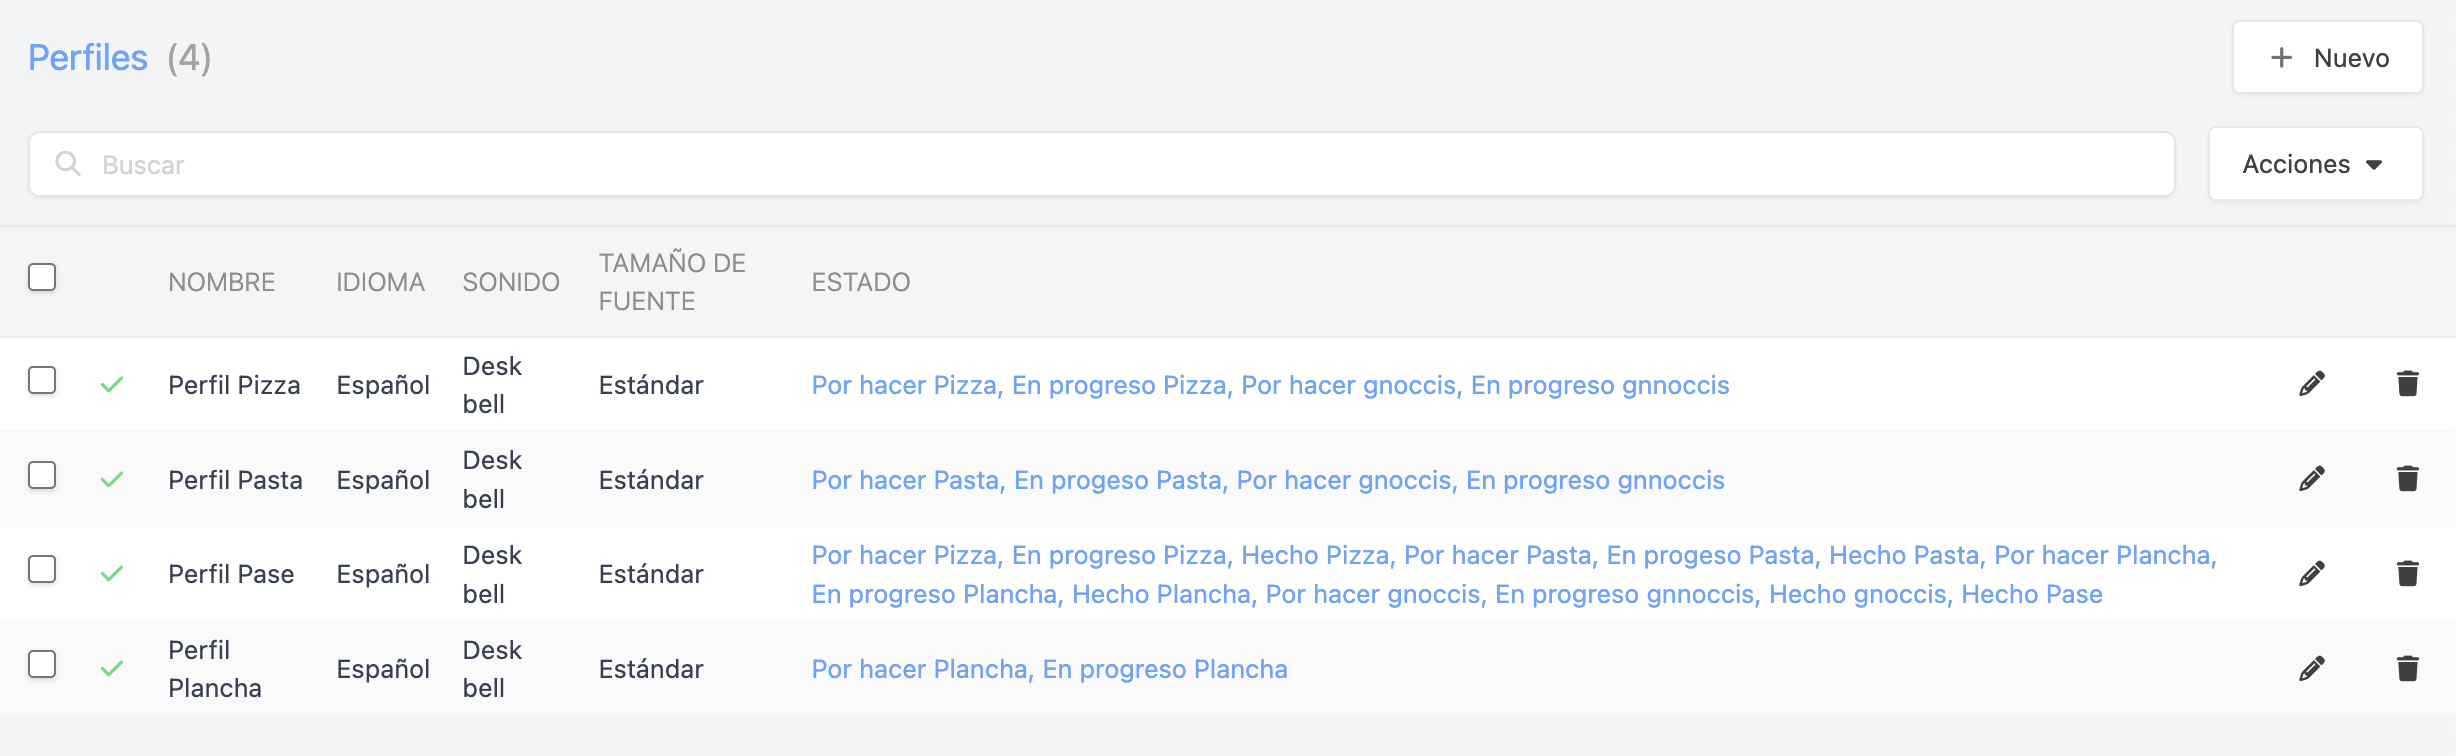
Therefore, to create a profile, we need to follow these steps:
1. Click on + New.
The following window will appear automatically:

2. In this window, we will find the following fields:
-
Active: Activated.
-
Name: Enter a descriptive name for the KDS 2 profile.
-
Language: Select the language you want to use with this KDS 2 profile.
-
Display Type: Choose between Standard or Continuous flow.

-
Ticket Rows: Define how many rows of tickets to display on the KDS 2.
-
Change state when clicking: Activate this option to change the state of products when clicking on them.
-
Move to joined order: With this option activated, when sending a modification to an open order, the KDS will display the joined order, as well as play a sound.
-
Sound: Choose the sound for new orders received on the KDS 2. Here is a list of available sounds.
Air Horn:
Desk Bell:
Door Bell:
Japanese Bell:
Metal Gong:
Ship Bell:
-
Printer: Select a printer from the list to print the pass tickets on the KDS. You can create a new one by clicking . More information here.
-
Font Size: Choose Large or Standard for the font size on the KDS 2.
3. Click on Save.
4. Once the profile is created, we need to associate the states we want to display on each of the KDS 2 devices.
4.1 To do this, click on --:
4.2 Select the state.
4.3 Click on Add.

When activating Revo KDS 2 for the first time on a Revo XEF account, a default profile will always be created. This profile will contain the three default states created and defined by Cegid Revo.
5.6. TIME MANAGEMENT:
Revo KDS 2 optimizes kitchen time management, ensuring greater efficiency and synchronization. Now, each dish order has a single time management, simplifying the process. Additionally, multiple ways to start the cooking time are incorporated, adapting to different workflows. The calculation based on the product's time and its modifiers remains, improving accuracy and organization.
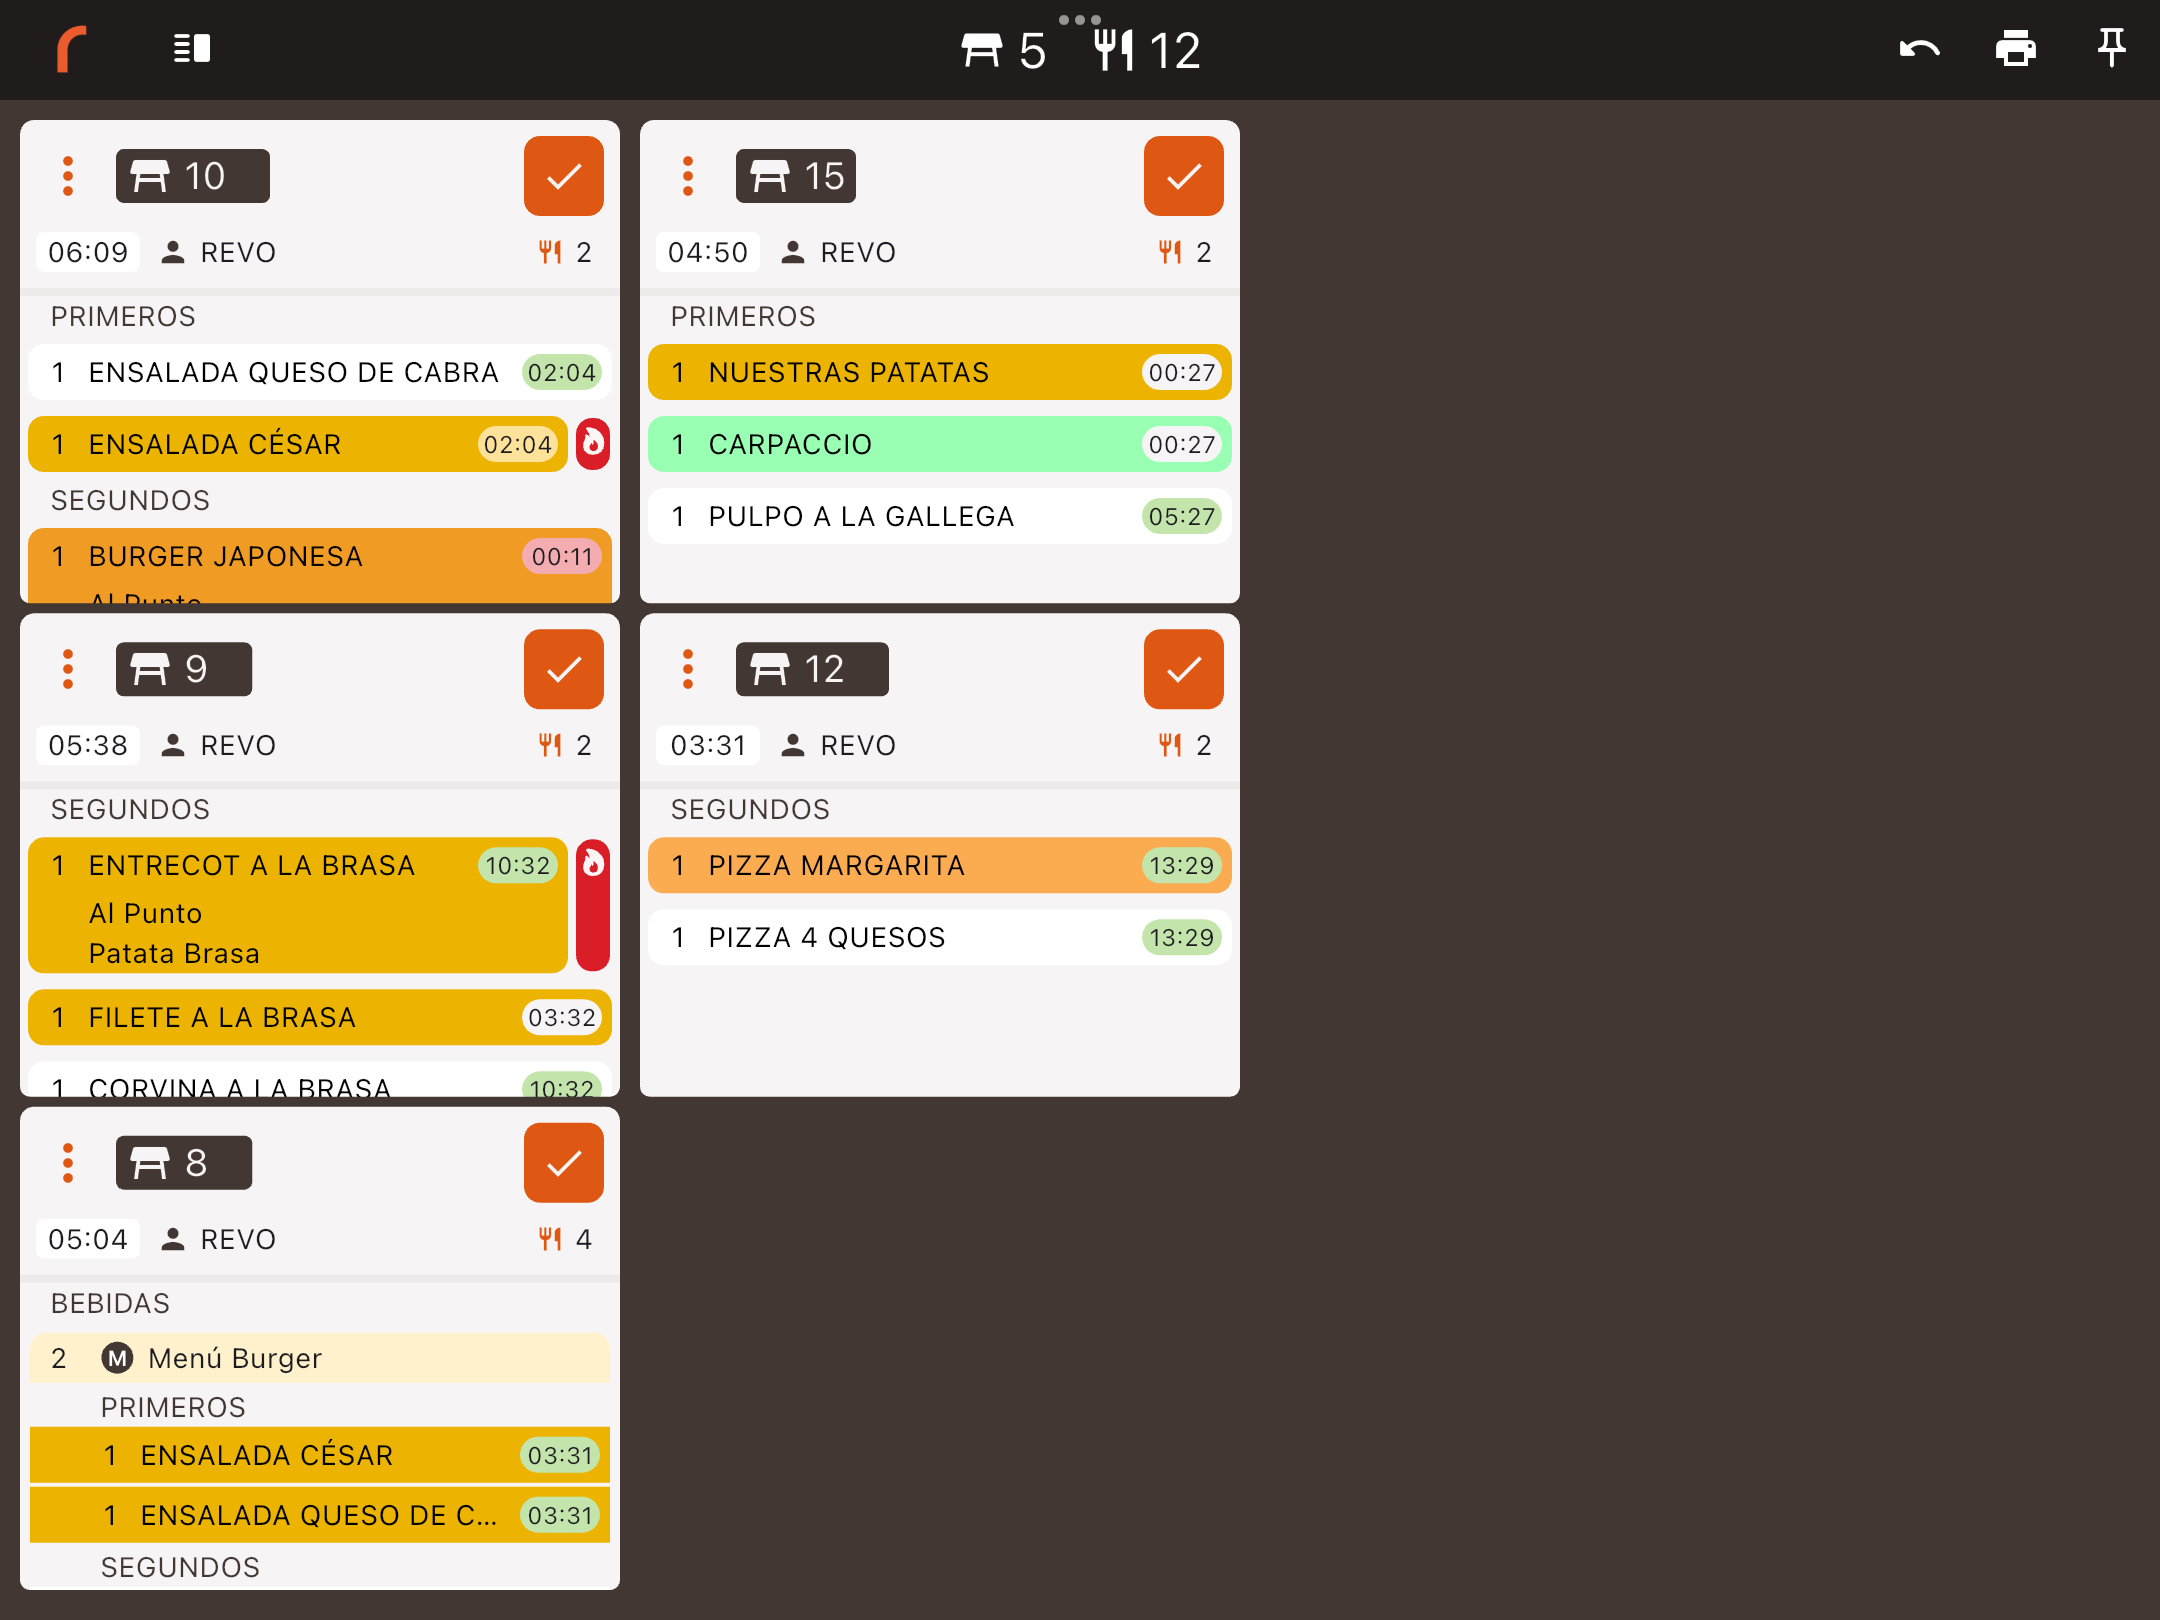
- Green: The dish must be in preparation.
- Yellow: There are only a few seconds left for the dish to be ready.
- Red: The dish has exceeded the cooking time.
- Light gray: The time remaining to start preparing the dish.
CONFIGURATION:
Products
First, we need to specify the cooking time for products and modifiers. These times can be configured in the product and modifier details. Enter the time in seconds. Example 180:
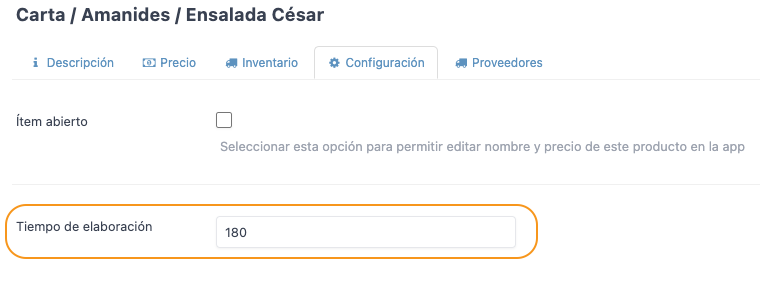
If you don't want to track the time for a product, simply leave it at zero.
Time Management
Time management is linked to a Dish Order and can be configured in the Time Management section within the KDS 2 area of the Revo XEF back office.

-
Active: Enabled.
-
Dish Order: The dish order to which the configuration is linked.
-
Start:
- Automatically upon arrival: The timer starts when the order arrives in the kitchen.
- When sent: The timer starts when a dish is sent.
- When put in progress: The timer starts when a product is set to progress.
-
Completing the previous dish order: The timer starts when the previous dish order is completely finished.
Note: We can configure more than one selection at a time. This way, we have multiple ways to start the cooking time.
-
Warning threshold: Configured as a percentage. This means the warning will appear when a percentage of the total cooking time is left. Example: If the threshold is set at 10% and the total time is 5 minutes (300 seconds), the warning will appear when 30 seconds are remaining. If the total time is 2 minutes (120 seconds), the warning will appear when 12 seconds are left. This change allows the warning to adjust proportionally to any cooking time.
-
Time management type:
- Start together: The timers for each dish start at the same time.
- Finish together: The timers for each dish start at the exact moment so that all finish at the same time.
Click Save to apply the configuration.
Note: We can only create one entry per dish order.
6. KDS 2 APP OPERATION
Once your iPad/Android MicroTouch Monitor is configured and the options are customized in the back office, follow these steps to use the KDS 2 app:
Open the KDS 2 app and enter your username and password for Revo XEF.
7.1. HEADER

1. REVO MENU: Tap the r to access the KDS 2 menu and actions.
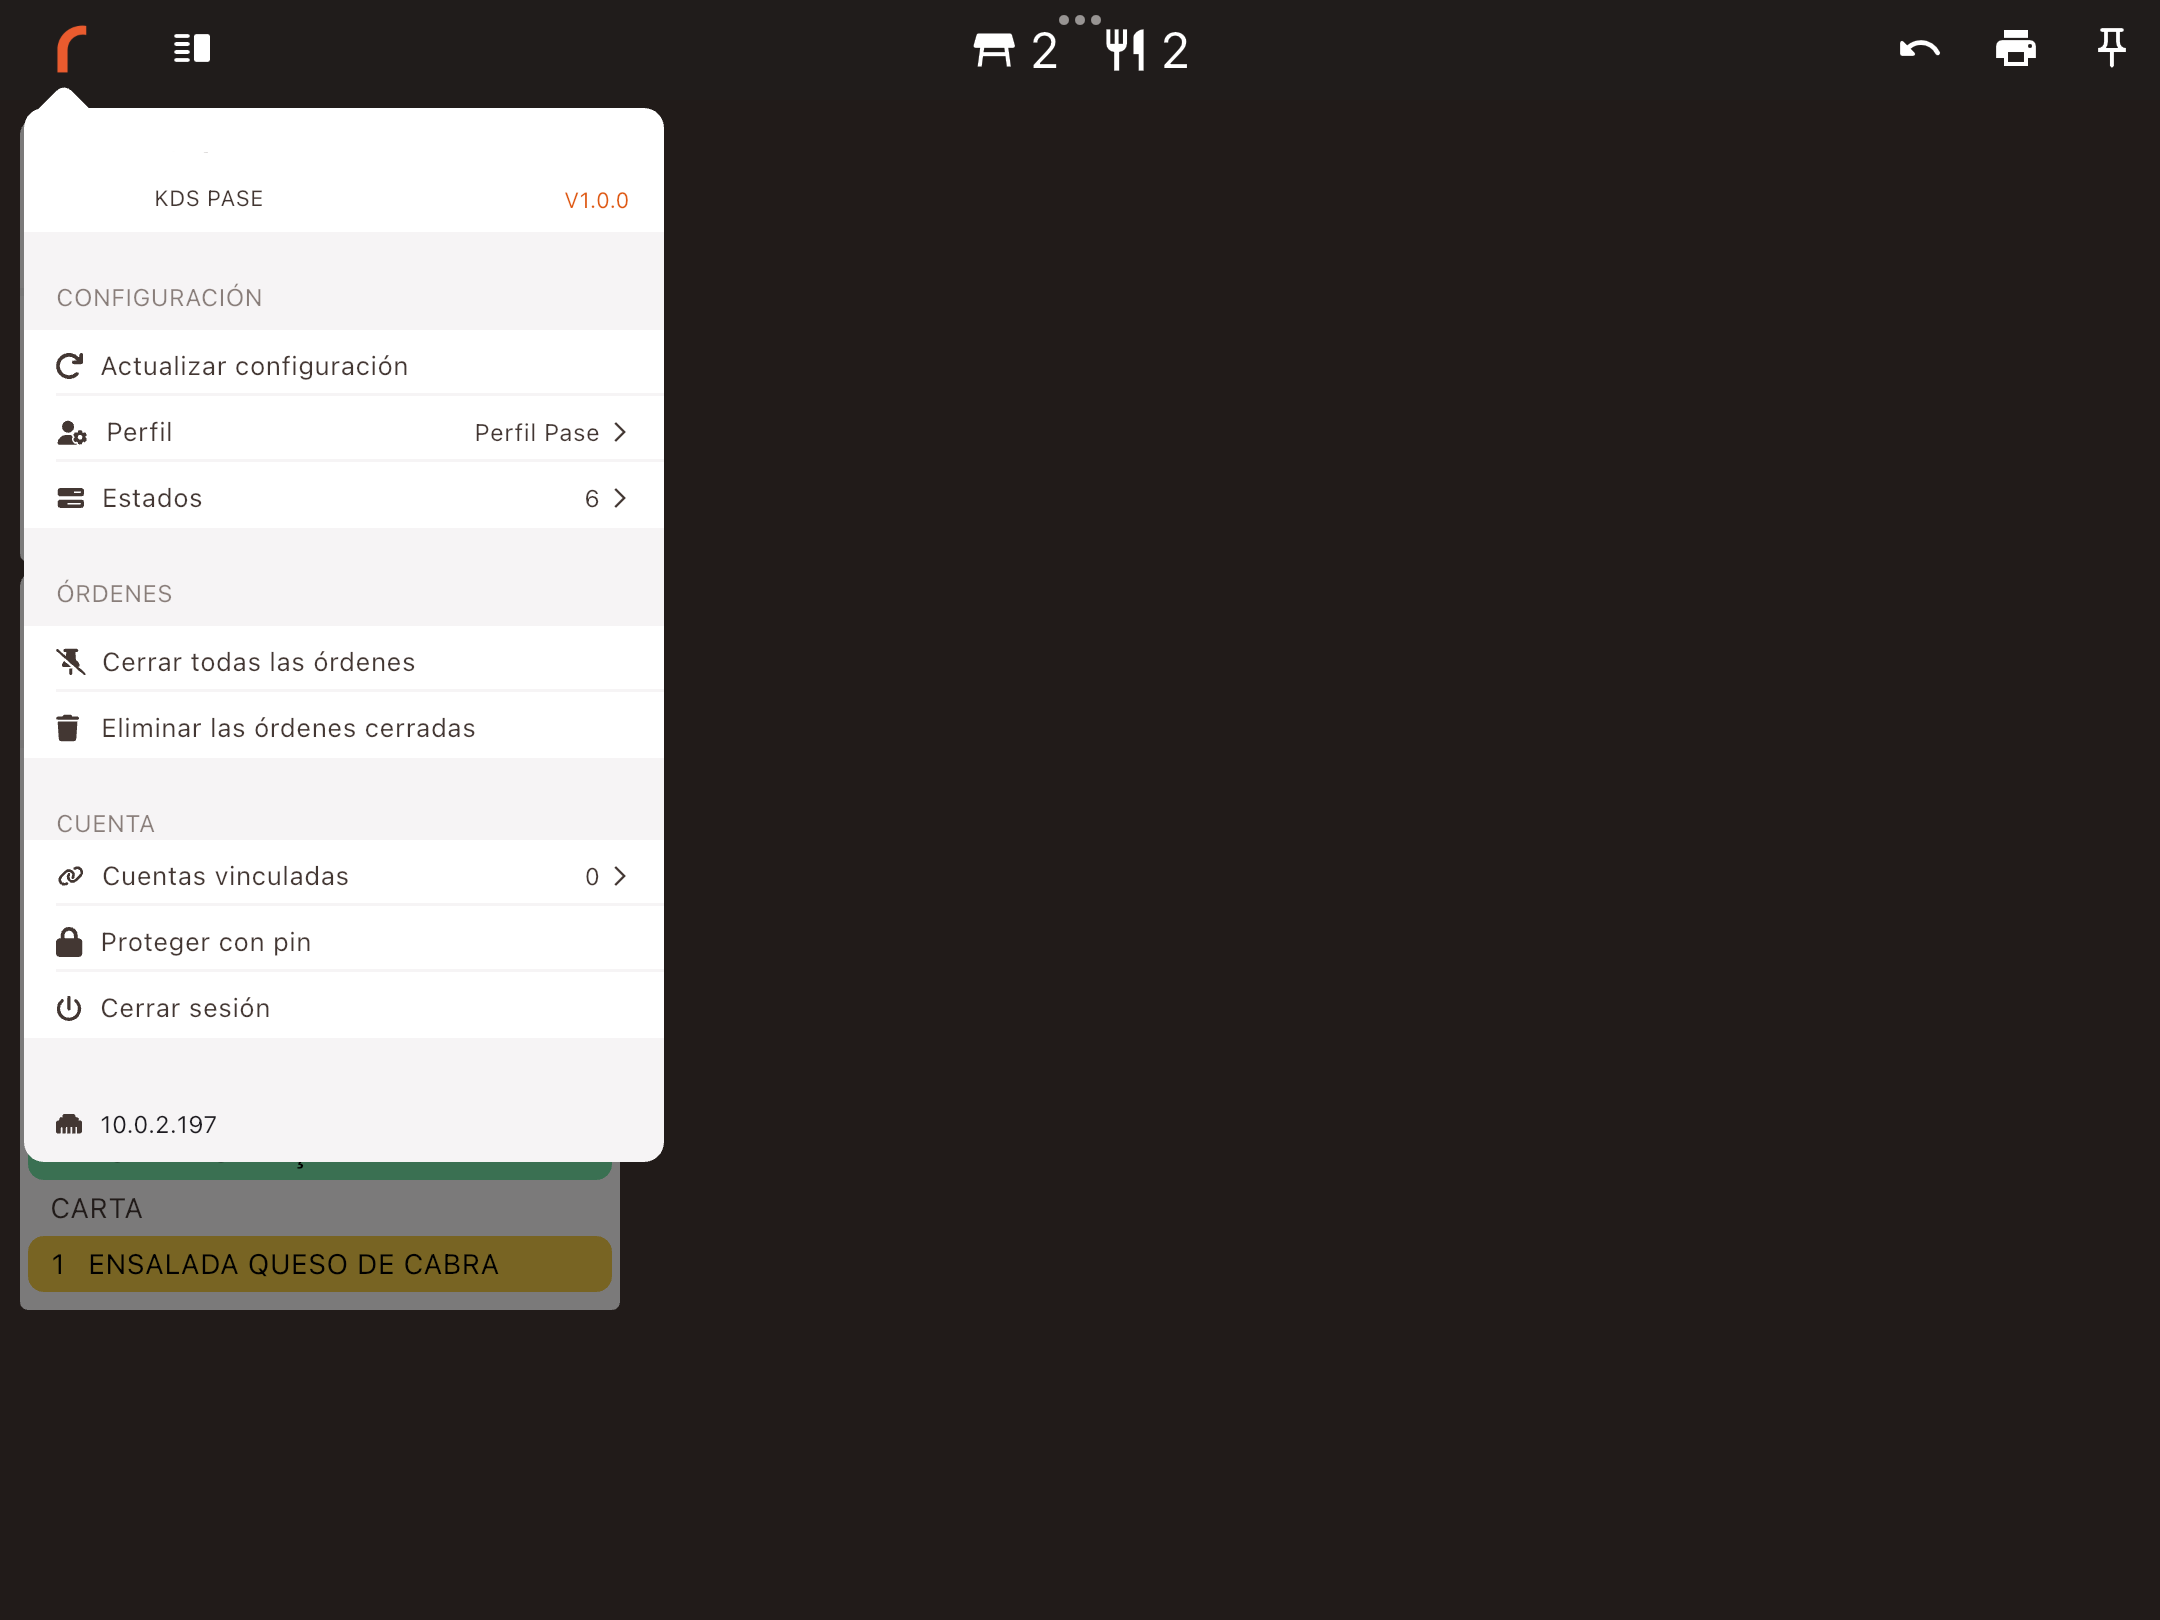
- Account: Your Revo XEF account.
- KDS Device: The name of the KDS 2 device associated with its IP address.
- Version: The version of Revo KDS 2 you are using.
CONFIGURATION
- Update configuration: Synchronizes the changes made in Revo KDS 2 from the Revo XEF back office.
- Profile: Select a profile from the back office.
- States: View the states you can see with the selected profile.
ORDERS
- Close all orders: Closes all open orders.
- Delete closed orders: Deletes the orders from the closed orders list.
ACCOUNT
- Accounts: Access your linked accounts.
- Pin protection: Add a pin for protection.
- Log out: Log out of your account.
- IP: Displays the current IP of the iPad or Android MicroTouch Monitor.
2. Filters: By default, orders arriving at the KDS are sorted by arrival order.
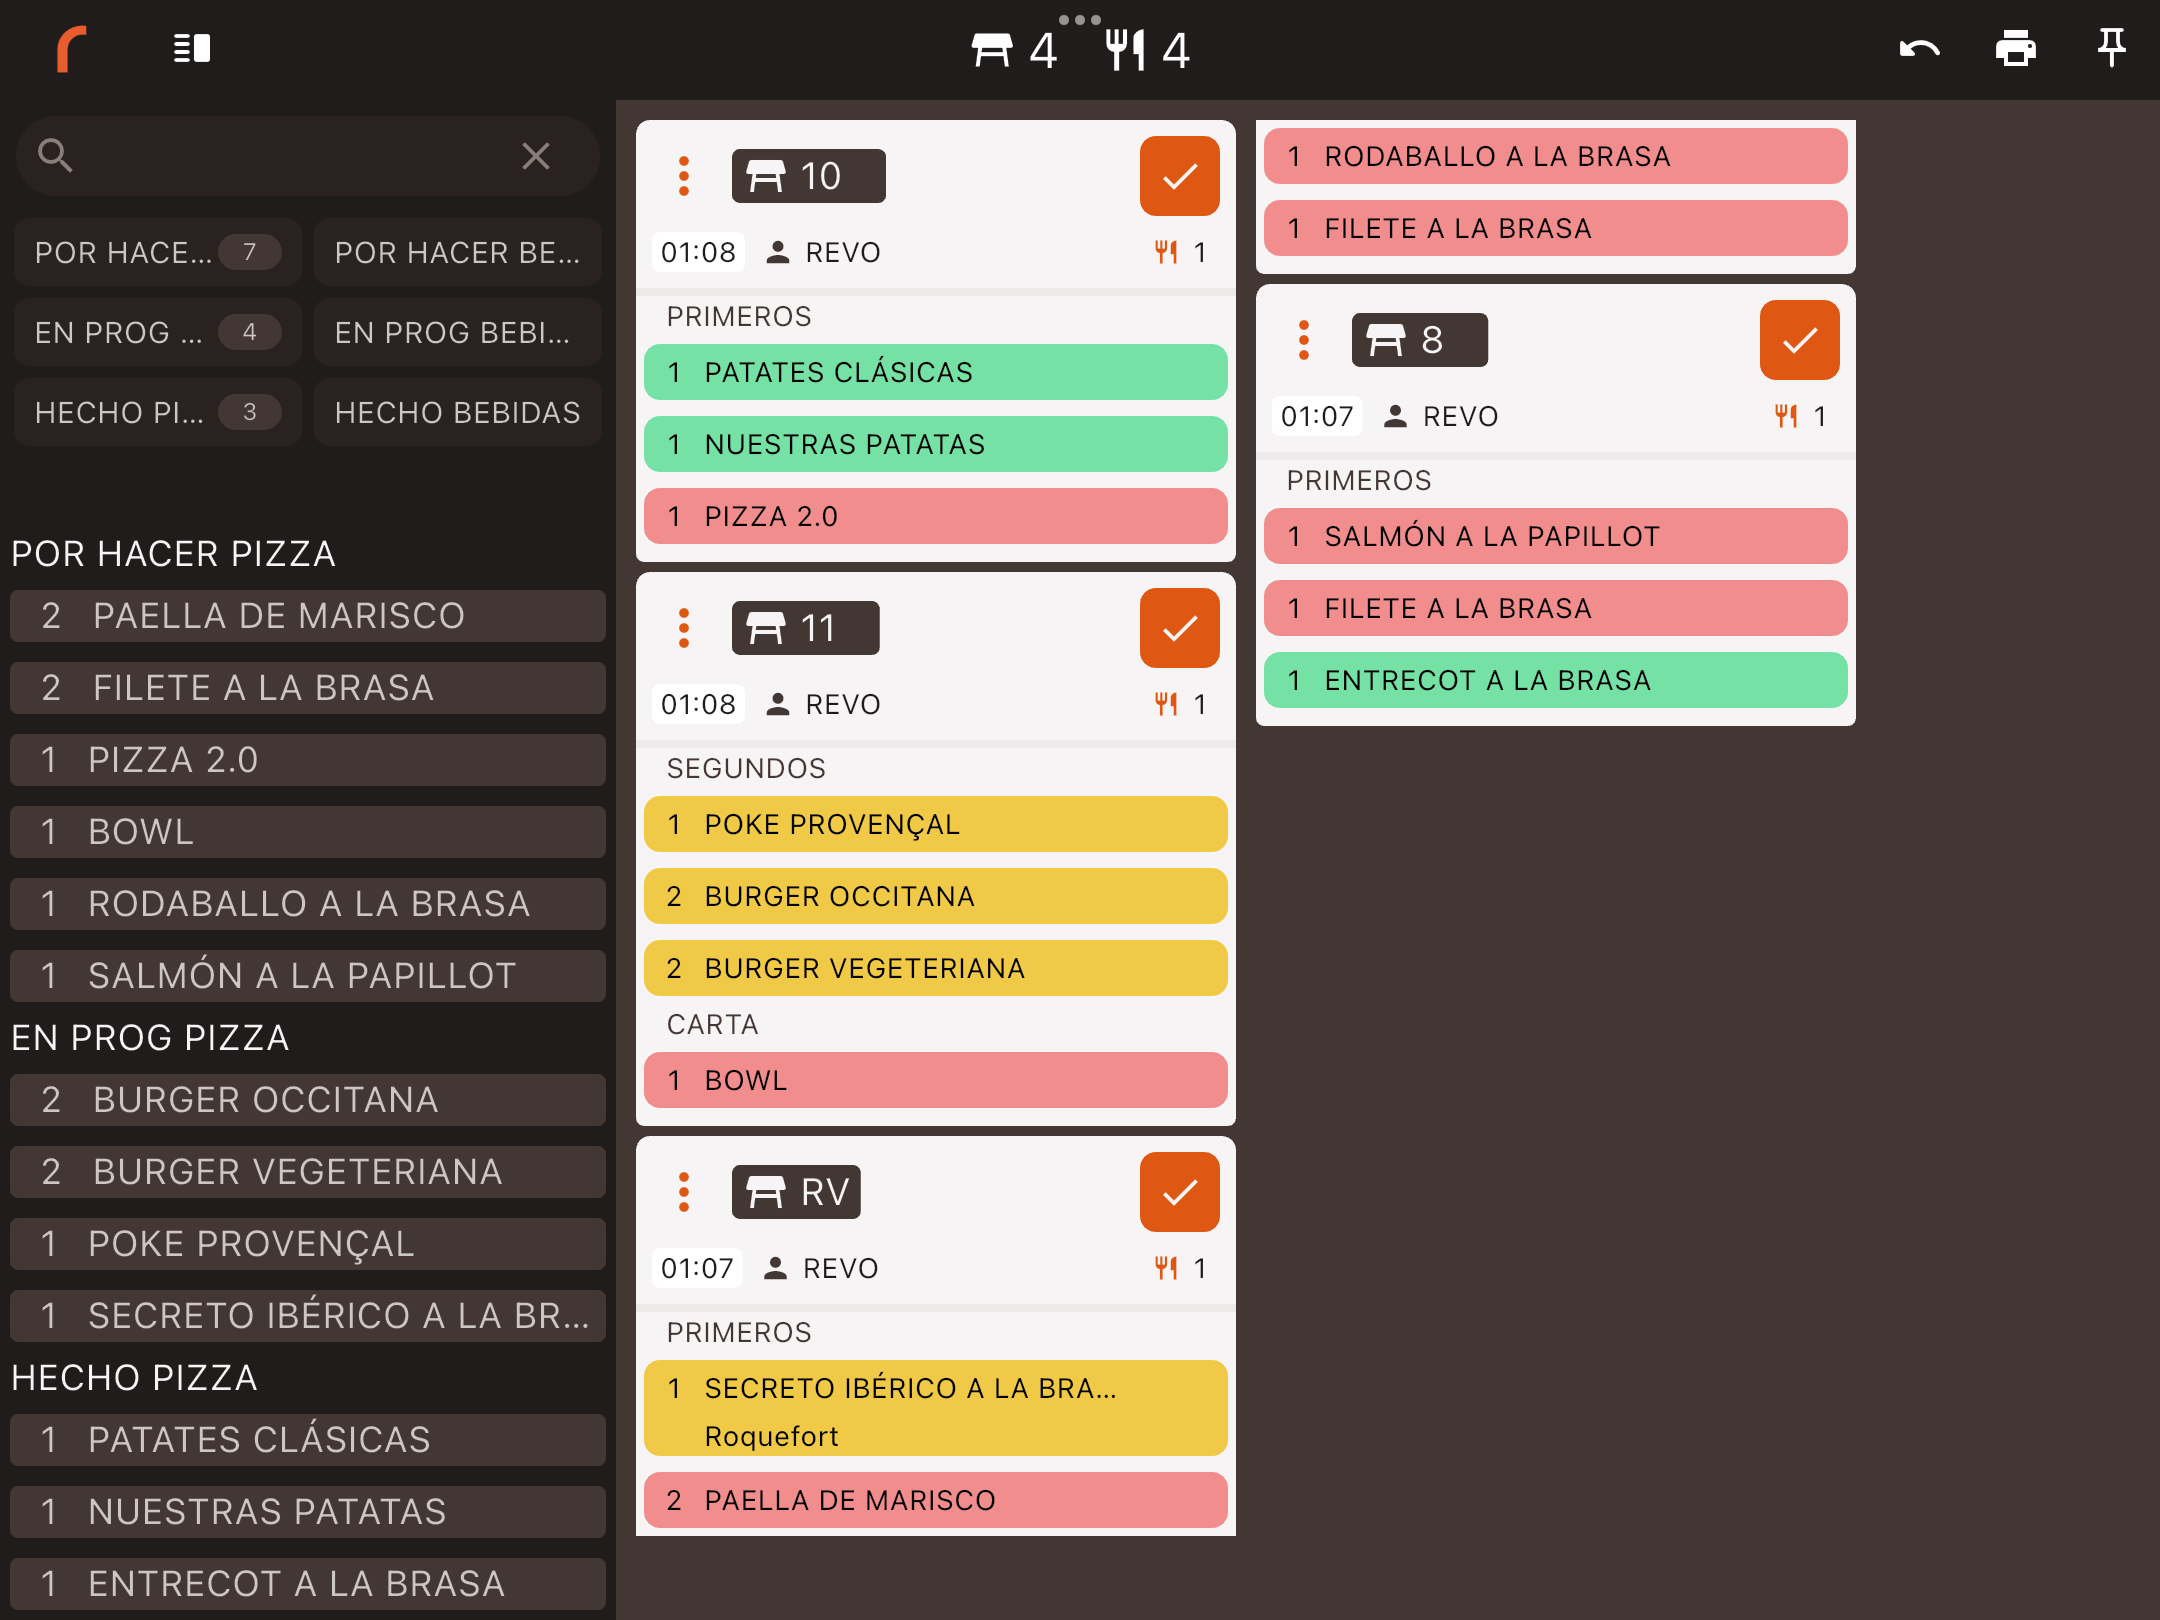
- Search: Search by table name, product, or order number.
- Status selector: We can filter by the states associated with the profile assigned in the Revo KDS 2 app. This way, we can see where each dish is in the flow. This selector allows multiple selections.
Once we apply the filter in the status selector, we will see all the dishes in that stage. By default, dishes will be sorted by quantity.
3. table_restaurant Total number of orders.
4. Total number of diners.
5. Undo: Reverts the last change.
Example: An order was closed by mistake or a dish was marked as "done".
6. Print: Prints the pass ticket.
Example: You receive an order with starters and main courses, mark them as completed, and want to print the pass ticket. Steps:
- Receive the order.
- Mark the dishes as completed.
- Click the icon
-
Pick up the printed pass ticket and place it next to the dishes.
This way, the waiter will know which table the dishes belong to without asking the cook.
It is essential that a printer is selected in the KDS 2 profile configuration.
Important: The pass ticket only works with printers that have ESC/POS drivers.
7. Closed Orders: Displays a list of all closed orders in the last 24 hours. You can view their contents and reopen them to send them again to the main screen.
6.2. ORDER ACTIONS
These are the actions you can perform with the orders:
-
Mark dishes: Tap on the products to change their status. When all the products of an order have gone through all the states, KDS 2 will ask if you want to close the order (This depends on the configuration we have for the option "Close automatically when finished").
-
Swipe through orders: Swipe from left to right to view all received orders.
-
Close order: There are two ways:
- Marking all dishes.
- Tapping on without marking the dishes. This action will automatically close the order on all KDS 2 devices.
-
View order number: Tap on the table name to view the order number. Tapping the order number will return to the table number view.
-
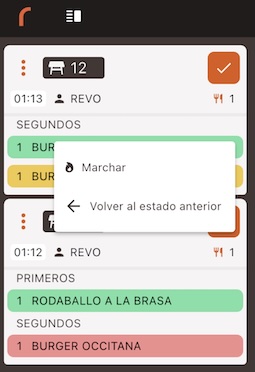
Send: Hold down a product and tap Send. This action will allow us to send a dish directly from the Revo KDS 2 app.
-
Return to the previous state: Hold down a product from an order and tap Return to previous state. If a product's state was changed by mistake, this action will allow us to revert to the previous state, even if other orders have been changed.
On the other hand, if we tap the three dots of an order, the following options will appear:
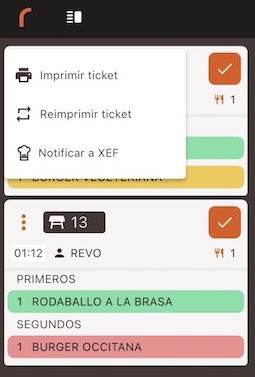
-
Print ticket: Prints the pass ticket for the selected order.
-
Reprint ticket: Reprints the pass ticket for the selected order.
Important: The pass ticket only works with printers that have ESC/POS drivers.
- Notify XEF: Sends a notification to Revo XEF indicating pending dishes. Tap the order header to send the notification. In Revo XEF, a red "chef hat" symbol will appear in the top left corner of the table.
6.3. ORDERS
In open orders, the following information is displayed:
- Table name.
- Employee who sent the order.
- Number of diners.
- Order number.
- Time when the order was received in the kitchen.
- Button to close the order.
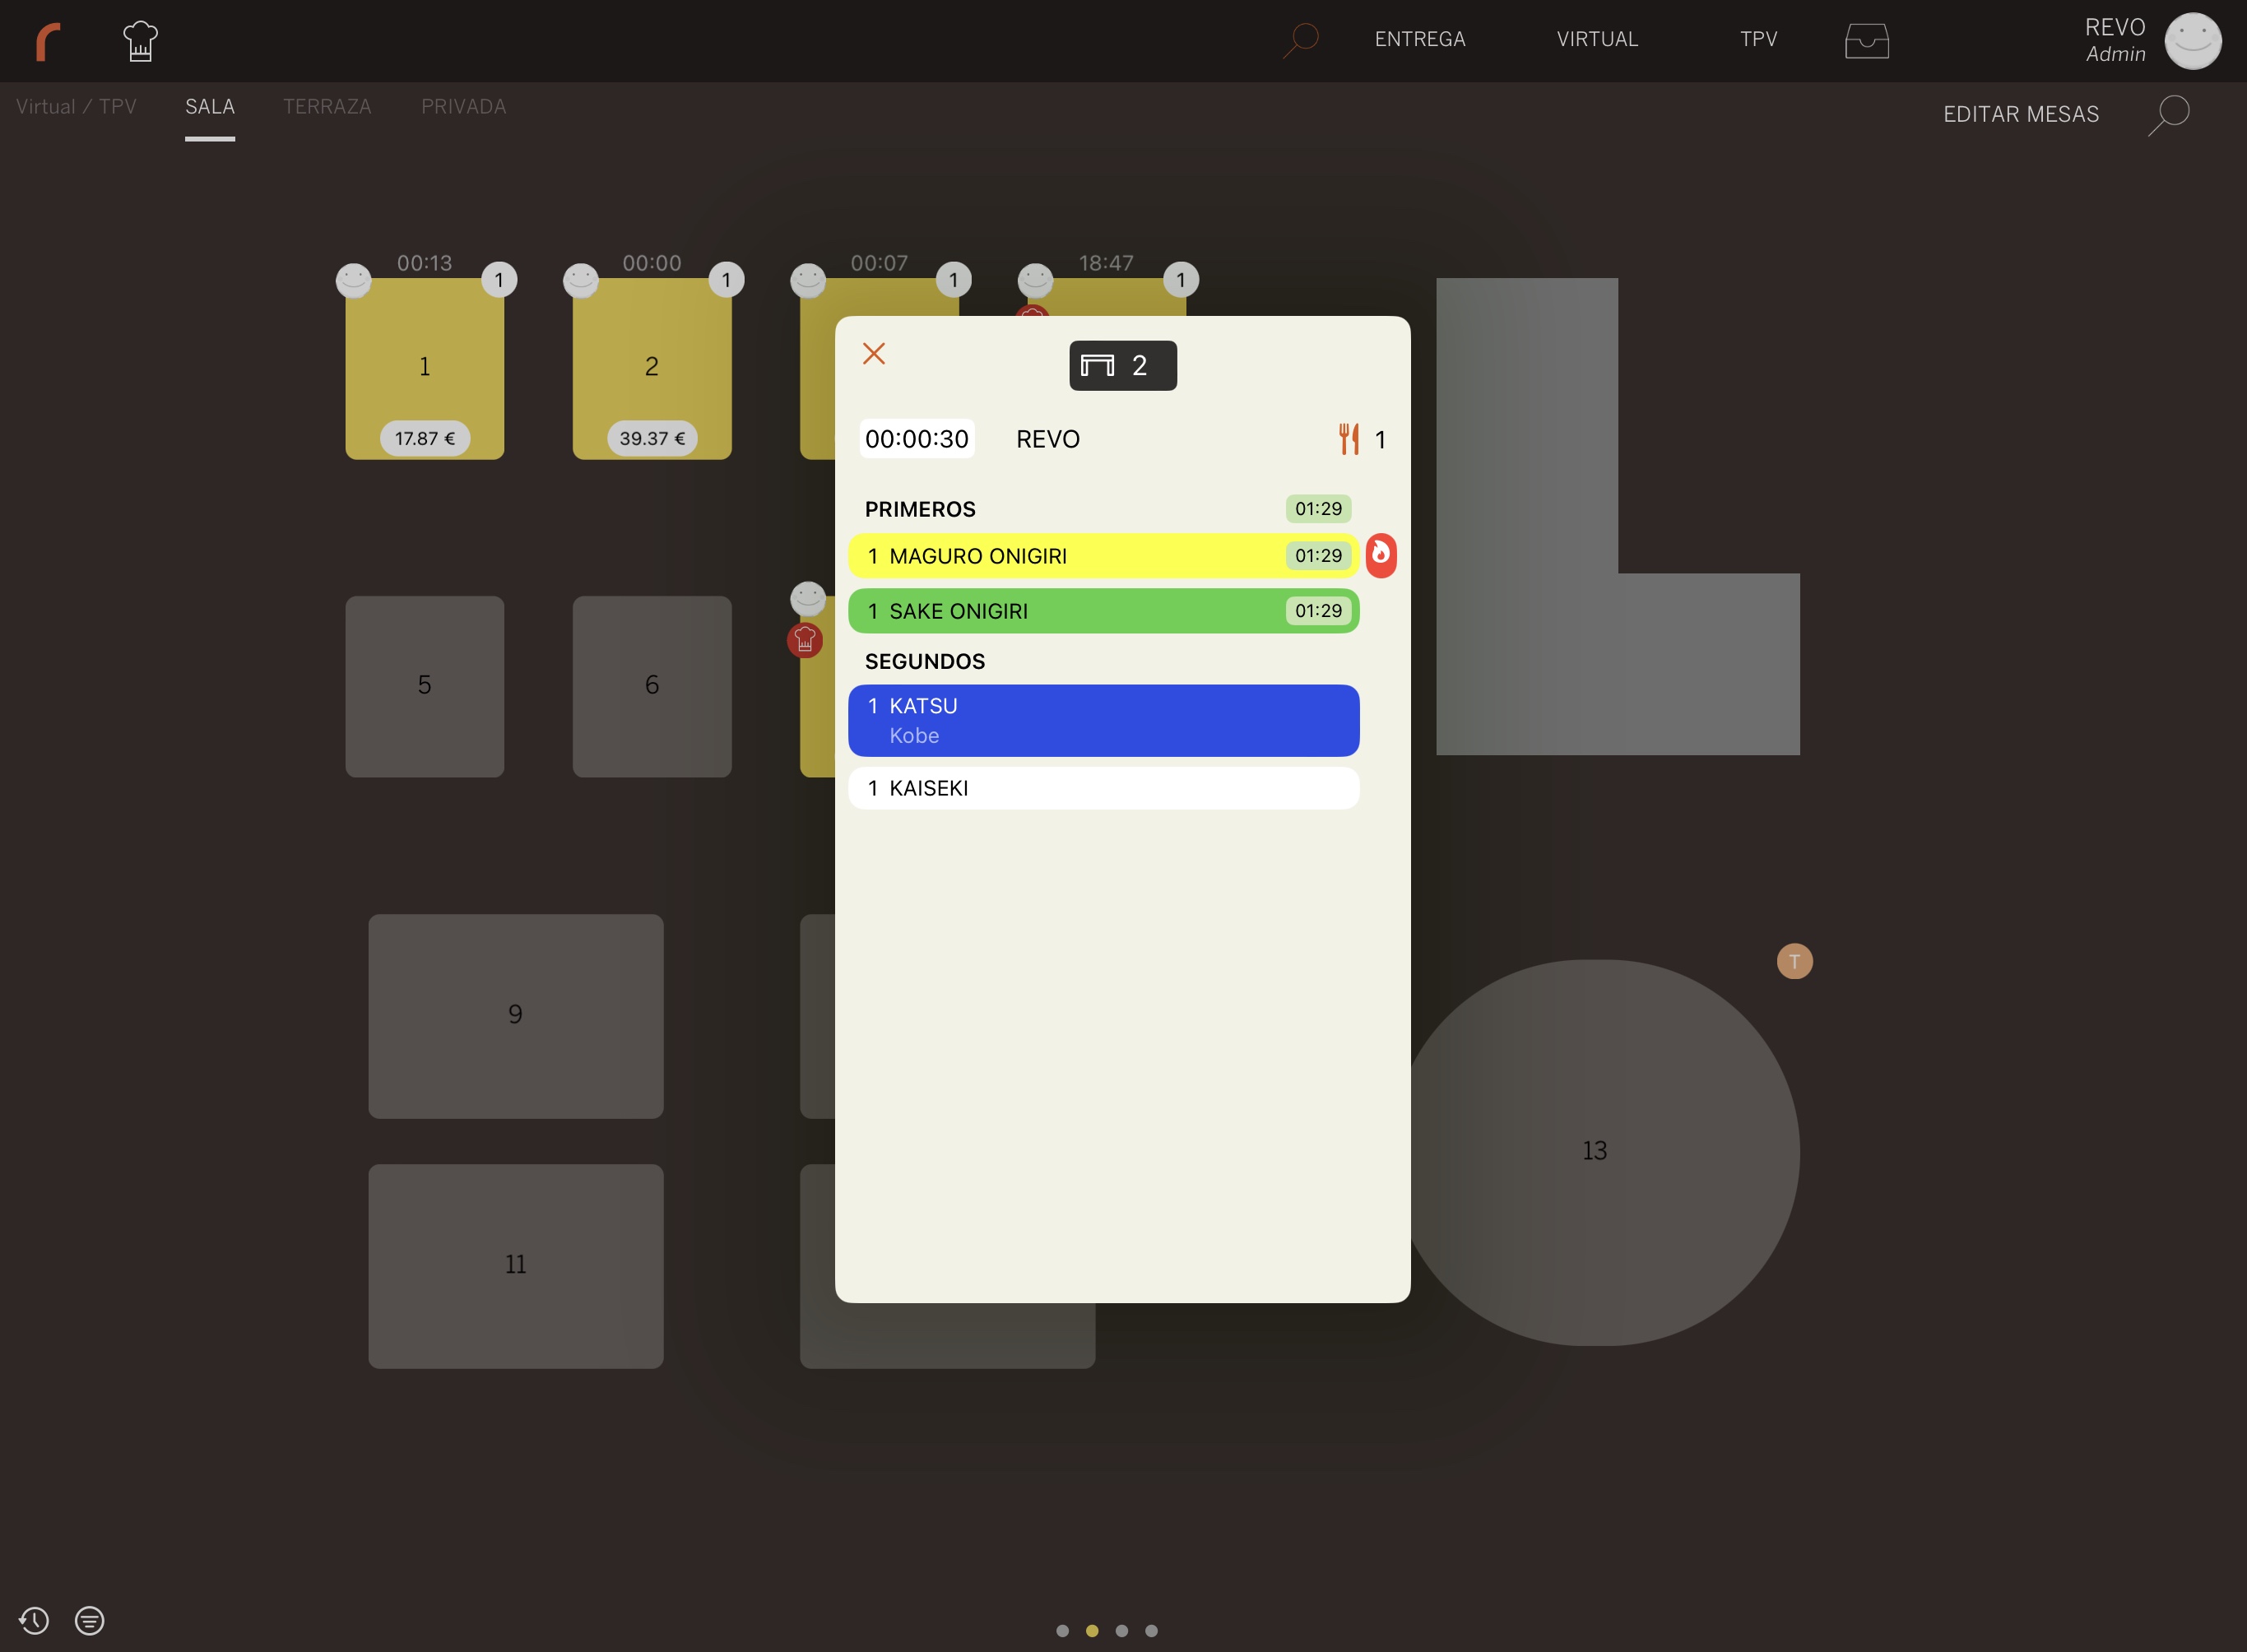
7. CHECK THE STATUS OF DISHES IN THE CEGID REVO XEF APP
To improve the customer experience, we have incorporated a new feature in the Cegid Revo XEF app that allows waiters to always know the status of dishes in the kitchen through Cegid Revo KDS 2.
Thanks to this feature, the front-of-house team can visualize the progress of each order without having to directly consult the kitchen, optimizing communication, reducing waiting times, and improving service coordination. This results in a smoother and more efficient experience for both staff and customers.
To use this feature:
1. On the table layout screen, swipe down on an occupied table, and a menu with several options will appear.
2. Tap on the action View KDS Status.

A new window will automatically open, allowing us to view the status of all dishes in the order: