
STATUS: ACTIVE
VERSION: 3.2
1. WHAT IS OPERA CLOUD (OHIP) 2. HOW THE INTEGRATION BETWEEN OPERA CLOUD (OHIP) <-> REVO WORKS 3. CONFIGURATION IN REVO 4. HOW TO POST A ROOM CHARGE 5. HOW TO CANCEL A ROOM CHARGE
1. WHAT IS OPERA CLOUD (OHIP)
OPERA CLOUD (OHIP) is a complete PMS for hotels.
With this software, you can organize hotel operations, manage guest preferences, inventory, and rates, adapt to constant changes, and keep data secure. That’s why Oracle Hospitality created OPERA Cloud Property Management.
It is designed for all types of hotels and works in the cloud. It’s ideal for you and your team to work from anywhere, improve check-in and check-out, and be more efficient thanks to real-time updates.
You can find more information about OPERA CLOUD (OHIP) here.
2. HOW THE INTEGRATION BETWEEN OPERA CLOUD (OHIP) <-> REVO WORKS
Thanks to this integration, you can use one of the most innovative PMS systems with REVO. This way, you can easily connect your bars, restaurants, and points of sale with the hotel system, offering a modern and seamless experience to your customers.
The OPERA CLOUD (OHIP) <-> REVO integration connects two Cloud systems so you can:
- Post consumption charges directly from REVO to the guest’s room.
- Transfer daily revenue (cash, card, etc.) to the PMS.
- Search for guests.
3. CONFIGURATION IN REVO
INTEGRATION SETUP
1. Log in to the back-office of Revo XEF.
2. Go to Integrations / INTEGRATIONS.
3. Click on + New, search for OPERA CLOUD (OHIP) and select + Add.
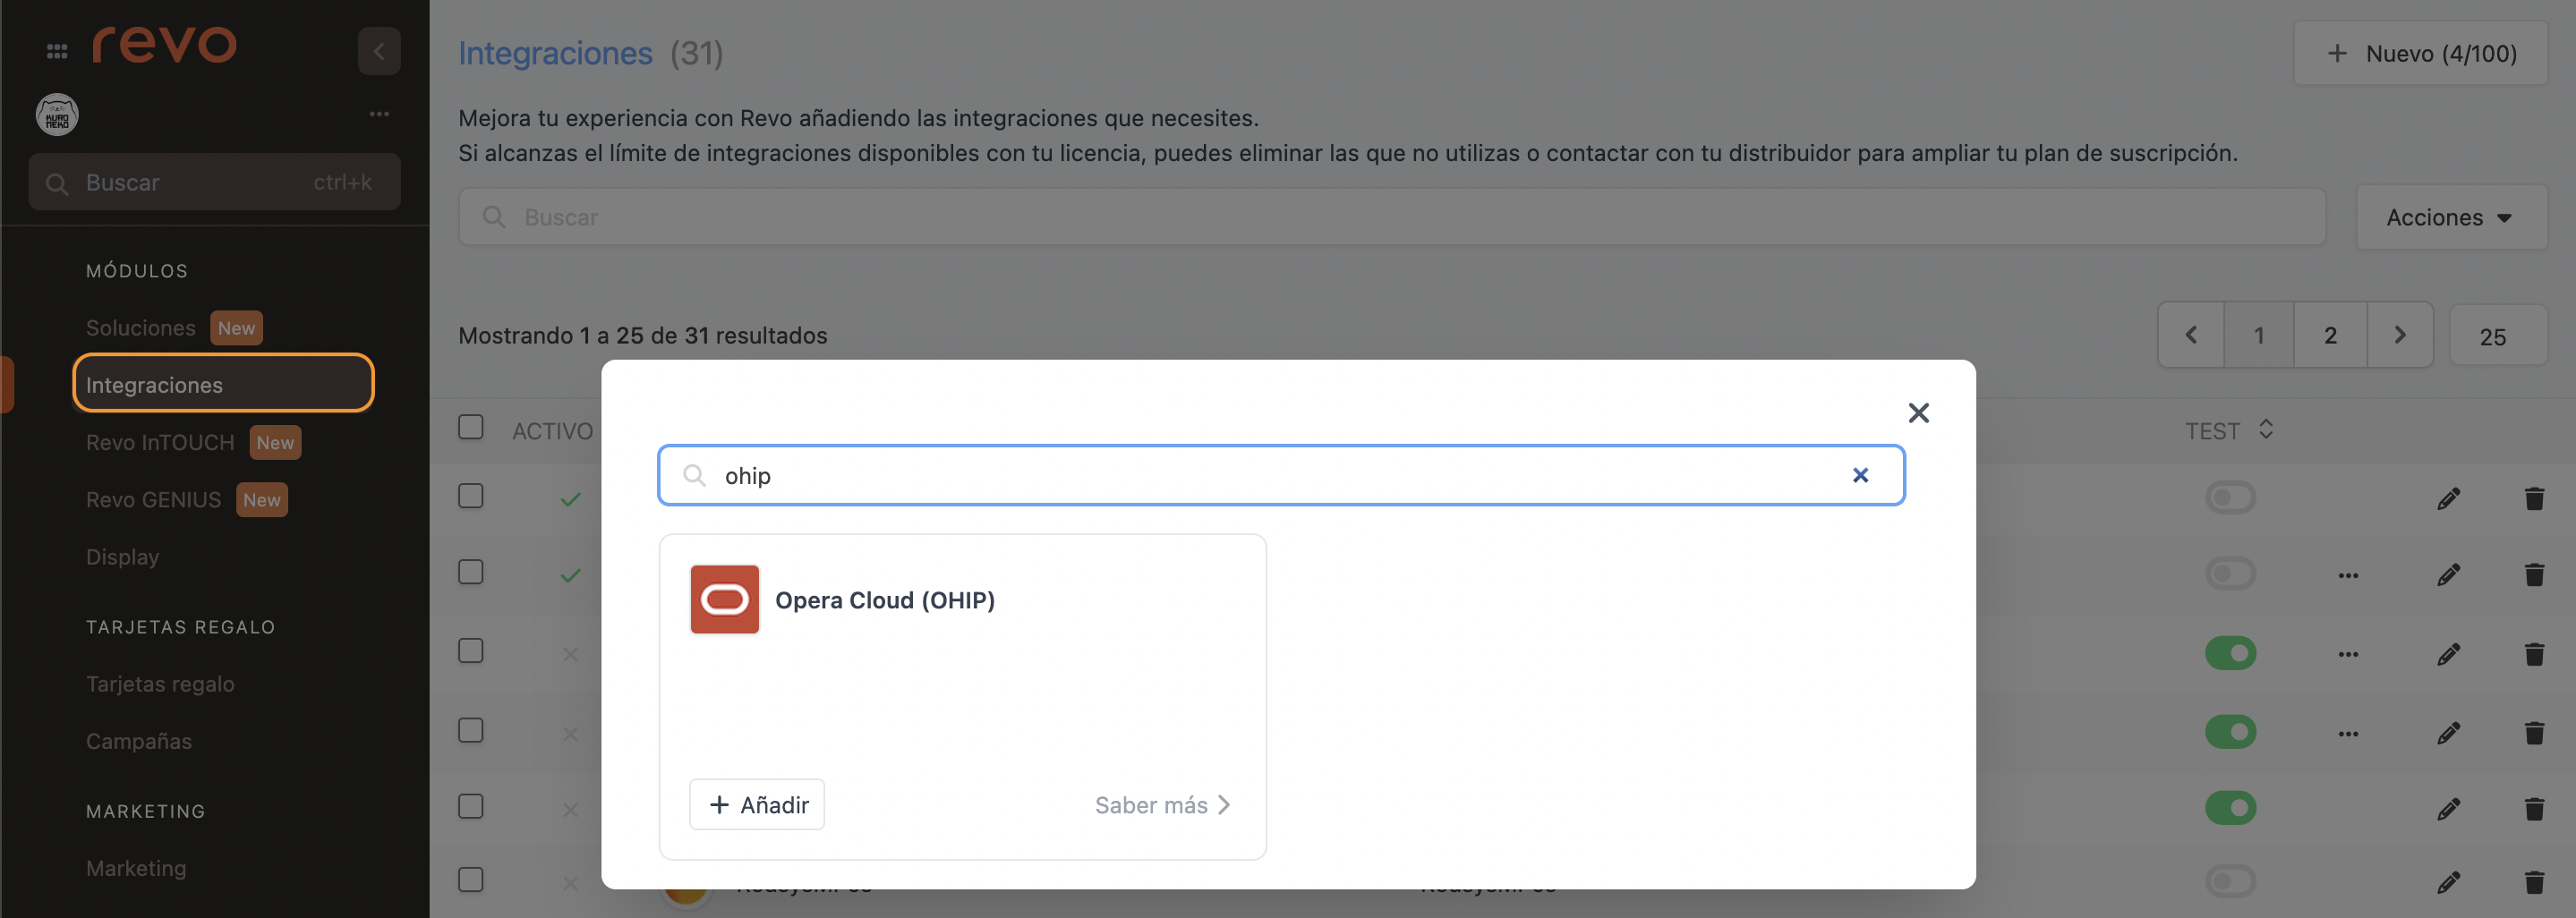
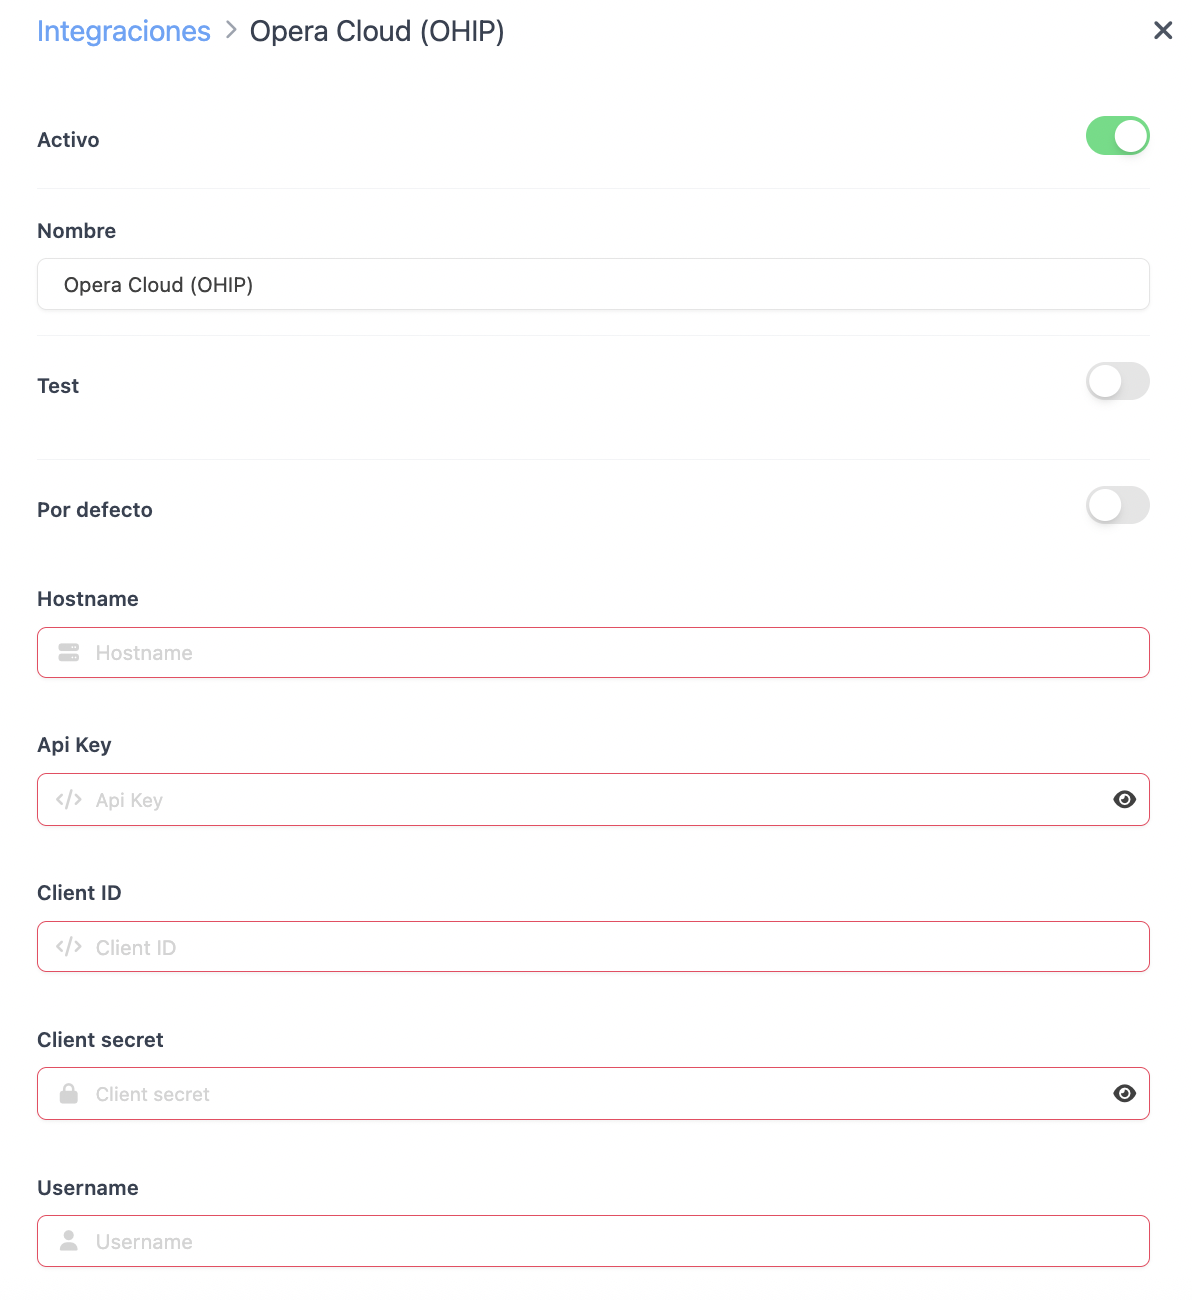
4. Fill in the information.
-
Active:
-
Name: Choose an identifying name.
-
Test: Disabled.
DATA OBTAINED FROM THE DISTRIBUTOR
-
Api Key
-
Username
-
Password
DATA PROVIDED BY REVO
-
Hostname
-
Client ID, Client secret – always the same
-
Gateway URL
DATA PROVIDED BY THE HOTEL
-
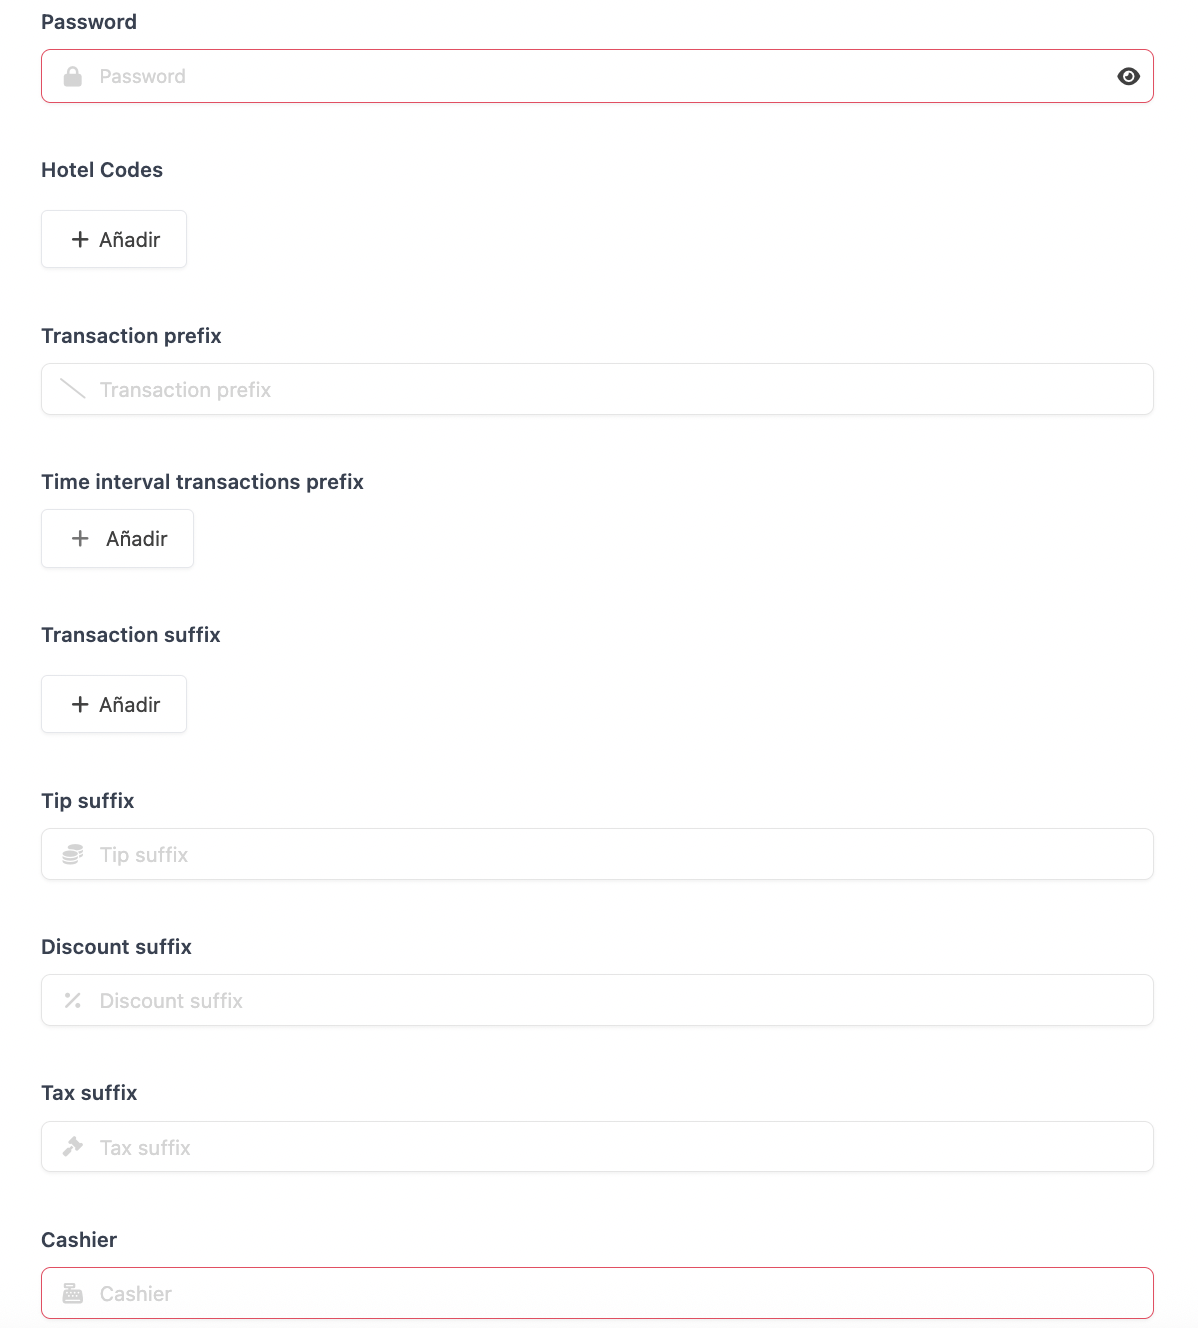
Hotel Codes: Add the hotel code in OHIP and a name. You can add several.
-
Transaction prefix: Prefix for TRX for the point of sale.
-
Time Interval transaction prefix: Define a different TRX prefix by time slot (breakfast, lunch, dinner).
-
Transaction suffix: TRX suffix based on product type (general group).
-
Tip suffix: TRX suffix for tips (can be a full 4-digit TRX code).
-
Discount suffix: TRX suffix for discounts (can be a full 4-digit TRX code).
-
Tax suffix: TRX suffix for taxes (can be a full 4-digit TRX code).
-
Cashier: Cashier code in OHIP.
-
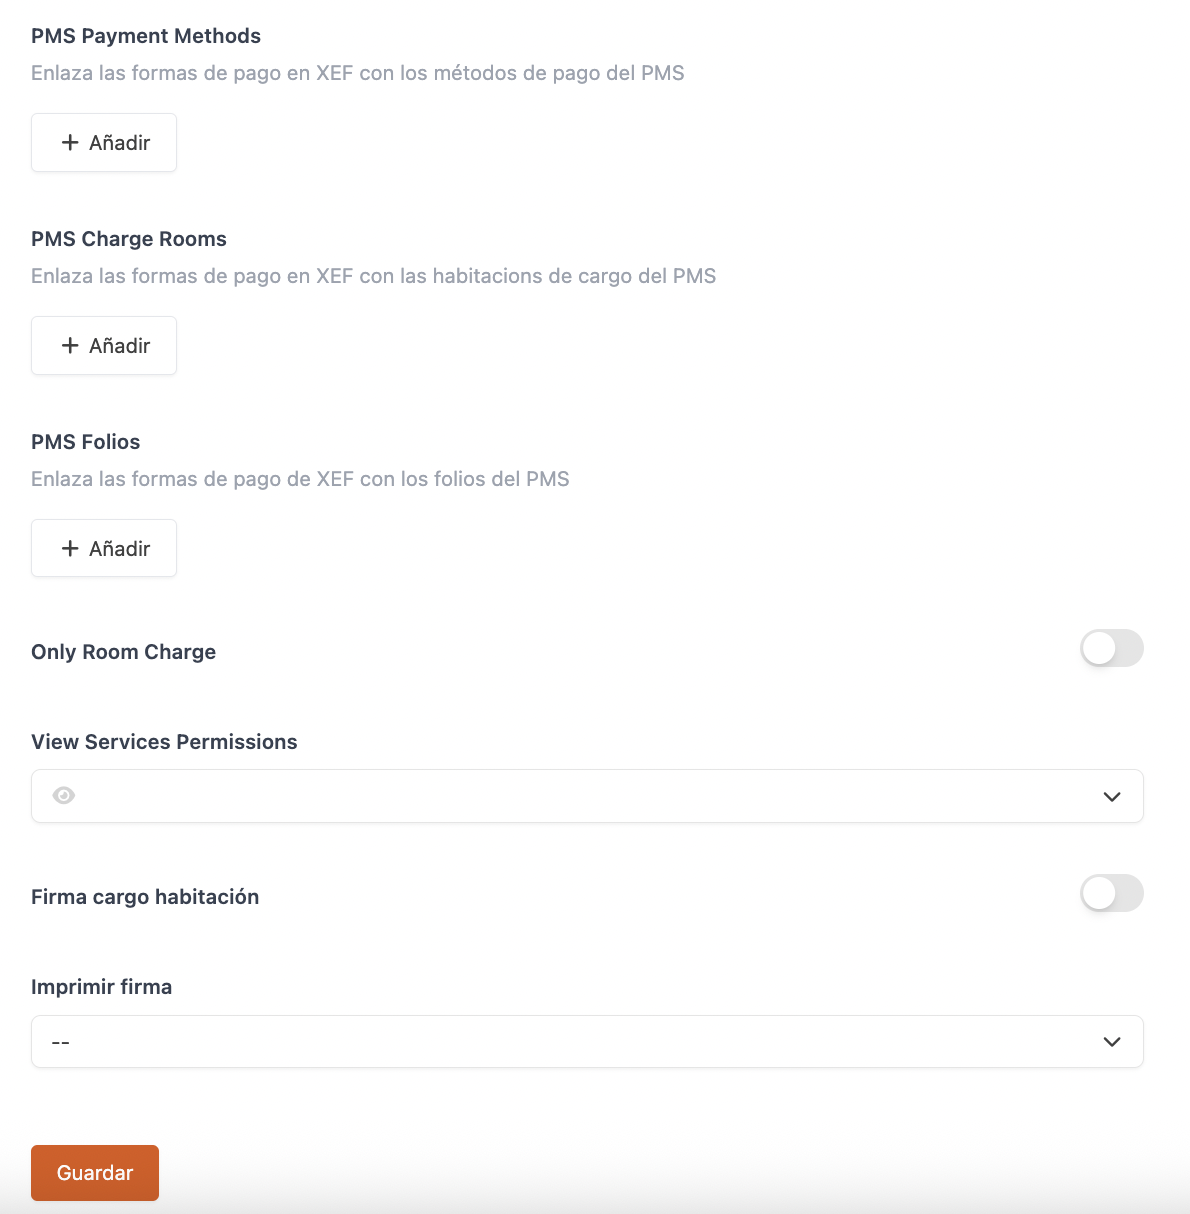
PMS Payment Methods: Mapping of additional payment methods to be sent to OHIP. Indicate the payment method code in OHIP.
-
PMS Charge Rooms: Room for additional payment methods to be sent to OHIP.
-
PMS Folios: Folio number for additional payment methods to be sent to OHIP.
These three data points must be related. Enter uniform values for the additional payment methods. Only required when “Only room charge” is unchecked.
-
Only Room Charge: Enable if you only want to send room charges.
-
View Services Permissions: Choose which profiles will see the “PMS” button.
-
Room Charge Signature: Enable to request room charge signature.
-
Print signature: Choose whether to print it.
6. Click Save.
Using the information provided by the hotel chain, we must follow these 5 steps to incorporate the chain into OHIP:
1. Set up an integration user to access the chain (Distributor).
2. Approval of the integration user property (Hotel chain’s responsibility).
3. Partner verifies integration user access (Distributor).
4. Add a property environment to the developer portal (Revo).
5. Access the environment credentials (Revo).
Create integration user
To create the access user for OHIP, we will need the following data: SSD URL, region (usually Frankfurt), CHAIN CODE (or tenant) and HOTEL ID.
1. Set up an integration user for the chain
Using the URL provided by the chain, edit it to include ?apiuser=Y
- It should look like this (note: it will look slightly different for Production vs Non-Production environment)
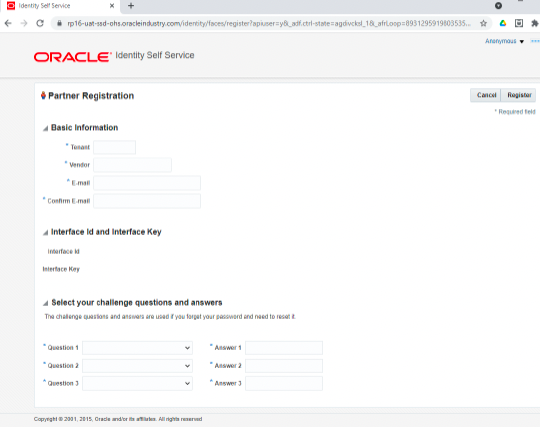
https://he13-ssd-ohs.oracleindustry.com/identity/faces/register?apiuser=Y
Note: Build the URL with “SSD URL” + “?apiuser=y” (typically) https://he13-ssd-ohs.oracleindustry.com/identity/faces/register?apiuser=Y
Fill out the form using the data collected from the property
-
Tenant = The tenant is provided by the client (CHAIN CODE).
-
Vendor = The vendor is -> REVO+HOTEL ID. Example: "REVOHHHH".
-
E-mail = Enter an email address.
-
Confirm E-mail = Repeat the email above.
-
It asks for 3 questions, select questions and answers.
Note: Before confirming the screen, copy the values INTERFACE ID + INTERFACE KEY which will be Username + password (DO NOT LOSE THEM)
- This triggers a request to the hotel chain administrator for approval.
Notes:
-
The Interface ID is often referred to as the Integration User ID.
-
The Interface Key is often called the Integration Password.
Integration user approval
2. The hotel chain administrator approves the user
-
Once the above steps are done, you must ask the hotel to activate the user in their OHIP (they will have received an email). They must log in to the SSD, locate the integration user request, claim it, and approve that user.
-
Here the chain administrator can also confirm that the WSACCESS role is assigned to the newly created integration user.
- We will explain to the user an issue with ORACLE to keep in mind:
ATTENTION. There is a bug in ORACLE and this must be done:
To fix the issue, do the following in sequence:
Contact the client who has access to their SSD and provide them with your integration user.
1. Go to SSD and remove the attached WSACCESS role.
2. Check if the WSACCESS role has been removed.
3. Go to User and re-attach the WSACCESS role (Only WSACCESS at chain level).
4. Verify if the WSACCESS role is attached.
5. Reset the password.
6. Now try using the new password to generate a new token followed by an API call.
Verify integration user
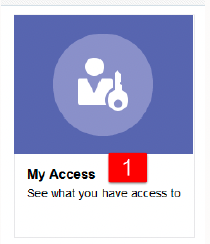
3. The distributor can log in to OHIP and verify that the integration user has the correct role assigned - CHAINCODE-WSACCESS
-
Using the SSD URL from the hotel chain, log in with the Username and Password we just created.
-
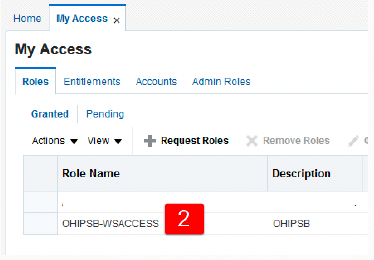
Click on "My Access".
-
Now we will see the roles assigned to your integration user; it should display "CHAINCODE-WSACCESS".
-
If we do not see the assigned role, we will request that the hotel chain administrator add this role to our integration user.
Add chain environment and access environment credentials
Finally, once the above steps are completed, the first time we connect to a chain, it is necessary to create the Production environment in the Oracle Development Portal.
For this step, we will contact the Revo team to add the chain’s environment to the developer portal and review the necessary credentials for correct authentication and OHIP access for the chain.
Important: Open a ticket to Revo requesting these steps and provide them with the Username (obtained in the previous step) and the region so they can complete the process.
PAYMENT METHOD CONFIGURATION
1. Go to Settings / PAYMENT METHODS.
2. It will have been created automatically. You can edit it by clicking .
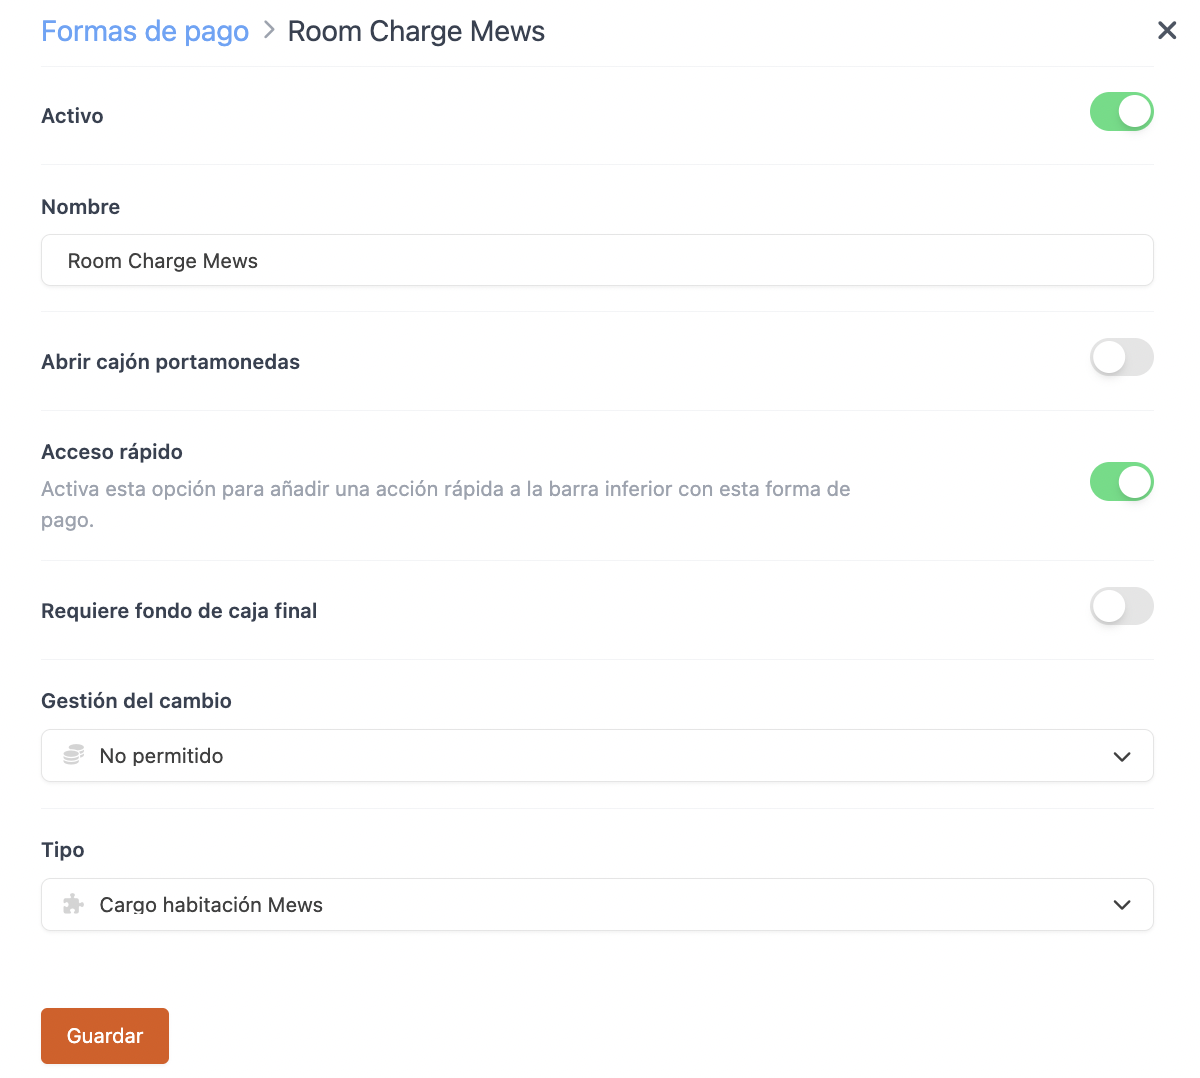
-
Active:
-
Name: Opera.
-
Open cash drawer:
-
Quick access: Enable if you want quick access.
Requires Revo XEF Advance.
-
Requires end-of-day cash balance: Enable if needed.
-
Change management: Not allowed.
-
Type: Opera room charge.
4. Click Save.
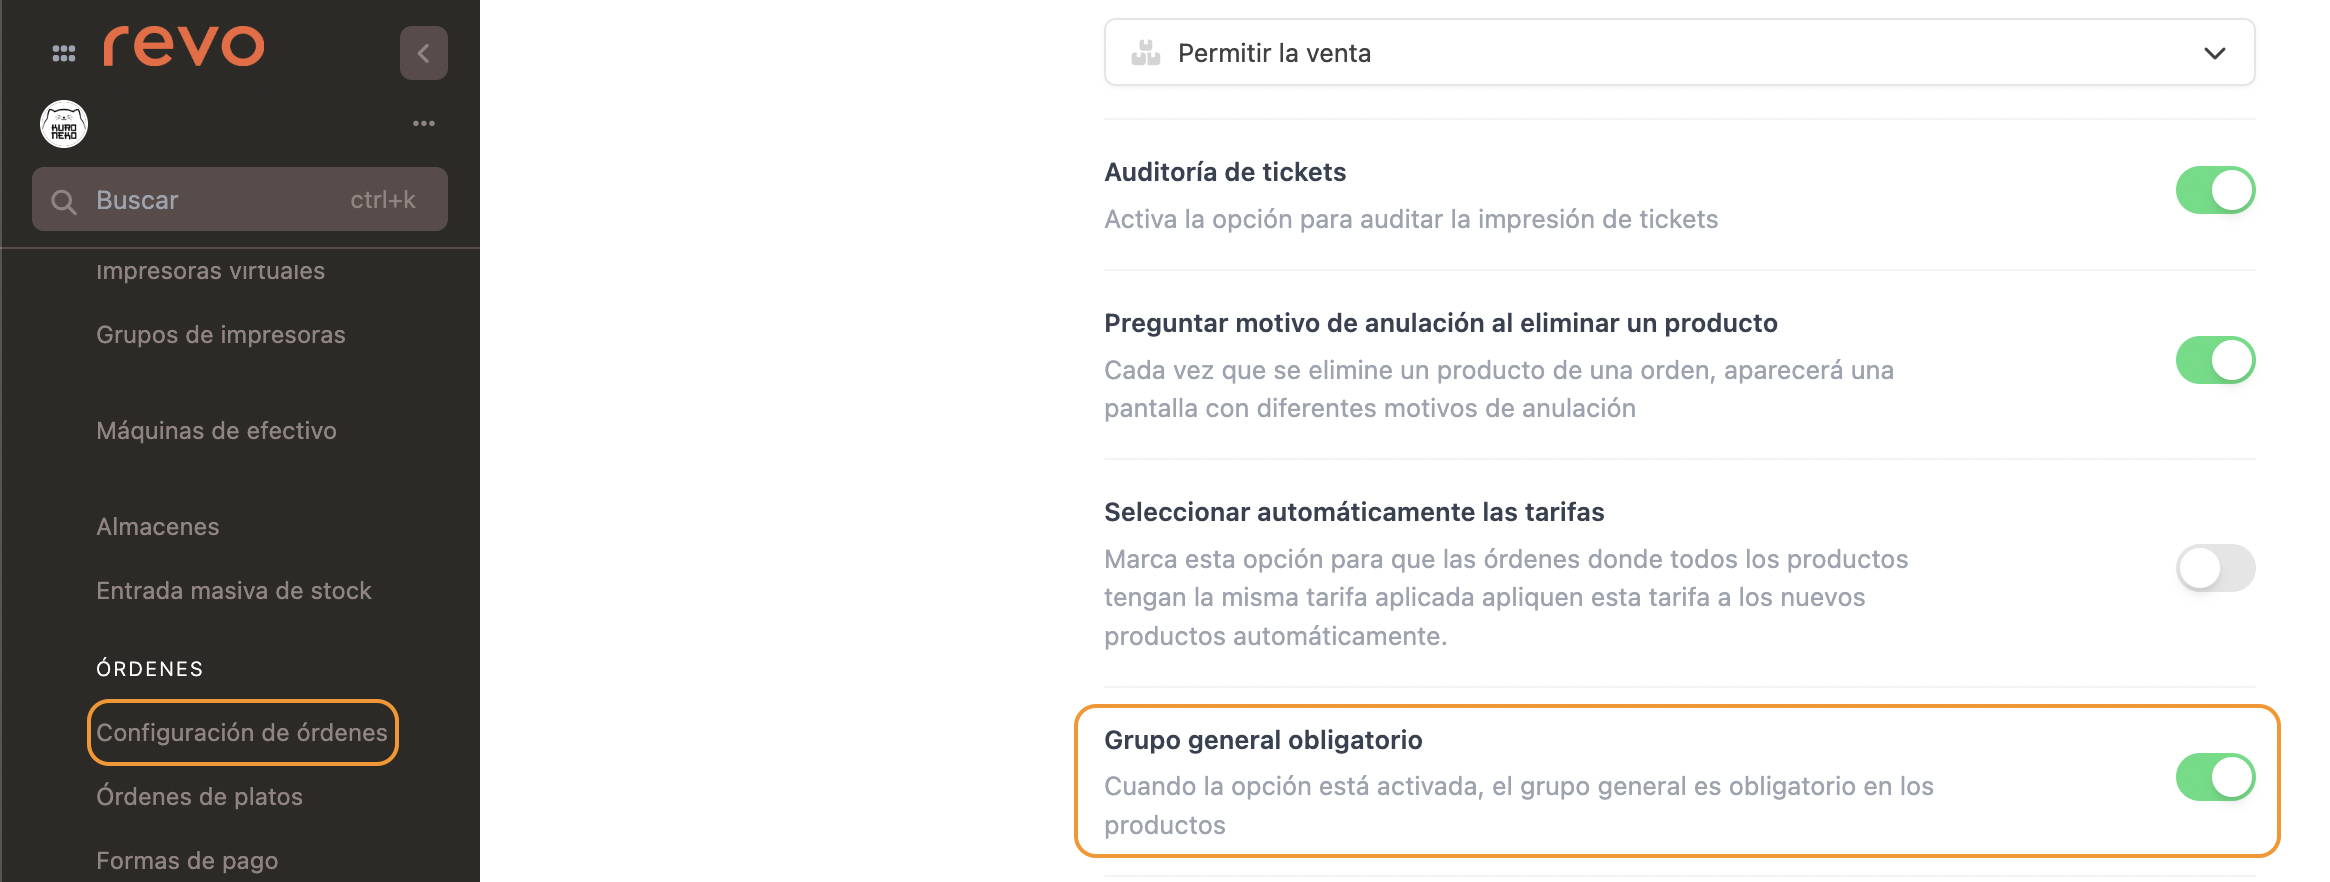
5. Make sure that all Groups have the General Group assigned correctly.
At this point, it should be emphasized that for the integration to work correctly, the general groups must be assigned item by item. The propagate action can be used.
REVO recommends assigning the general group to each item so you can use the filter in back-office statistics.
You can also enable the "Mandatory general group" option so that it is a required field when creating products.
Go to Settings / ORDER SETTINGS.
This is essential so that the Accounting IDs are sent correctly to Opera.
Done! You now have the integration configured.
4. HOW TO POST A ROOM CHARGE
1. Open an order, add products, and click pay.
2. If you have quick access, click . If not, click on other payment methods and choose Room Charge Opera.
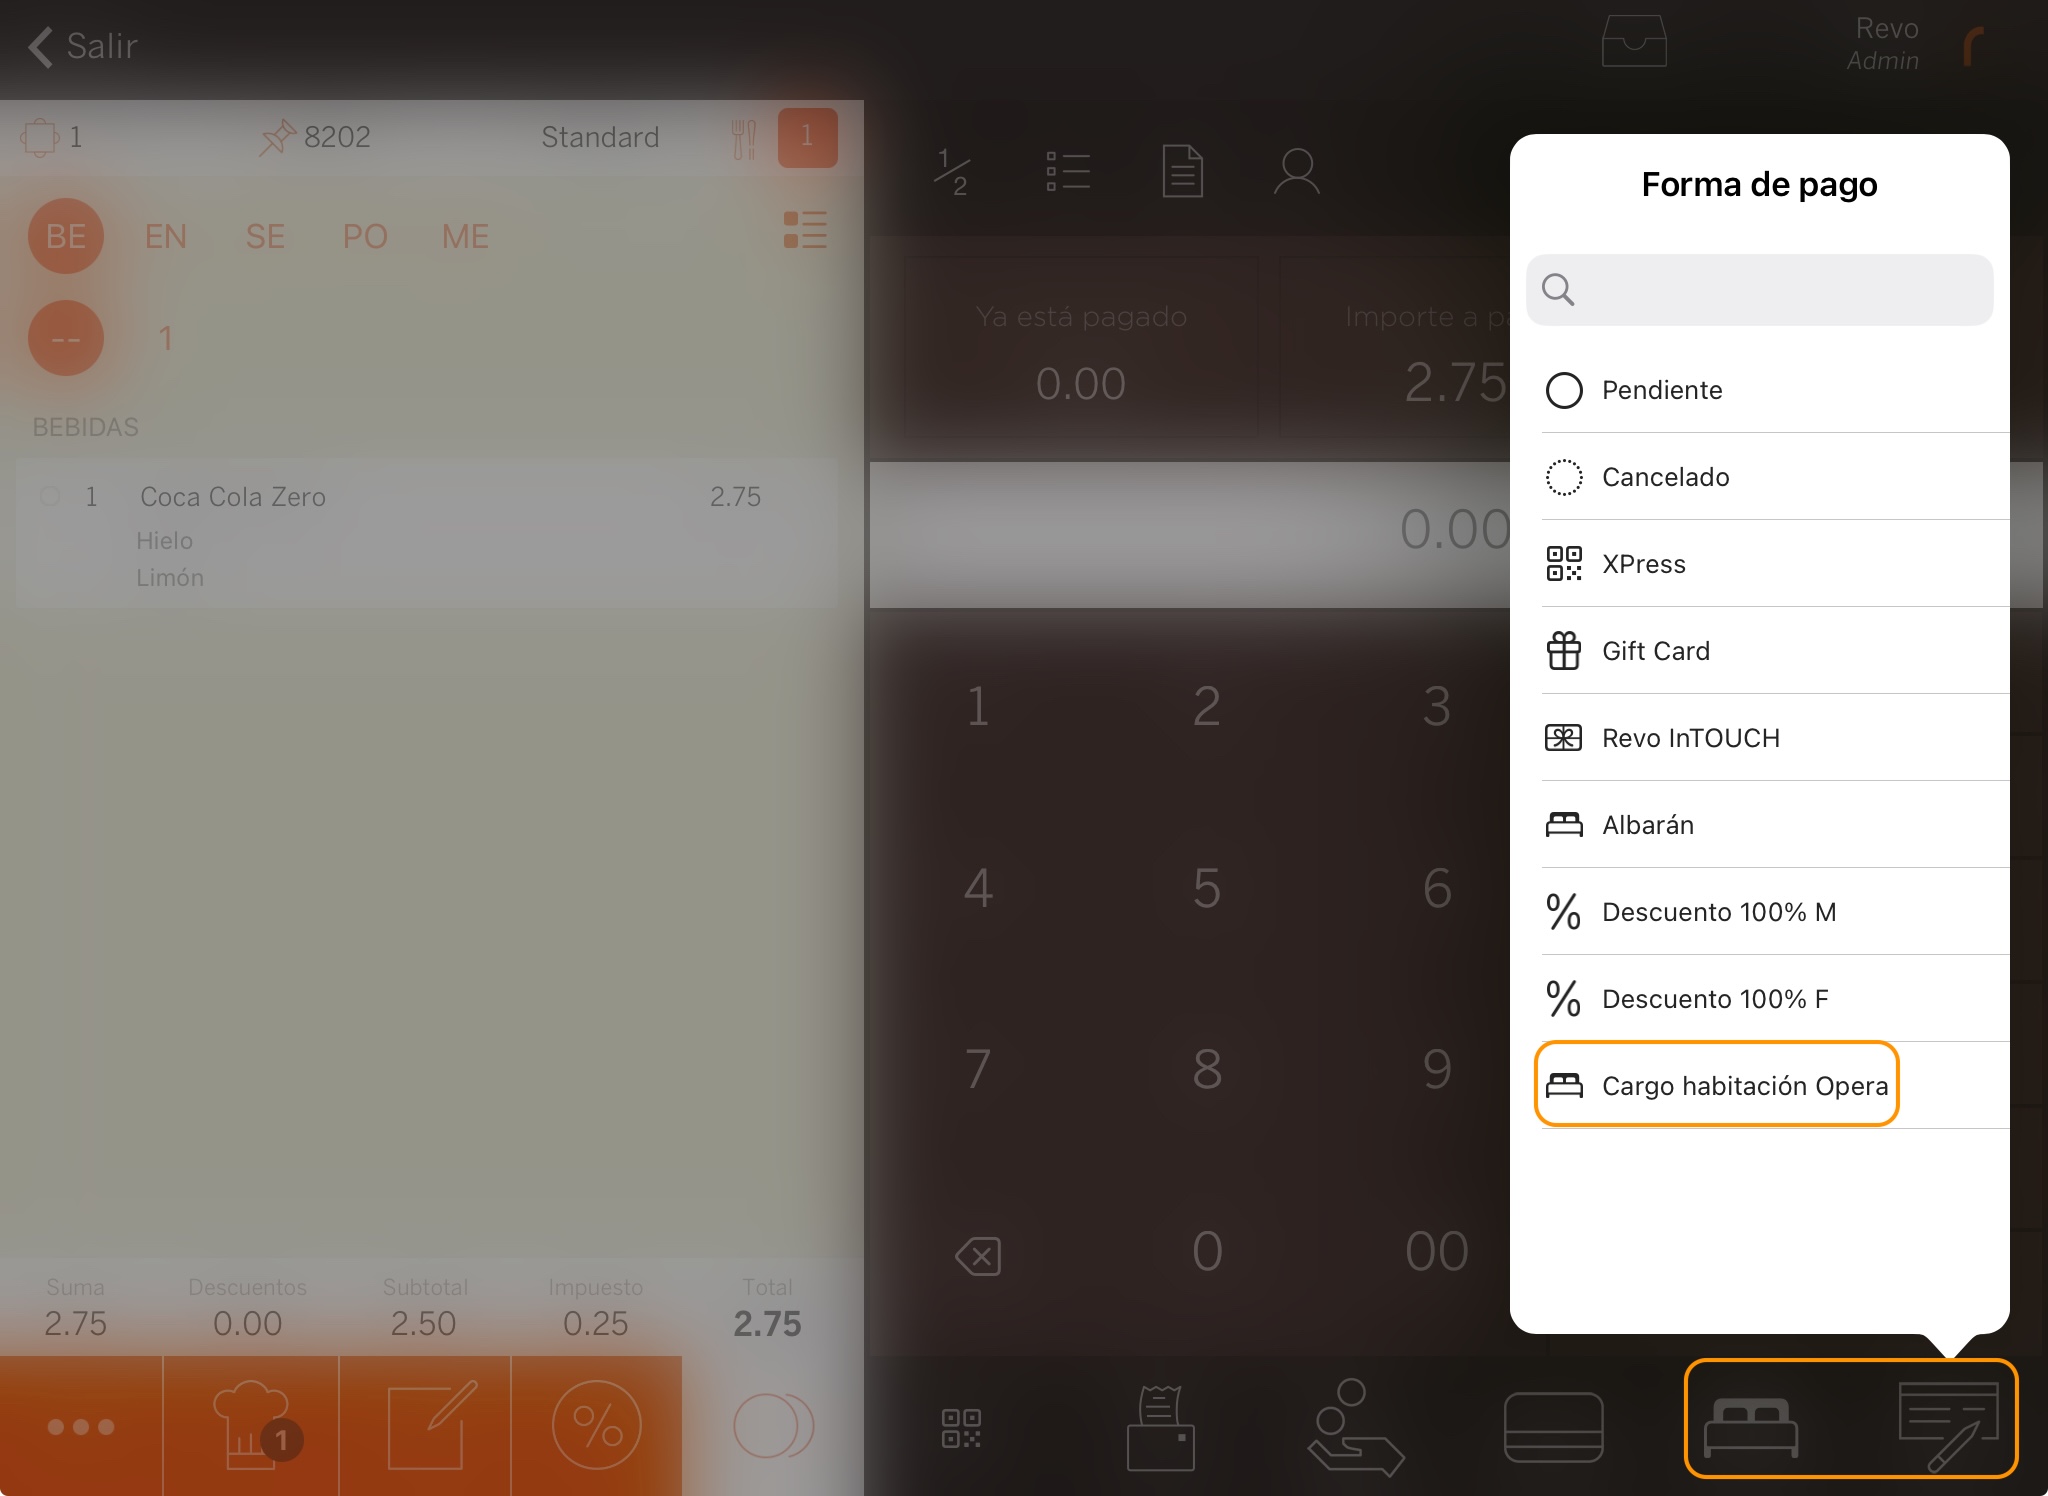
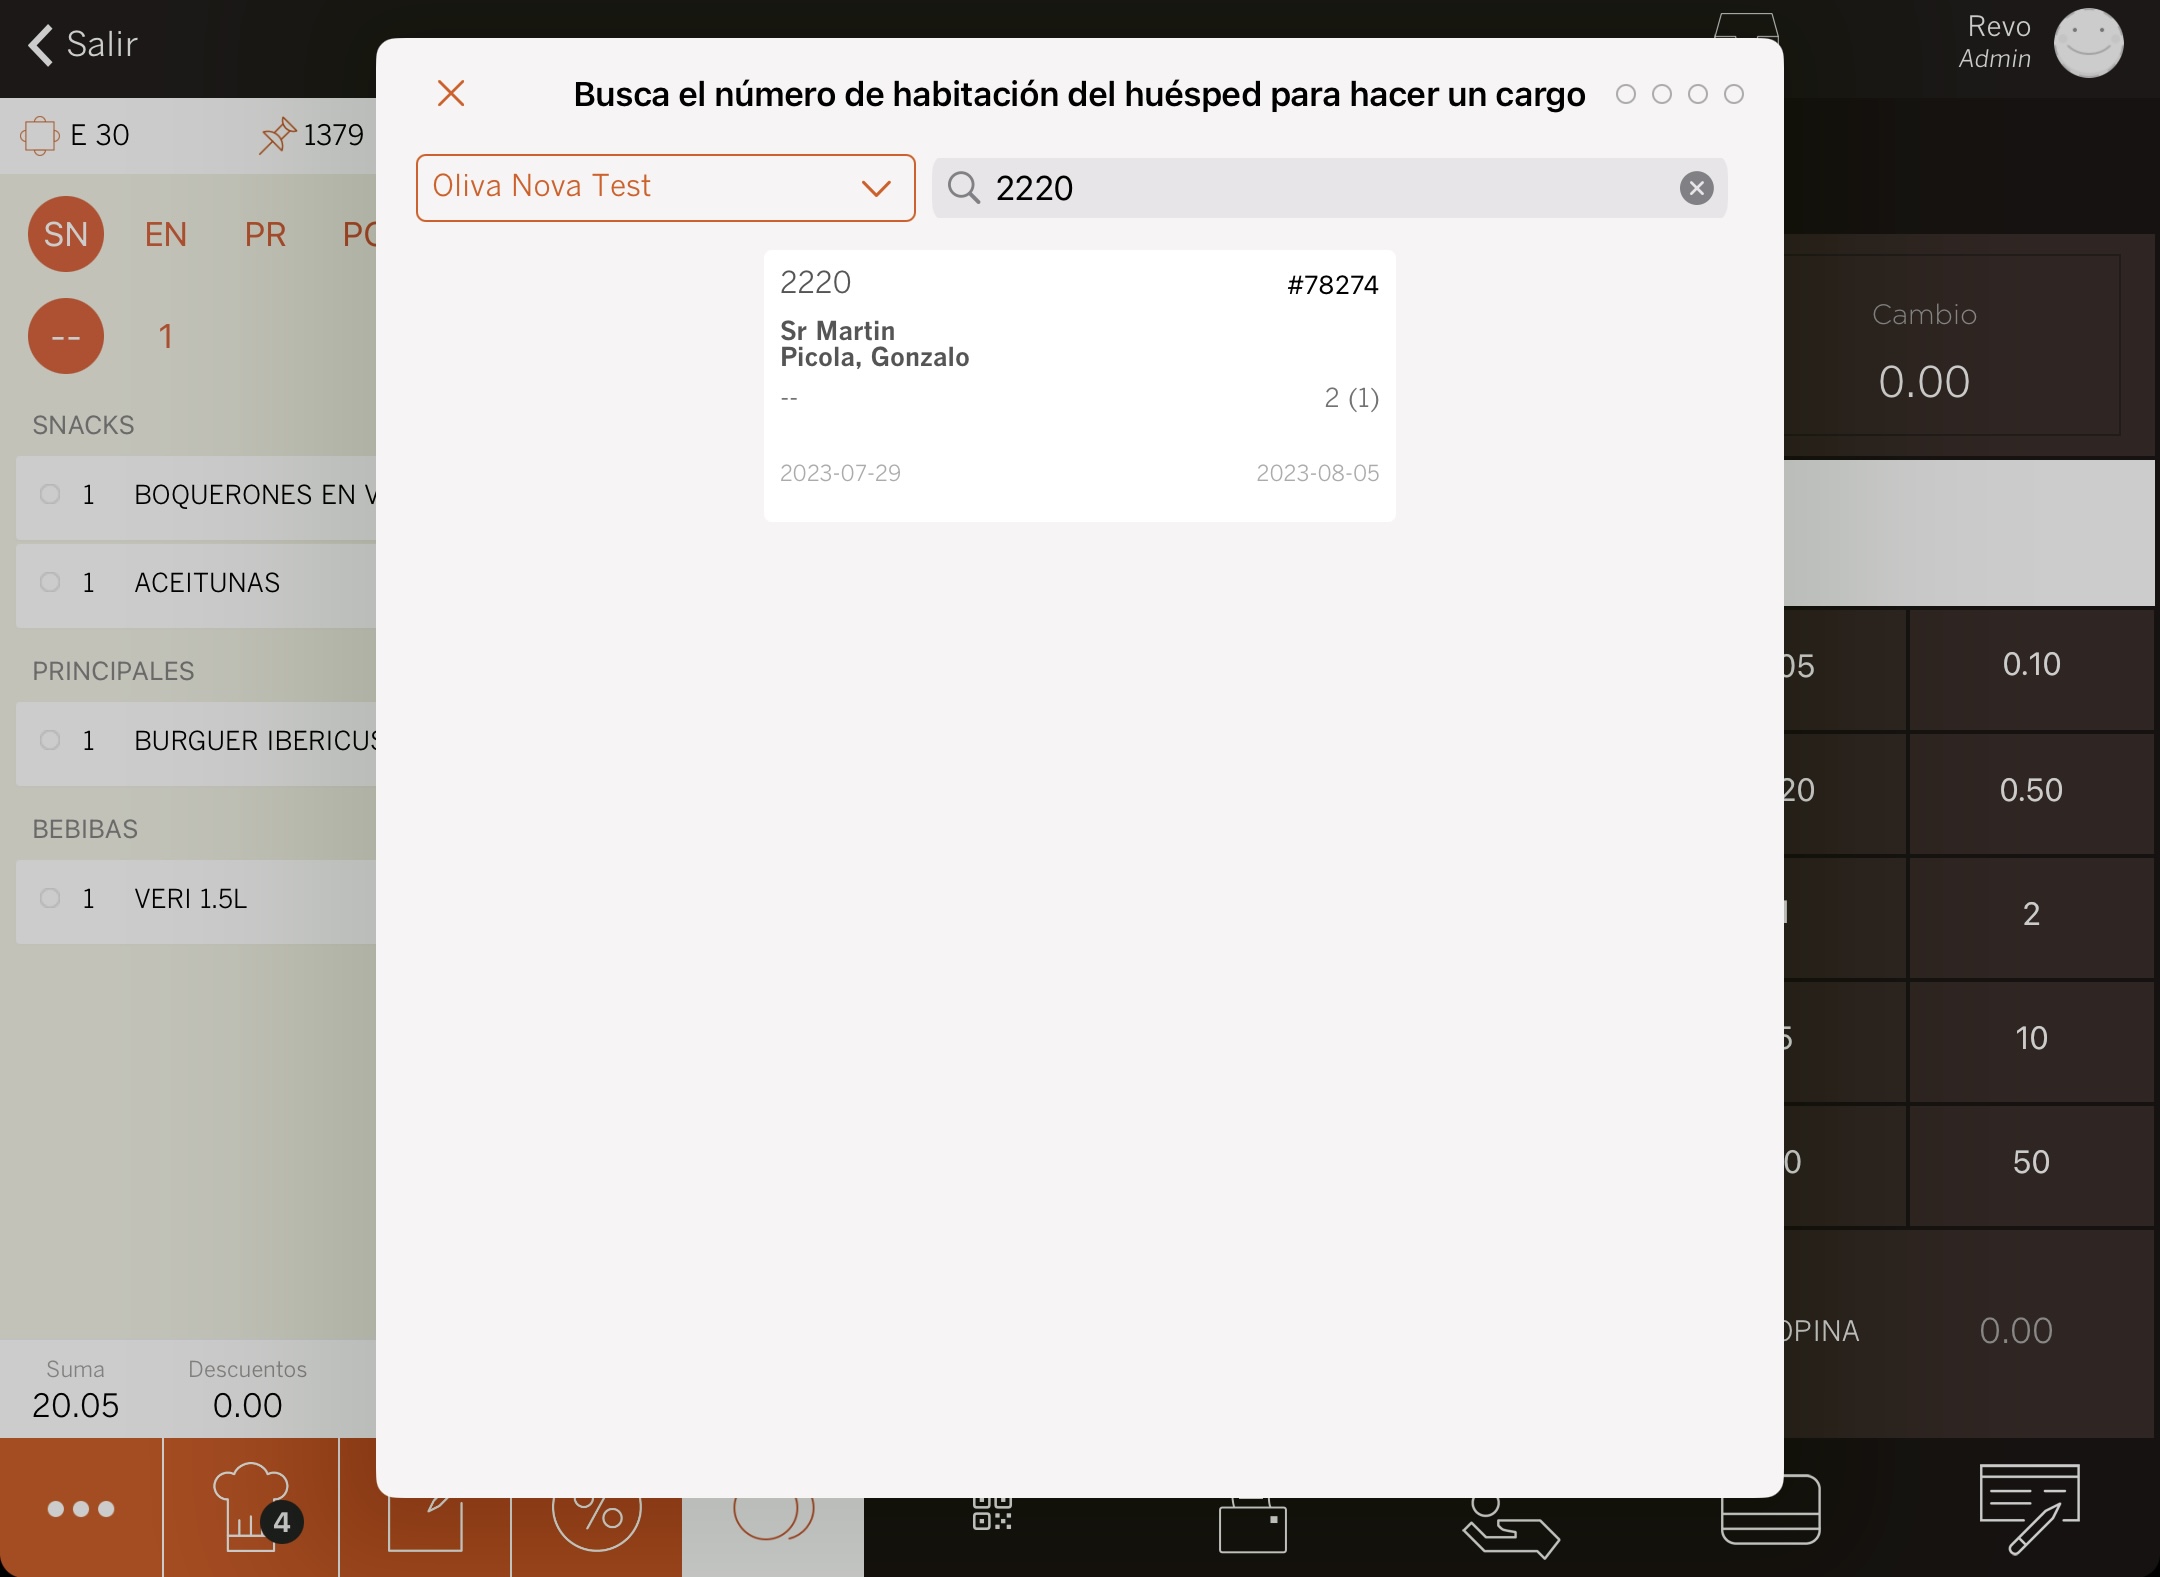
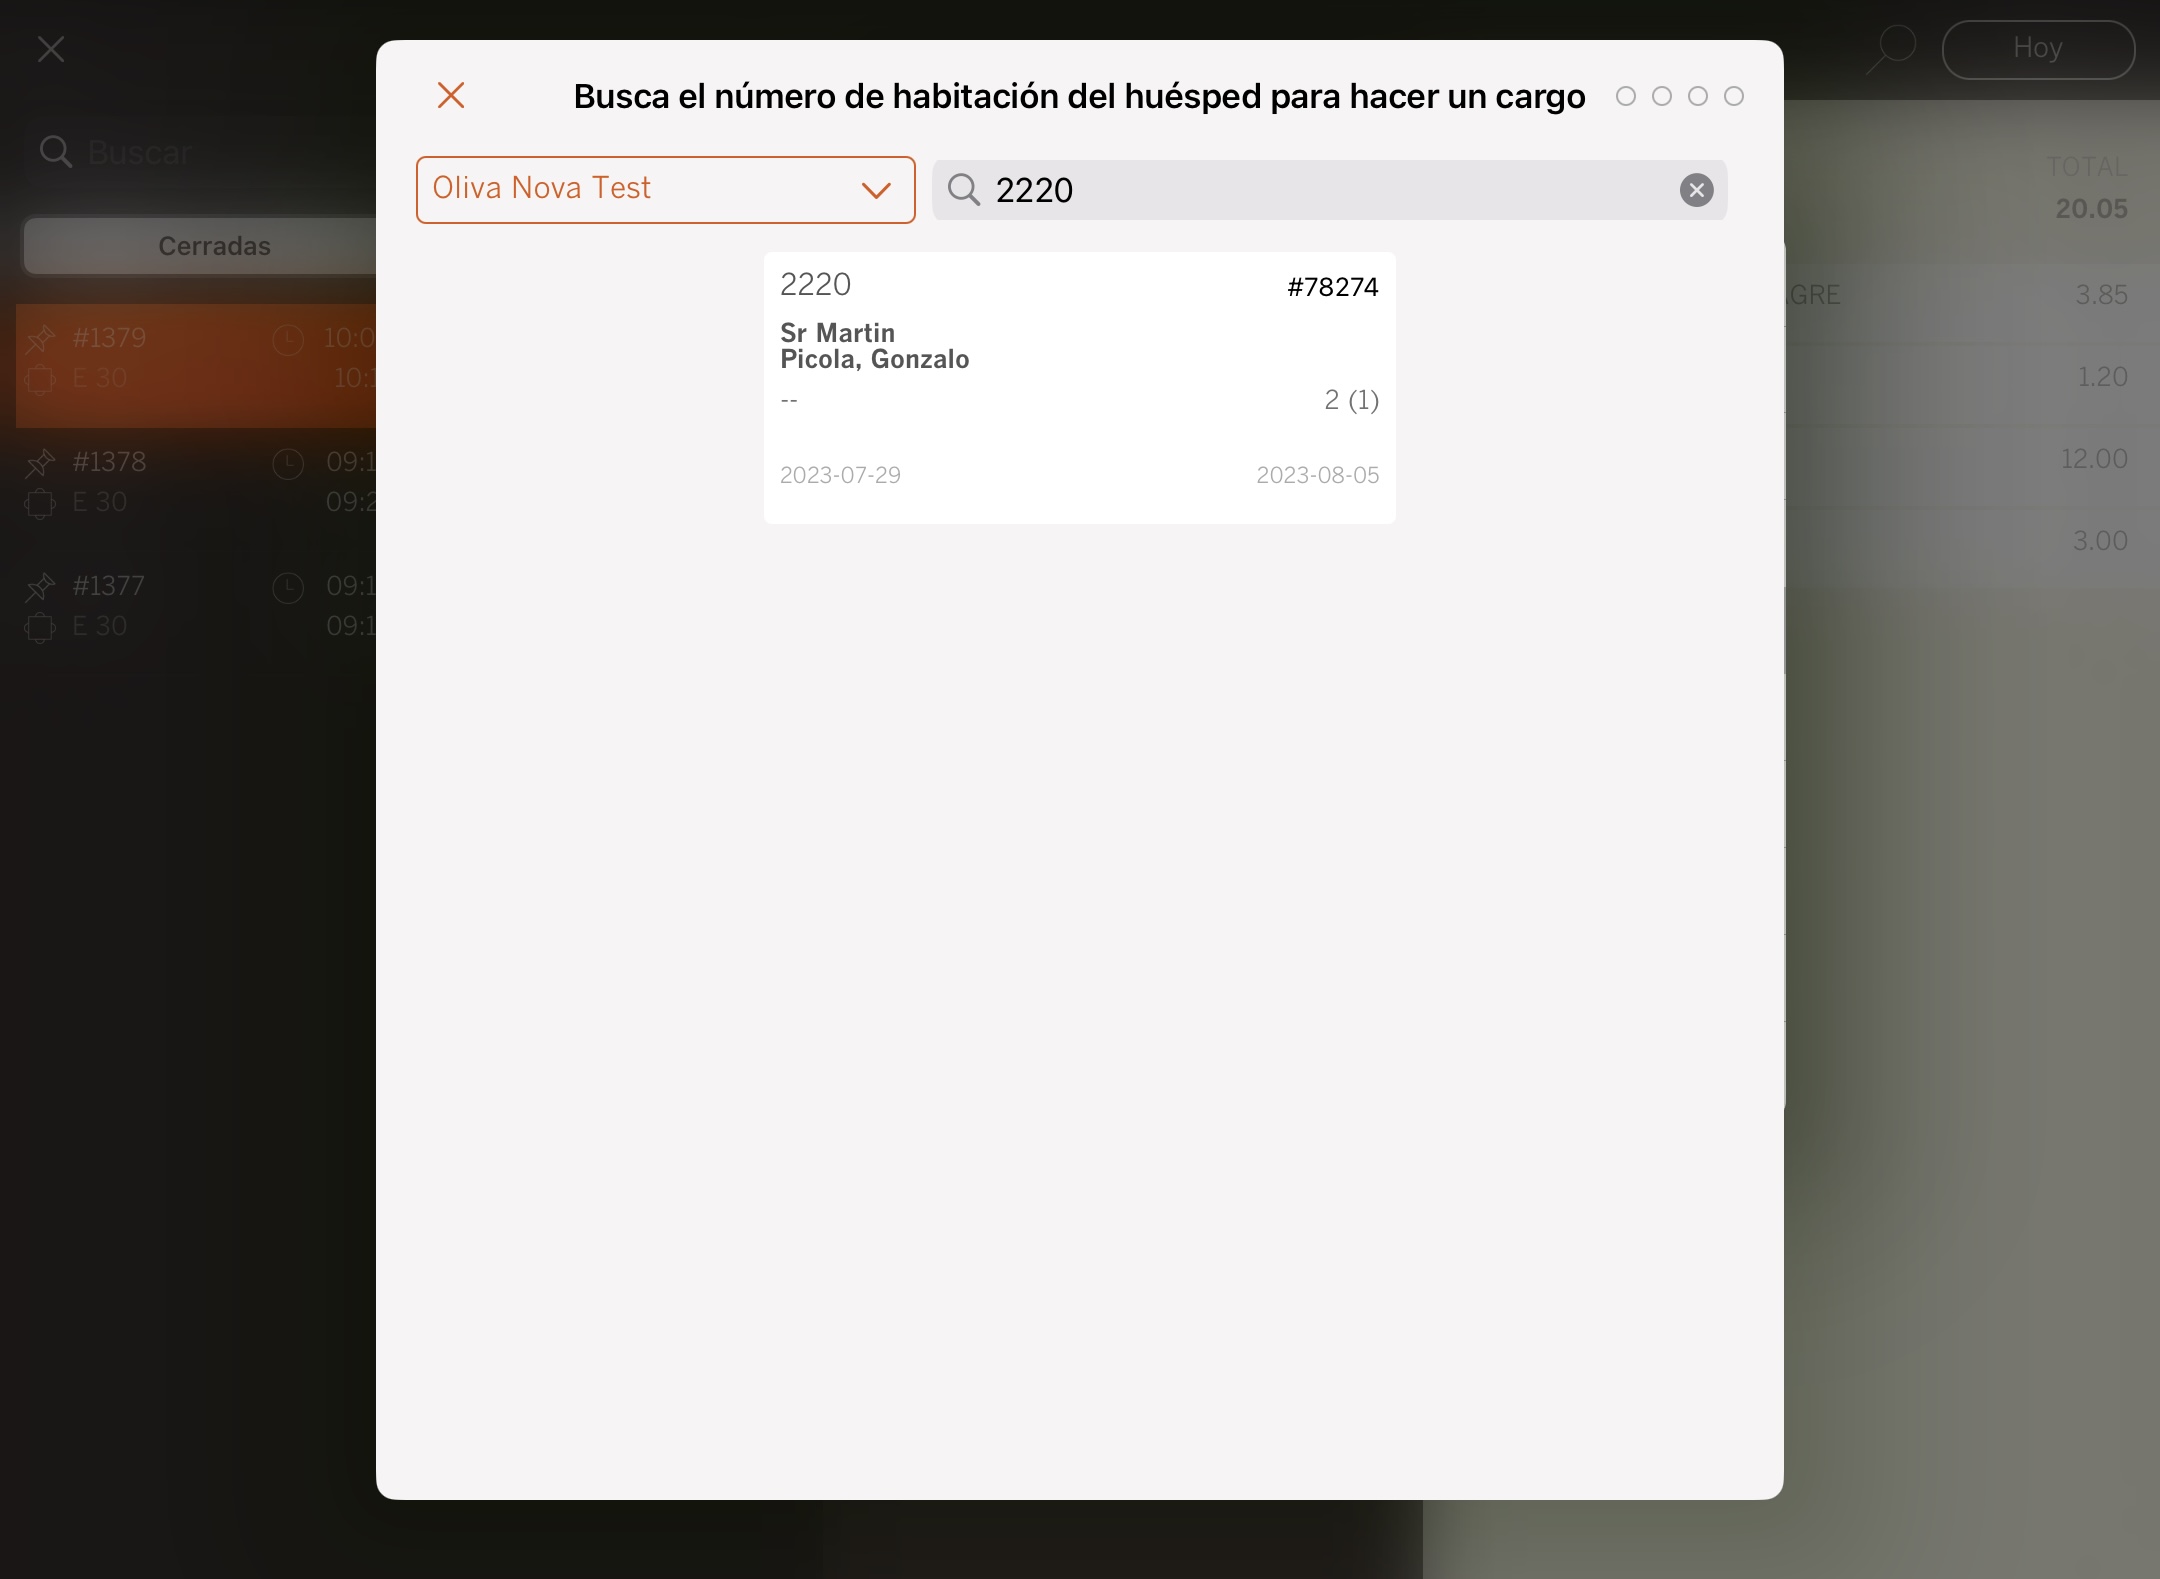
3. Enter the exact room number and select it.
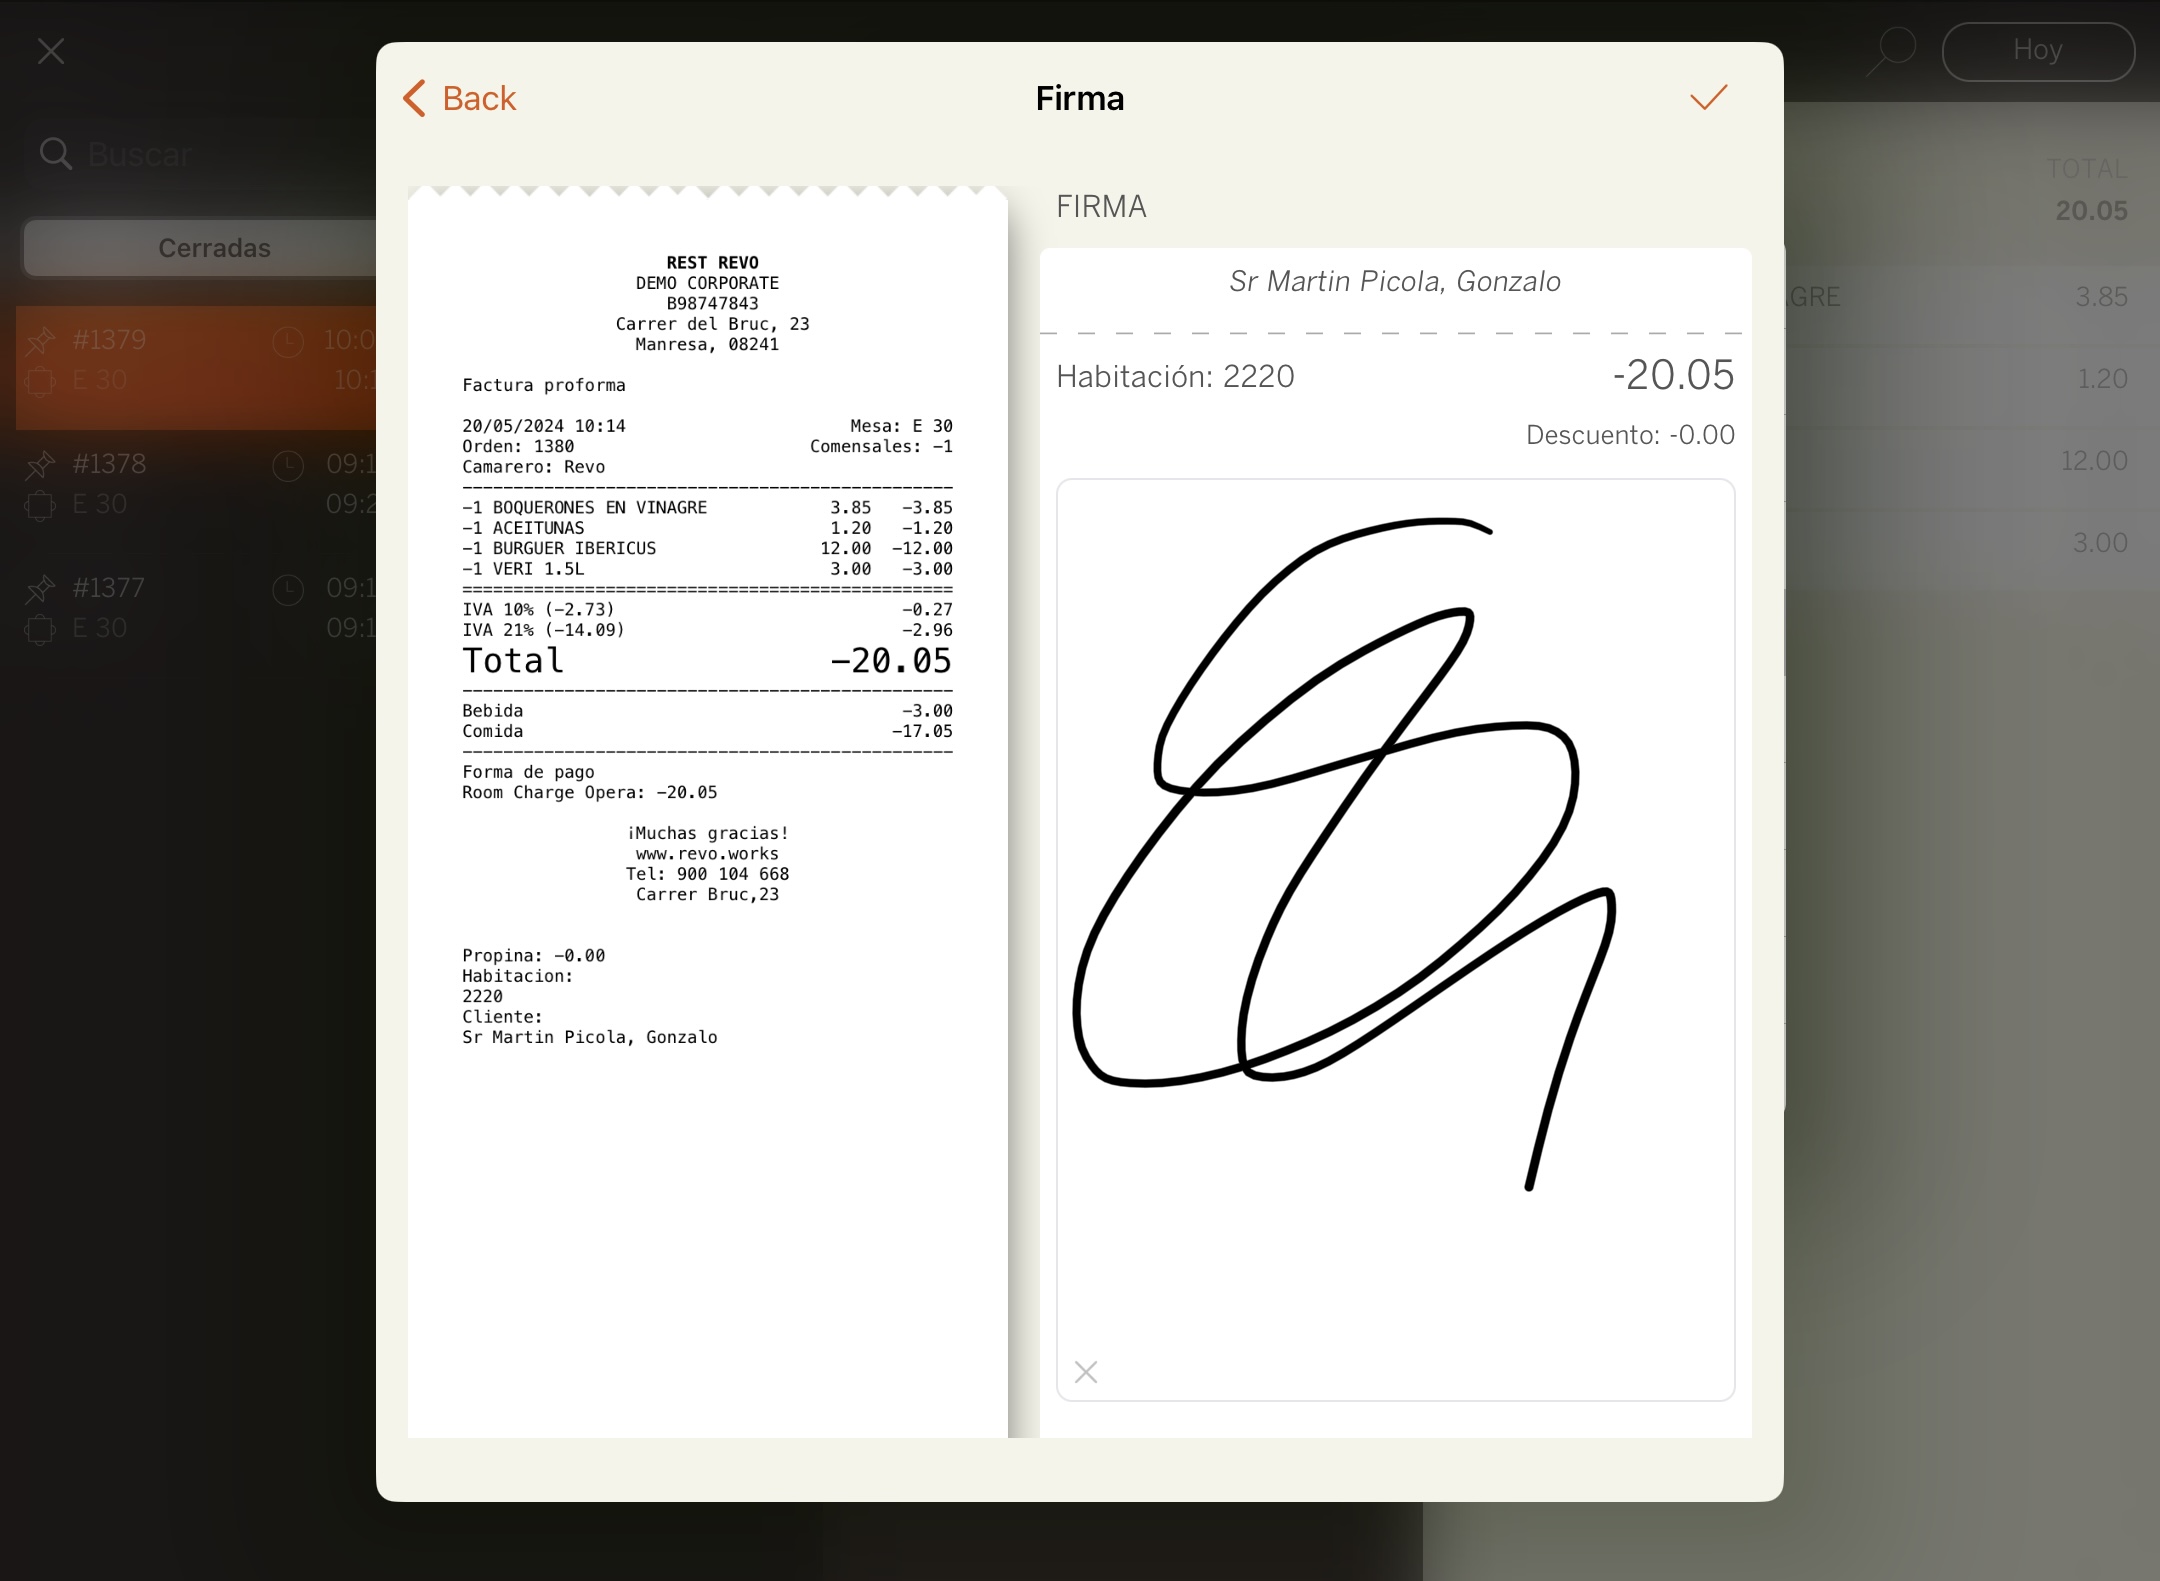
4. If you have enabled Room Charge Signature: ask the customer to sign and click
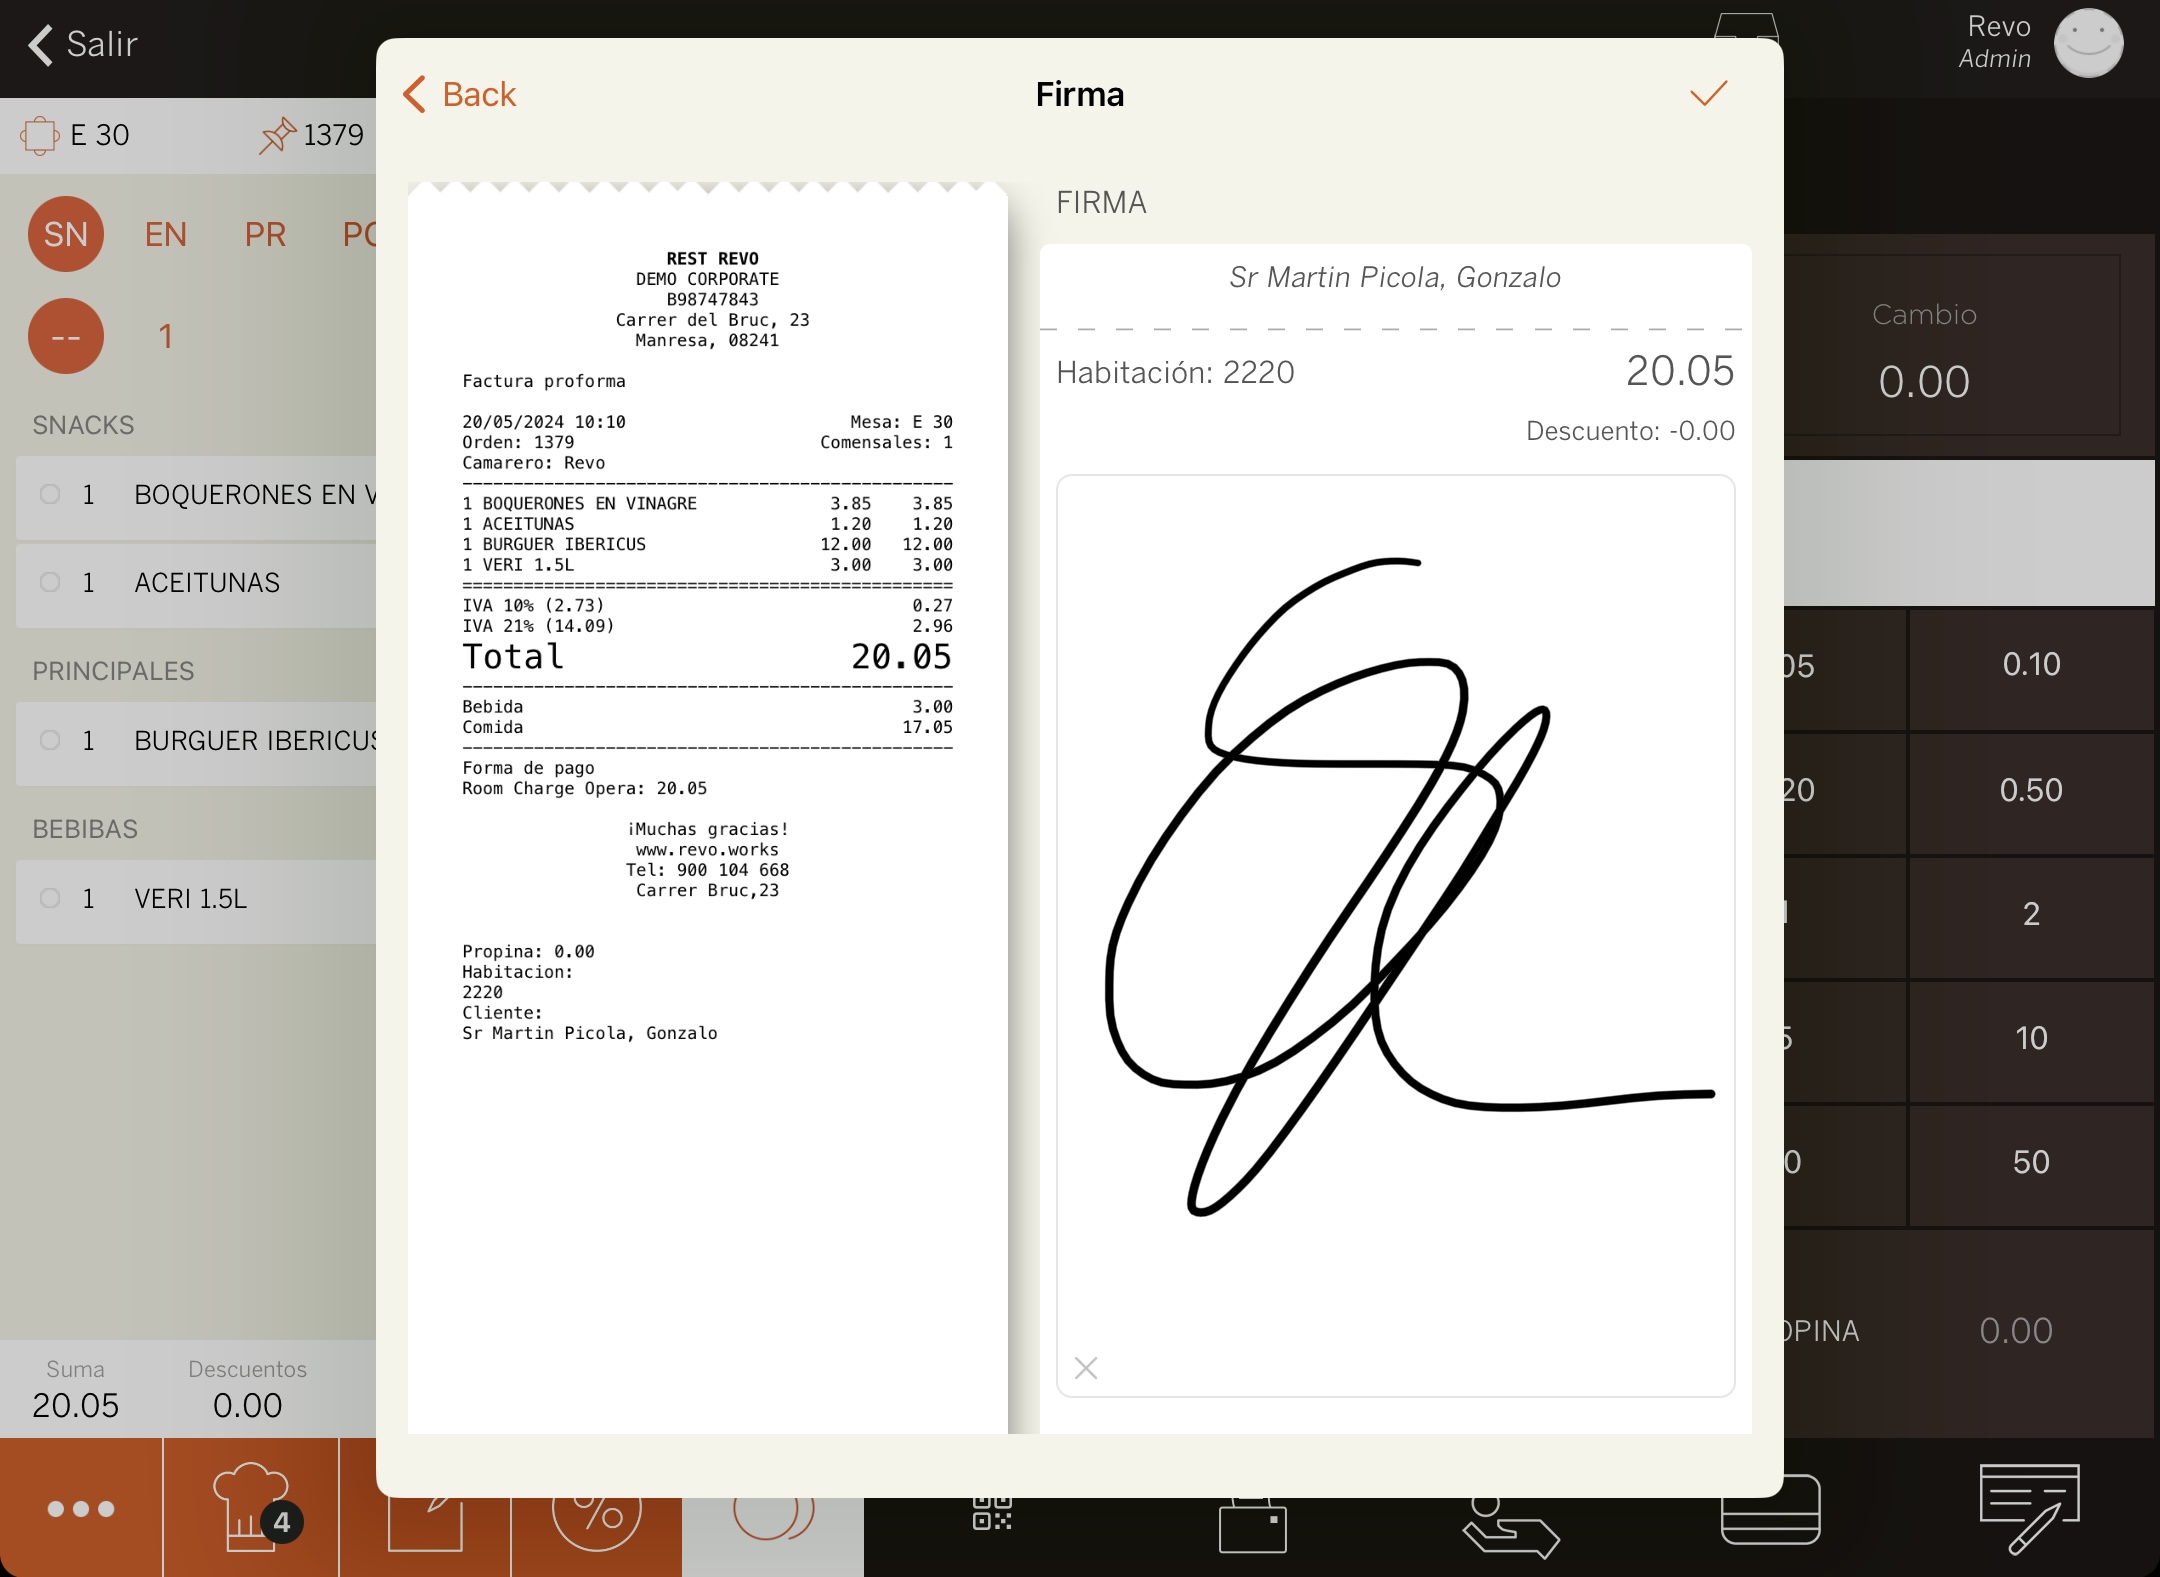
5. The receipt will be printed, or you will be asked if you want to print it.
5. HOW TO CANCEL A ROOM CHARGE
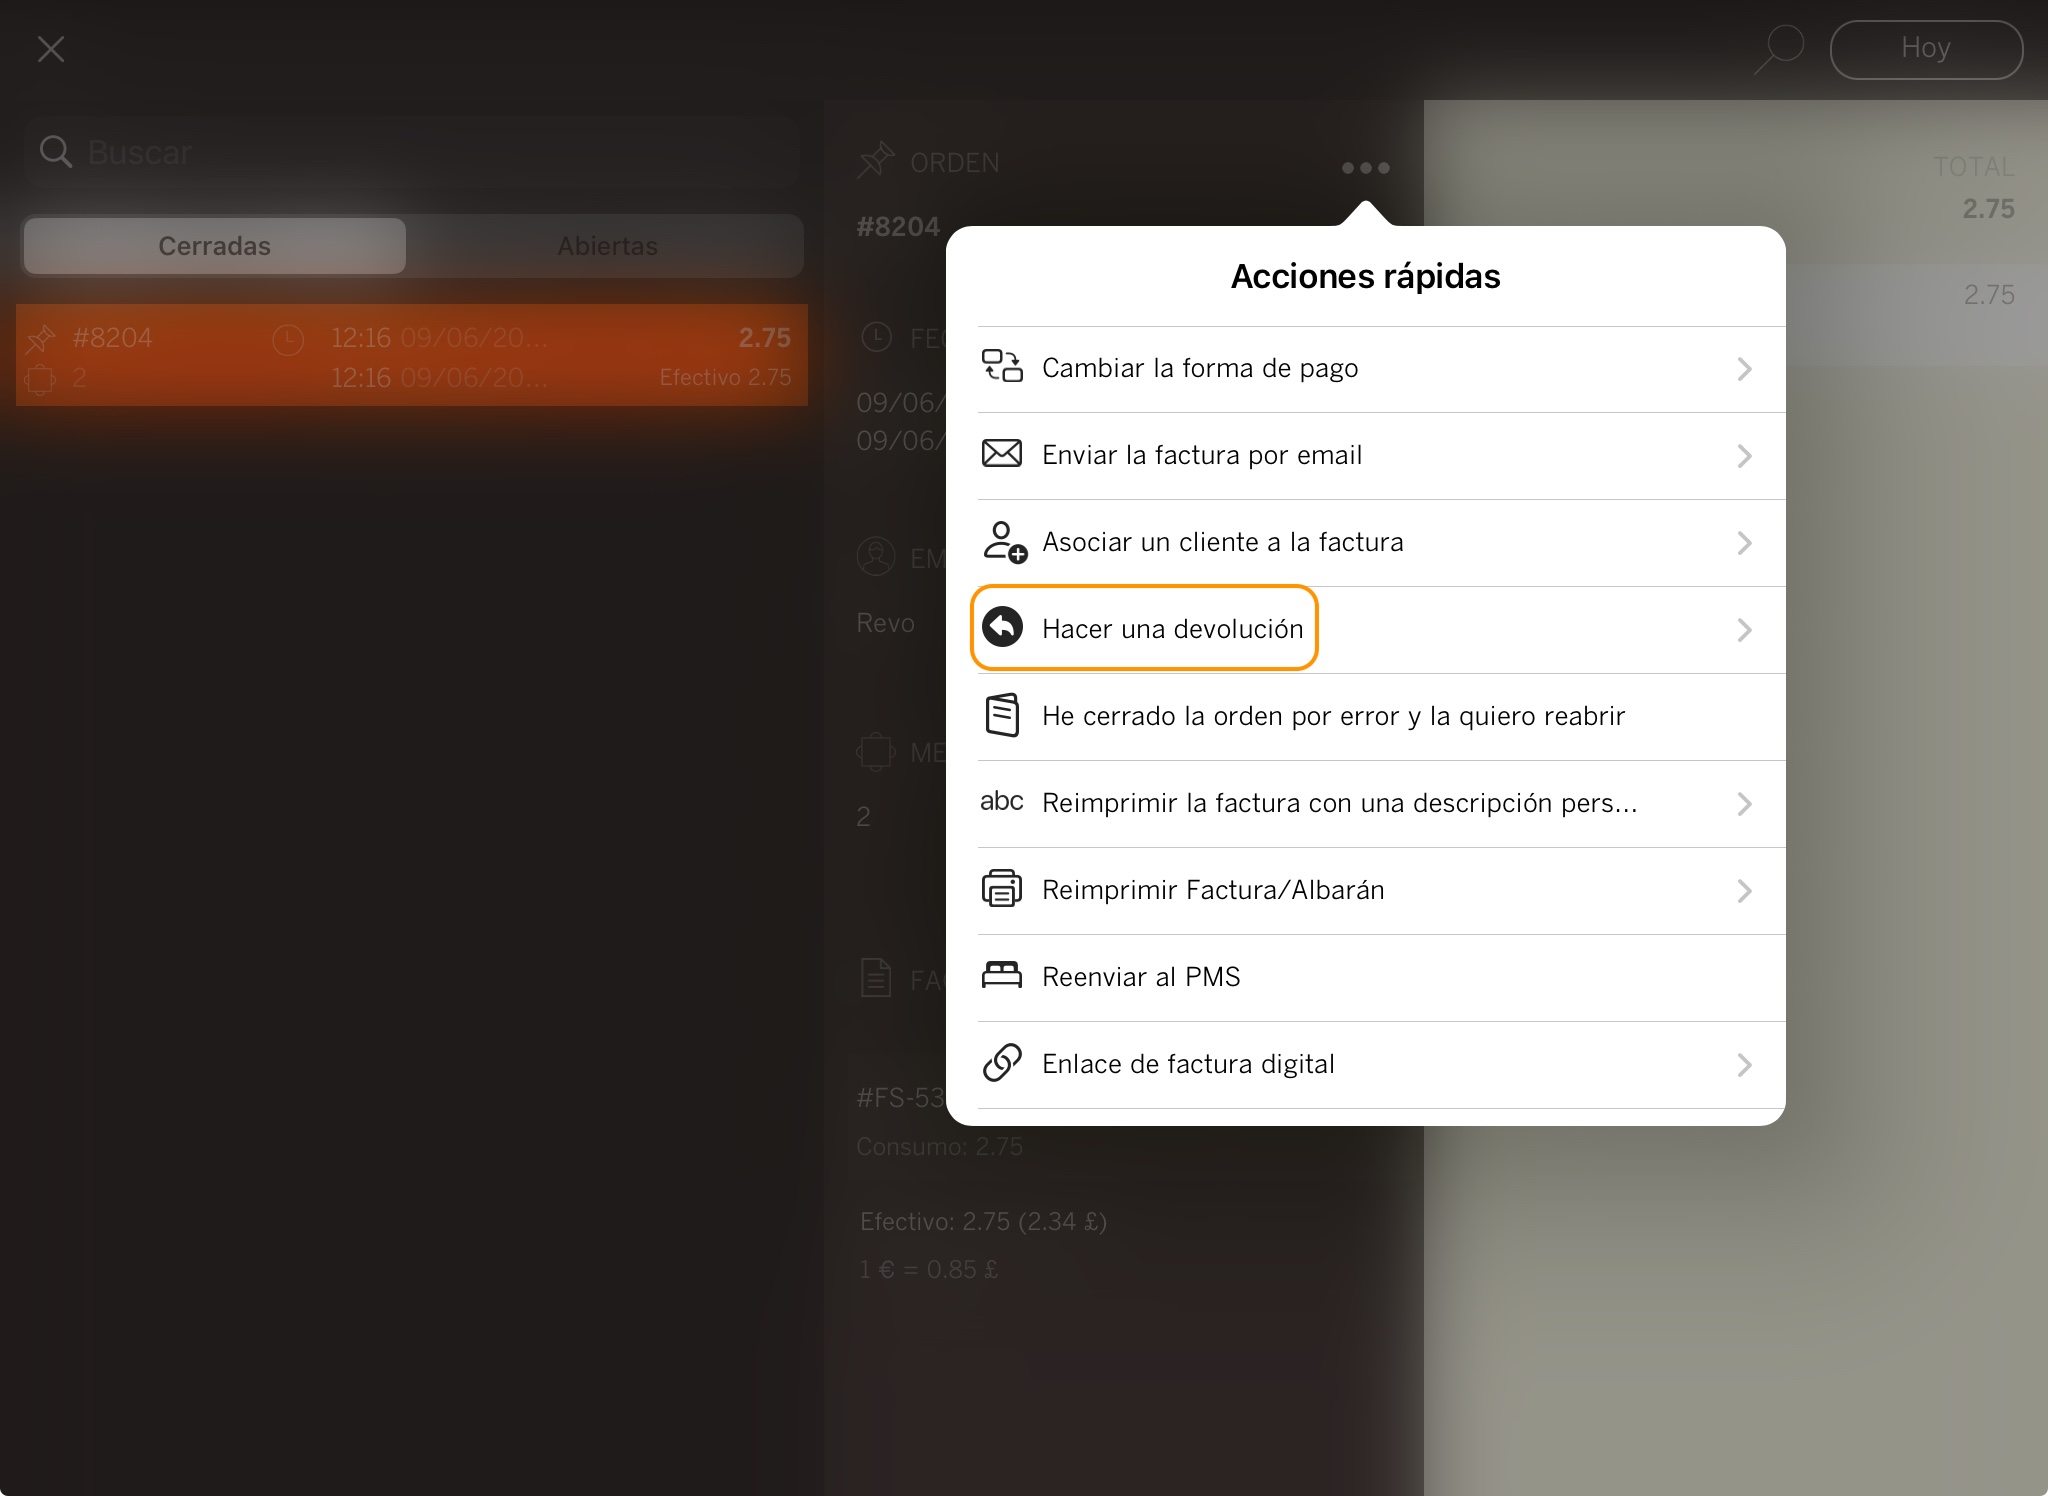
1. In the REVO menu r, go to History.

2. Find the order, click to see Quick actions and select Make a refund.
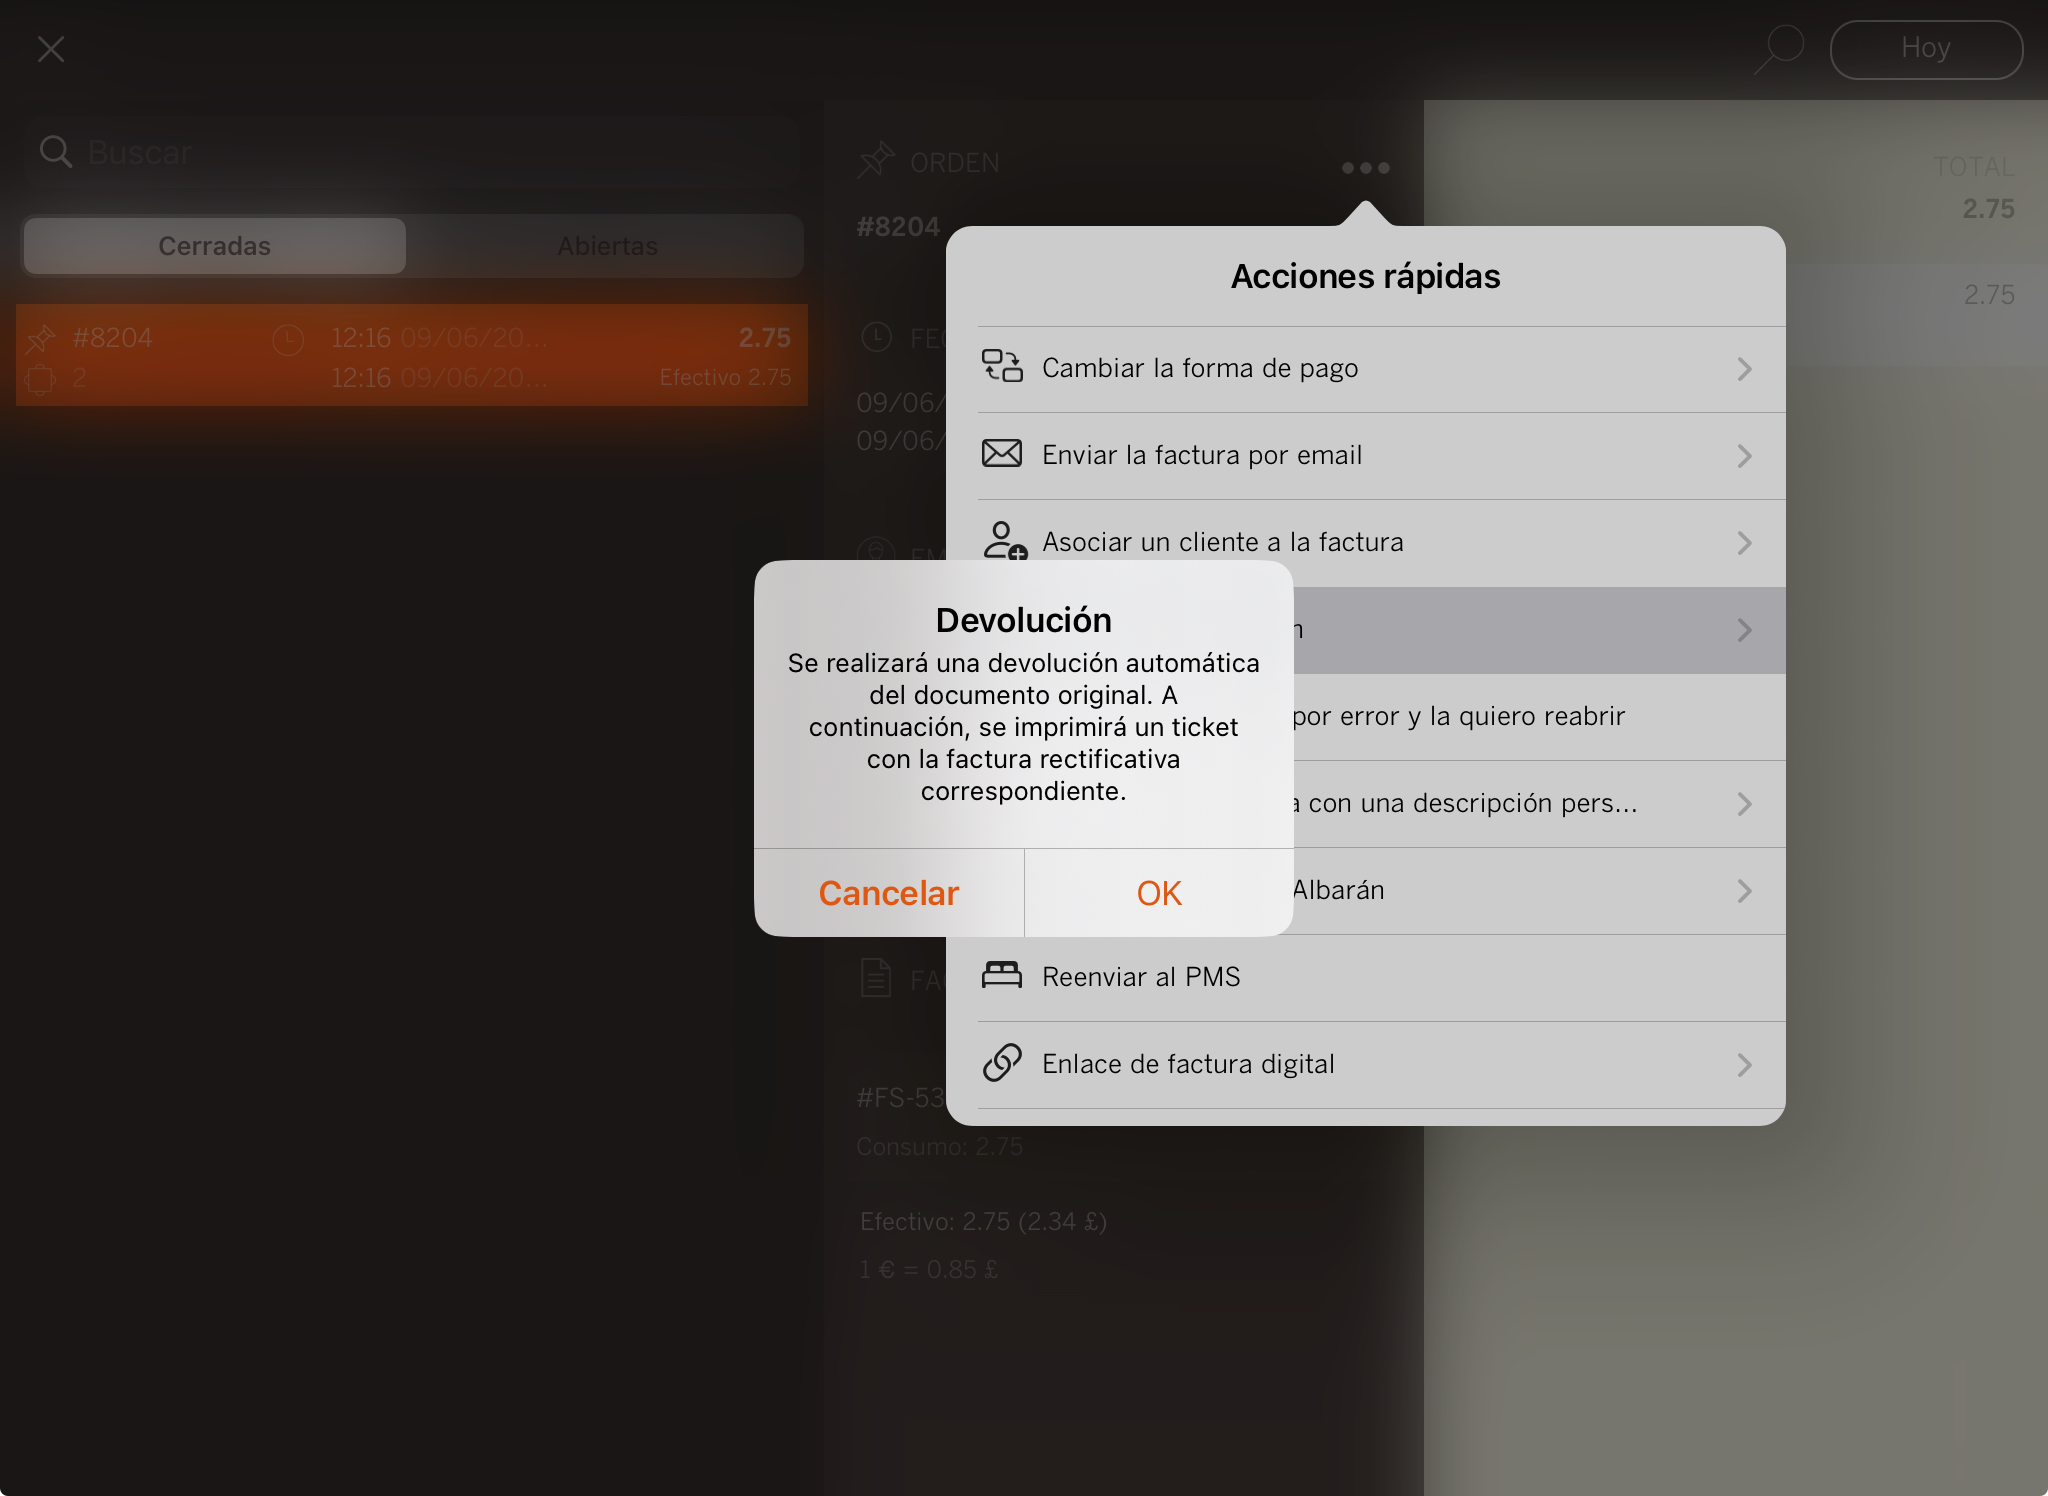
4. In the note that appears, click OK.
5. Enter the room number and select it.
6. If the signature option is enabled, ask the customer to sign and click
7. The receipt will be printed or you will be asked if you want to print it.