CONFIGURATION IN REVO 1. KDS DEVICES 2. CONFIGURATION 3. STATES 4. STATE FLOW 5. PROFILES 6. TIME MANAGEMENT 7. NOTIFICATIONS
CONFIGURATION IN REVO
Important: To receive orders on KDS 2 devices, the Revo XEF Advance version must be installed.
First, activate the Revo KDS 2 licence on the Revo XEF account.
Once the licence is active, access the back-office of Revo XEF.
Inside the back-office, you will find the following section: KDS 2
1. KDS DEVICES:
In this section you will create your Revo KDS 2 devices.
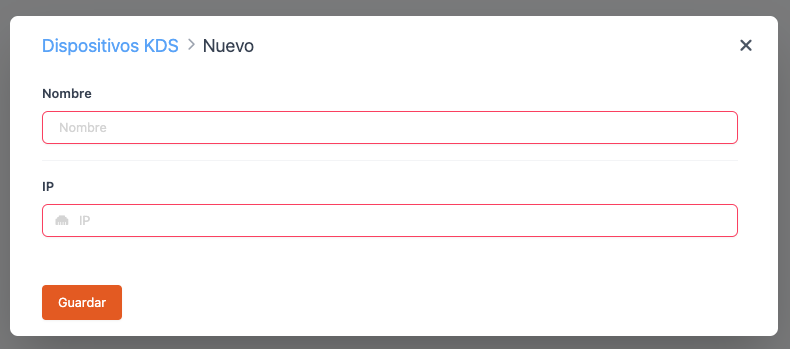
1. Click + New to create the KDS 2 device.
2. Enter the Name of the device.
3. Enter the IP address of the device.
4. Click Save.
Once your Revo KDS 2 devices have been created, there is no need to associate them with the catalogue. In Revo KDS 2, by default, all products will always be sent to all devices. Later, by configuring profiles, you will set up which information to display on each KDS 2 device.
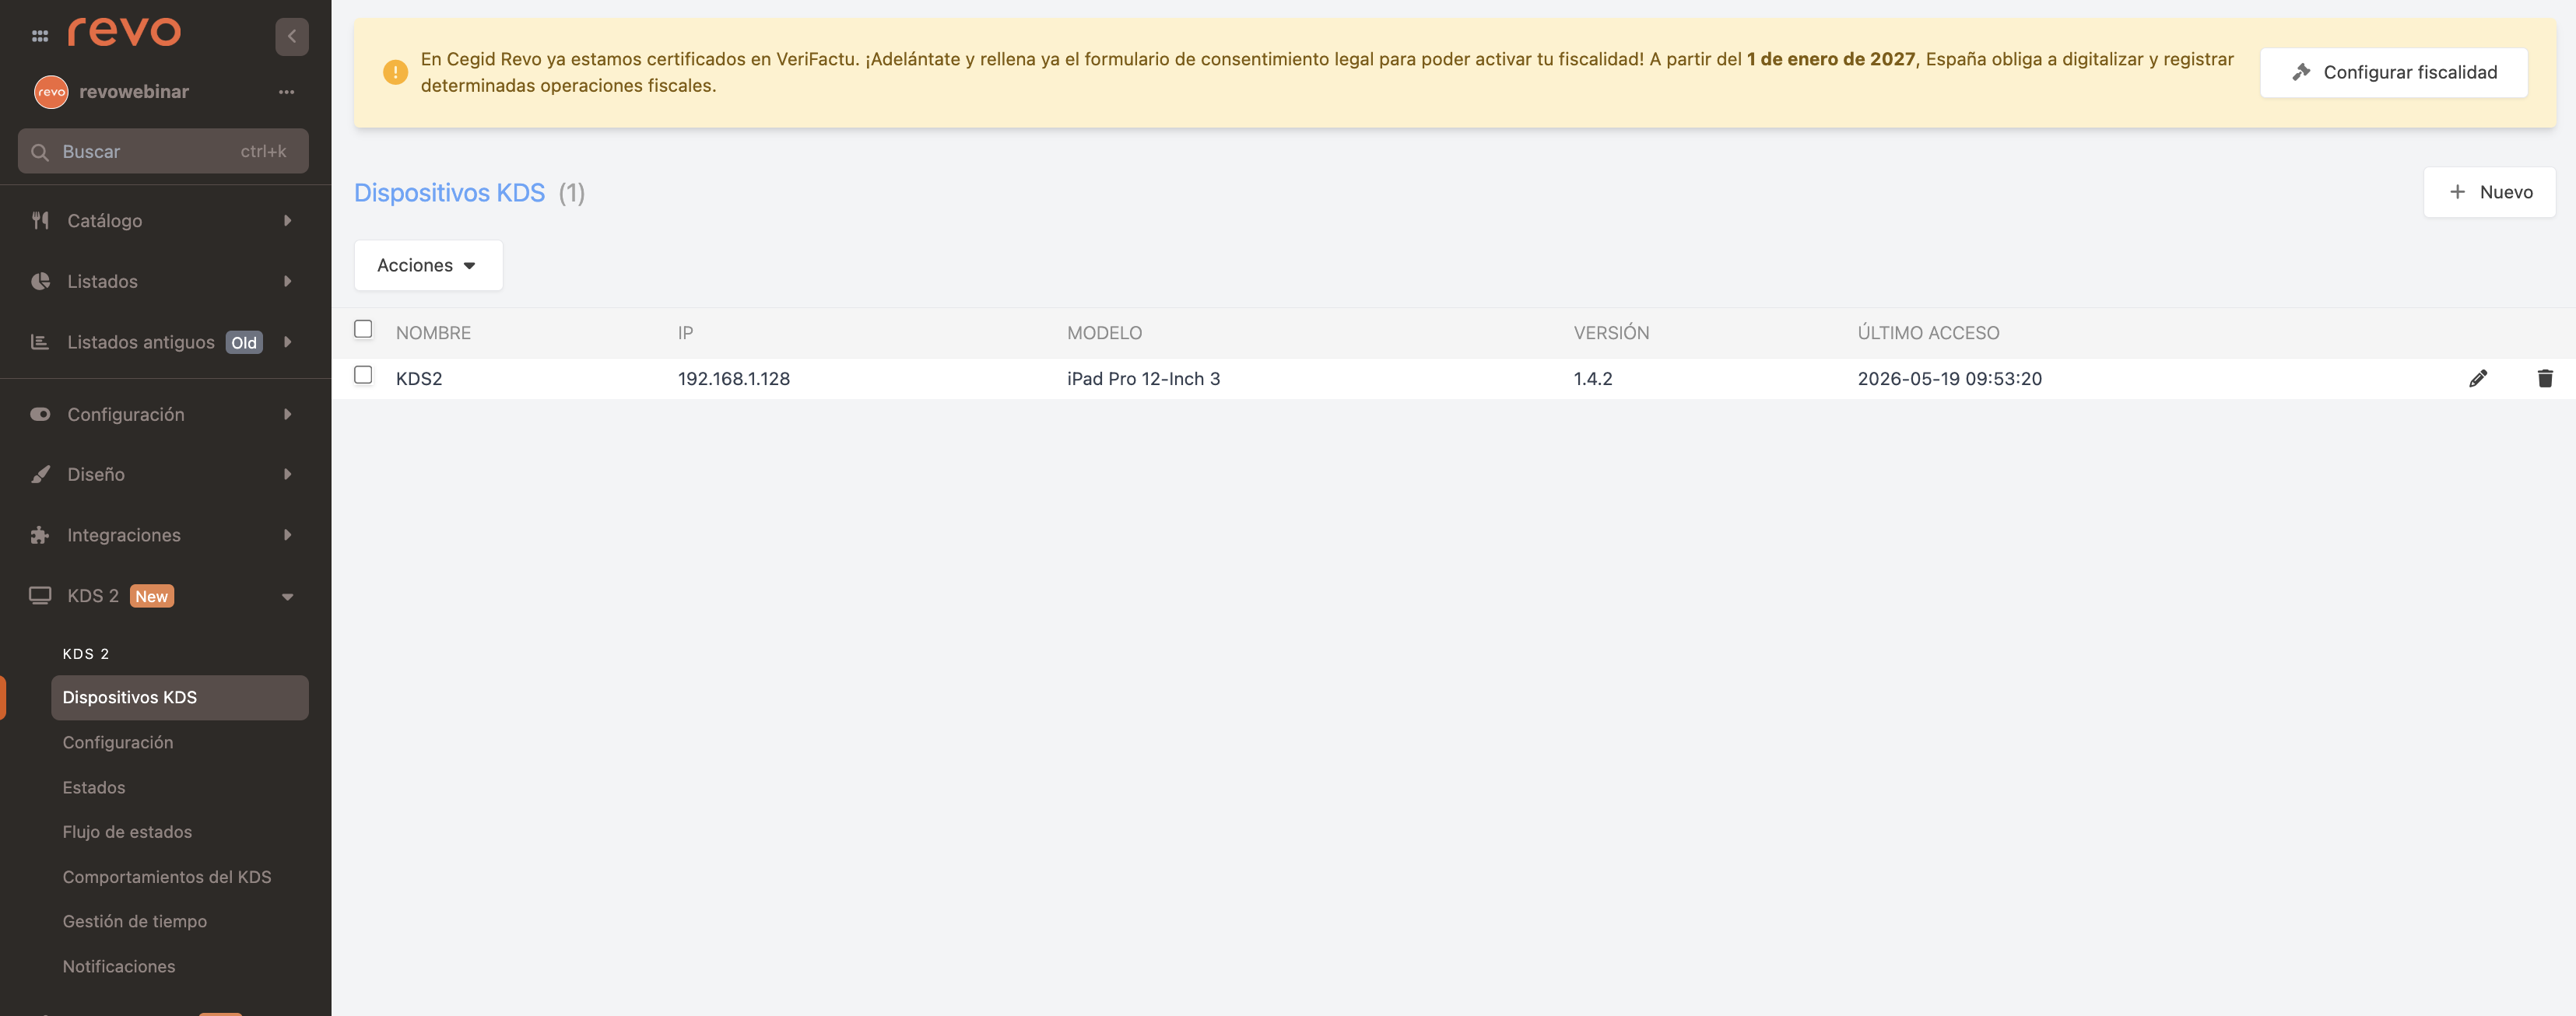
From version 1.5.0 onwards, every time a KDS 2 device logs in, it automatically sends the following information to the back-office:
- Installed version of the KDS 2 app.
- Device model (iPad or Android monitor).
- IP address of the device.
This information is visible in the Devices section of Revo XEF and allows the support team to quickly identify which version is installed on each device.
2. CONFIGURATION:
In this section, you will perform the general configuration for all KDS 2 devices.
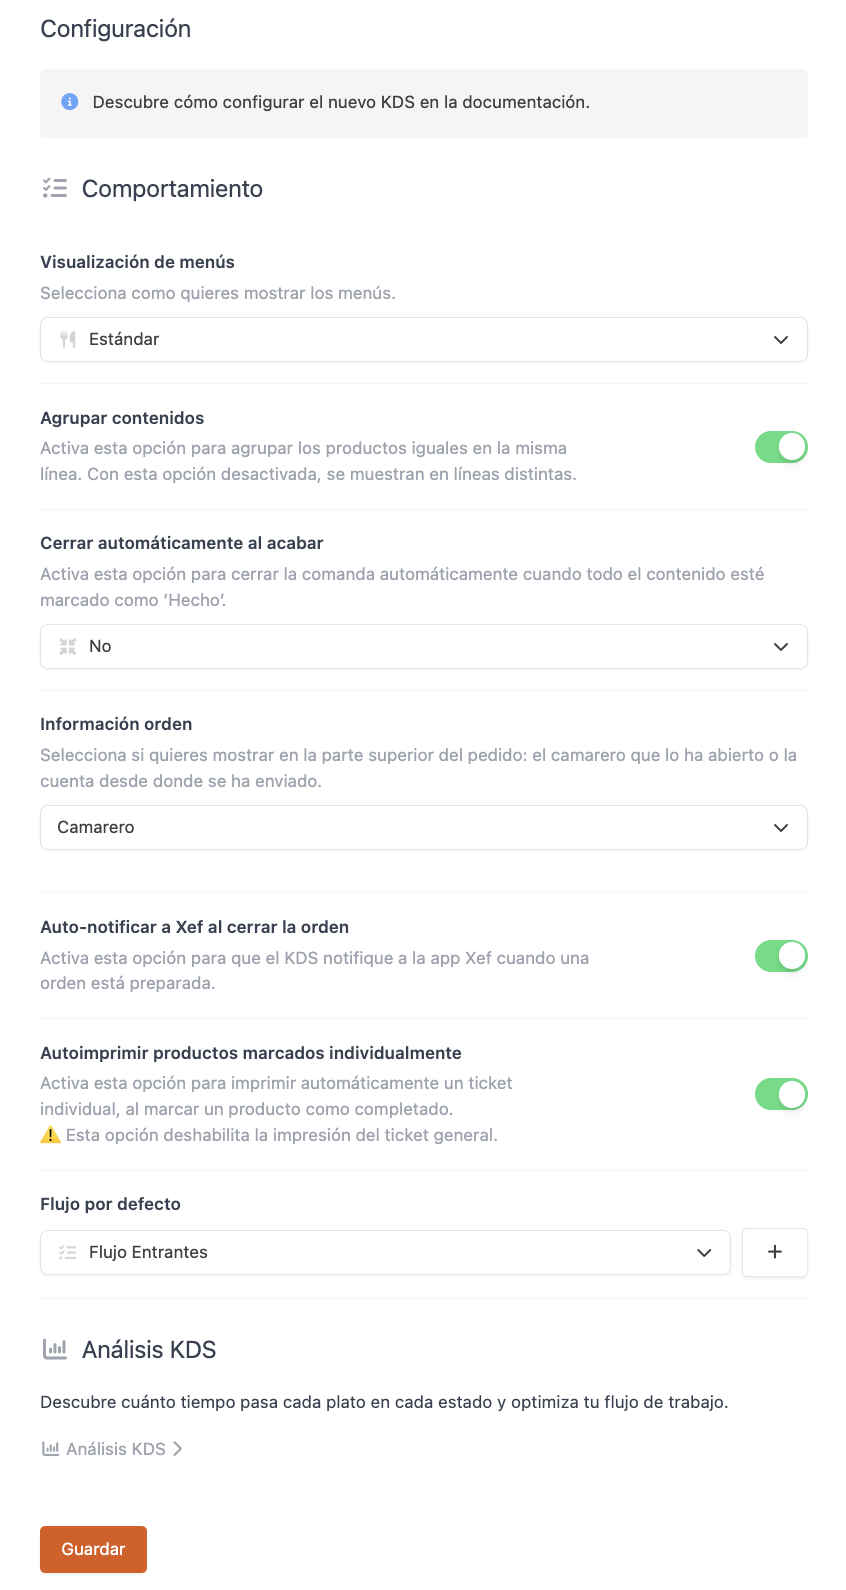
BEHAVIOUR
-
Menu display: Choose how you want to display menus. Select one of the two options:
- Standard: Displayed the same way as in Revo XEF.
- Regular products: Menu products are displayed together with à la carte products.
-
Group contents: Enable this option so that identical products are grouped by default. If disabled, they will be displayed and can be marked individually.
Example: If 2 Burger Shark are sent, they will appear as 2 Burger Shark rather than 1 Burger Shark and 1 Burger Shark. This means that if products are marked as done, they must be marked when both have been prepared. -
Close automatically when finished: When all dishes in an order are marked as done on a KDS 2 device:
- No: The order will not close automatically, but you will be asked if you want to do so.
- Yes: The order will close automatically on all devices, without warning.
- No, and don't ask anything: The order will never close automatically on the other KDS 2 devices and no question will be asked.
-
Order information: Select what information to display at the top of the order.
- Waiter: The name of the waiter who opened the order.
- Account: The account from which the order was sent.
-
Auto-notify Revo XEF when closing the order: Enable so that the KDS notifies the Revo XEF app when an order is ready.
-
Auto-print individually marked products: With this option enabled, when a product is marked as completed, an individual ticket will be printed automatically.
This option disables printing of the general ticket. -
Default flow: Select the state flow that will be applied by default at this KDS station if no specific one is defined in the catalogue, it will show "--". A "flow" is the sequence of states (e.g., Pending → In preparation → Ready) that dishes go through. The "+" button allows you to create new custom flows.
-
KDS Insights: Direct access to the KDS Insights module, where you can analyse how long each dish spends in each state and obtain metrics to optimise kitchen efficiency.
When Revo KDS 2 is activated for the first time on a Revo XEF account, the default flow defined in Cegid Revo will always be selected.
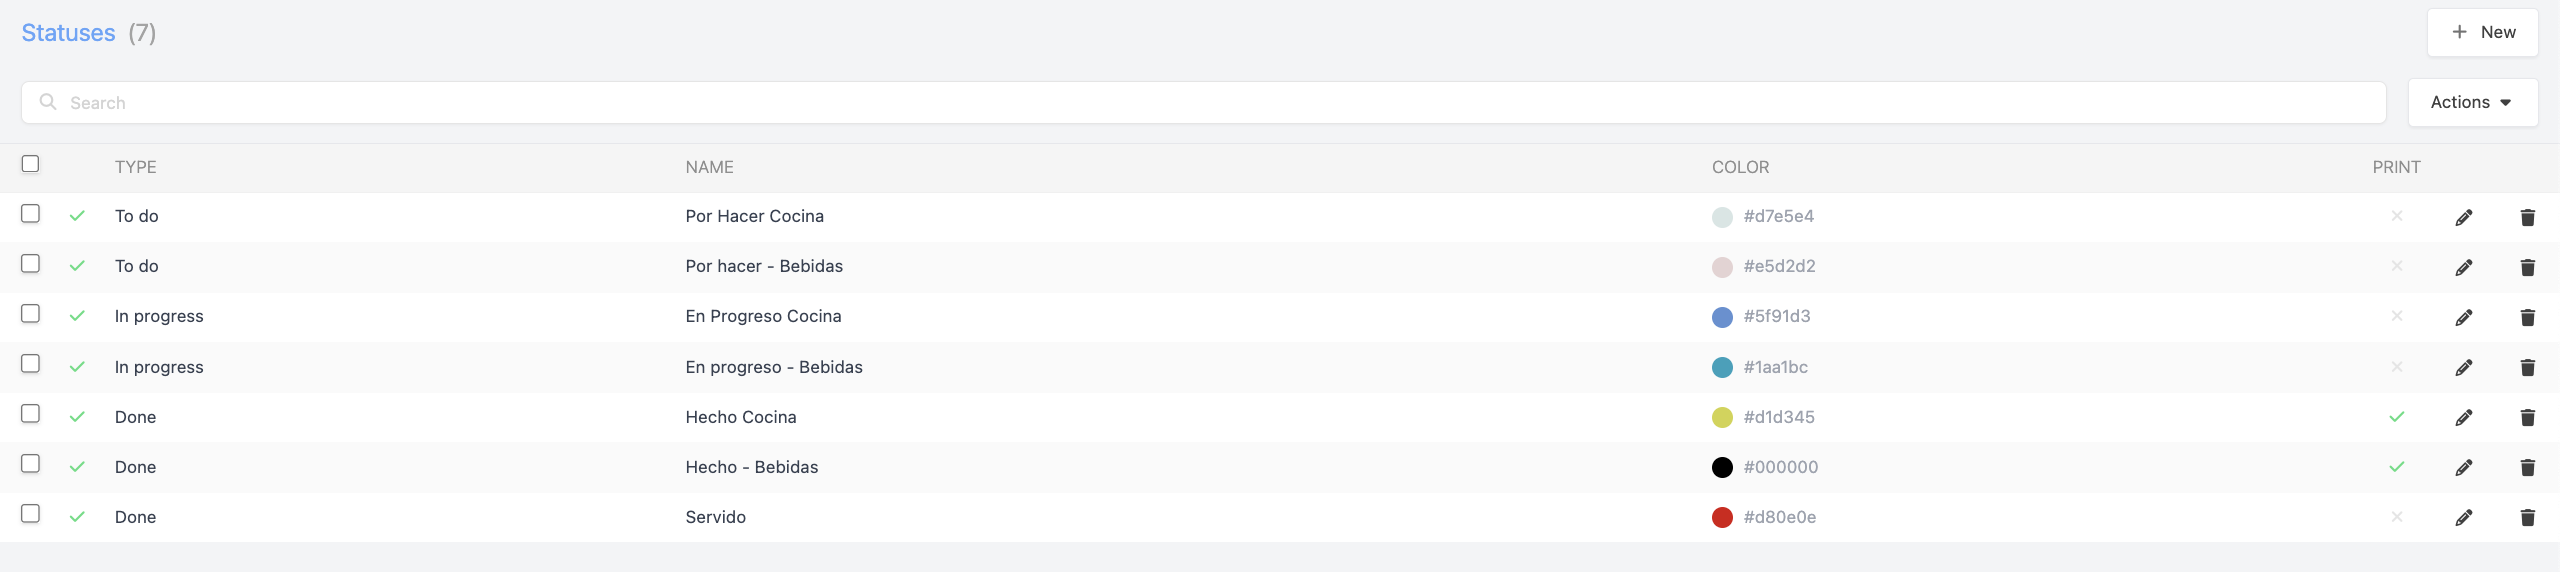
3. STATES:
In the States section you can create as many states as needed.
Think of a grill restaurant and how the preparation of a good entrecôte is orchestrated. The meat starts as a dish "to do" and, once on the grill, goes from "seared" to "in progress", and at the final step it is "done". That is when the waiter picks it up and the entrecôte appears on screen as "served"...
Now imagine what happens in a pizzeria. A margherita pizza also starts as a "pending" dish, but after preparing the base it appears as "base ready". When the tomato sauce and cheese are added, its state changes to "ingredients added" and then it is marked as "in the oven". When it comes out it is "done" and, as in the grill restaurant, the waiter picks it up and the pizza appears on screen as "served".
Therefore, to achieve these types of structures, you must first create the states and then create the state flows, which define the order of states you want dishes to follow.
To create a state:
1. Click + New.
2. Fill in the following information:
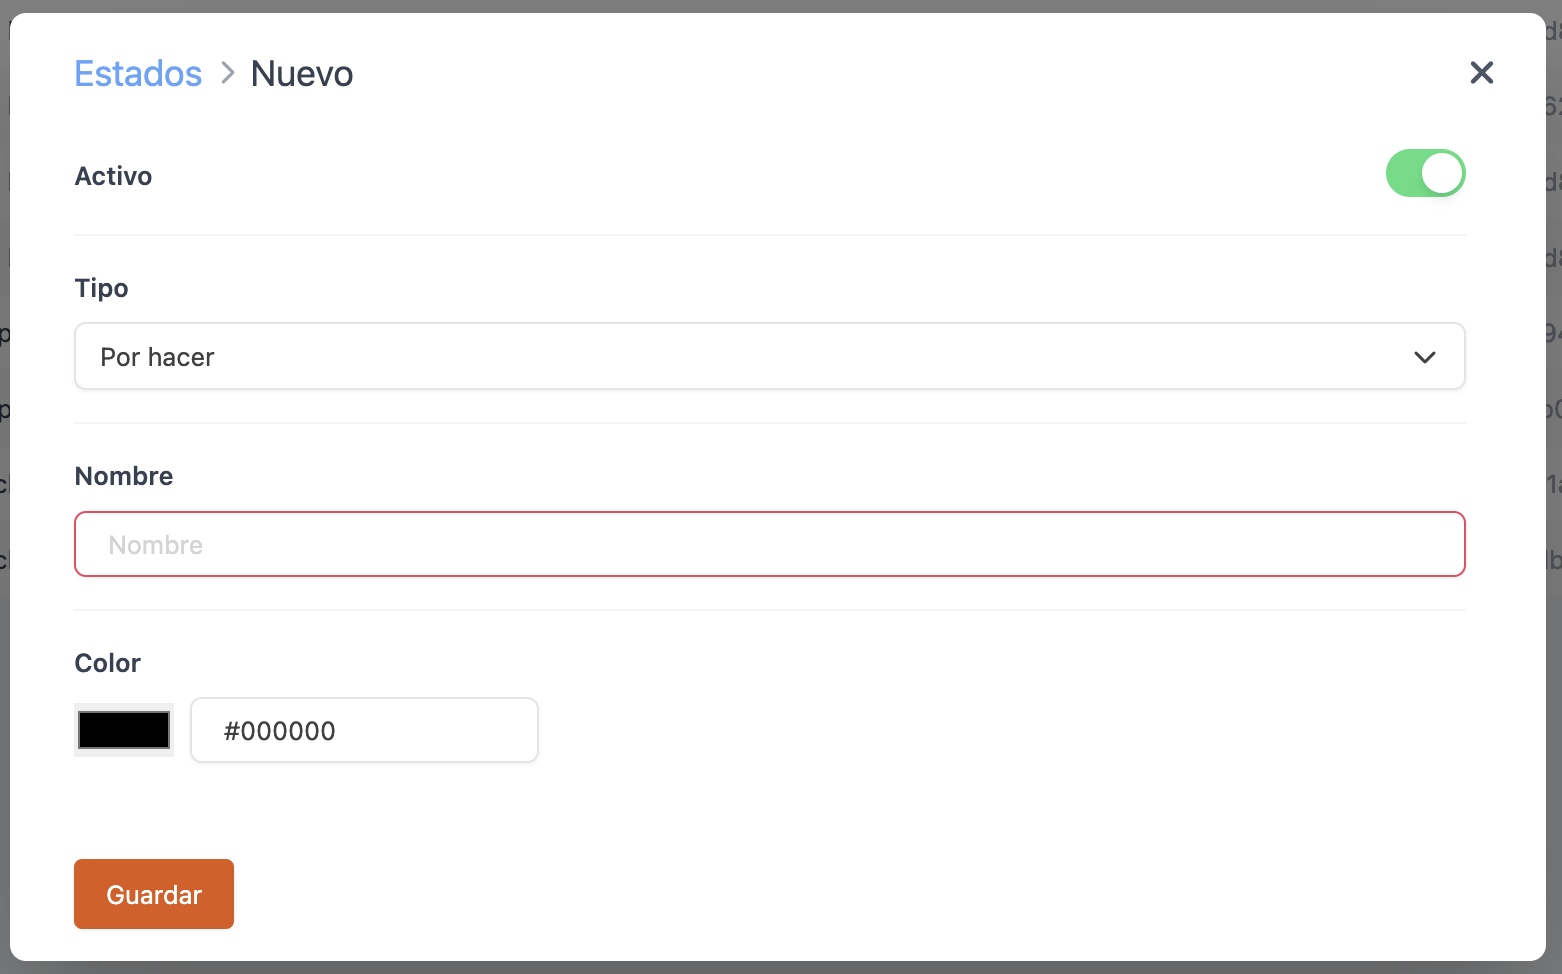
- Active: Enabled.
-
Type: Select the state type.
- To do
- In progress
- Done
- Name: Enter the name of the state.
- Colour: Set the colour for the state (the colour displayed when marking the dish).
- Print: The Print option in KDS states for Revo XEF indicates whether that state is configured to trigger a physical ticket print in the kitchen or at the bar. This means that even if an order has not reached the last visible state ("FINISHED" or similar), a pass ticket can be printed at that specific moment to coordinate deliveries or internal processes.
By assigning a different colour to each state, kitchen staff can understand at a glance what they need to do and what the rest of the team is working on.
3. Click Save.
When Revo KDS 2 is activated for the first time on a Revo XEF account, three default states will always be created, one of each type. These three states will be associated with the default flow also defined by Cegid Revo.
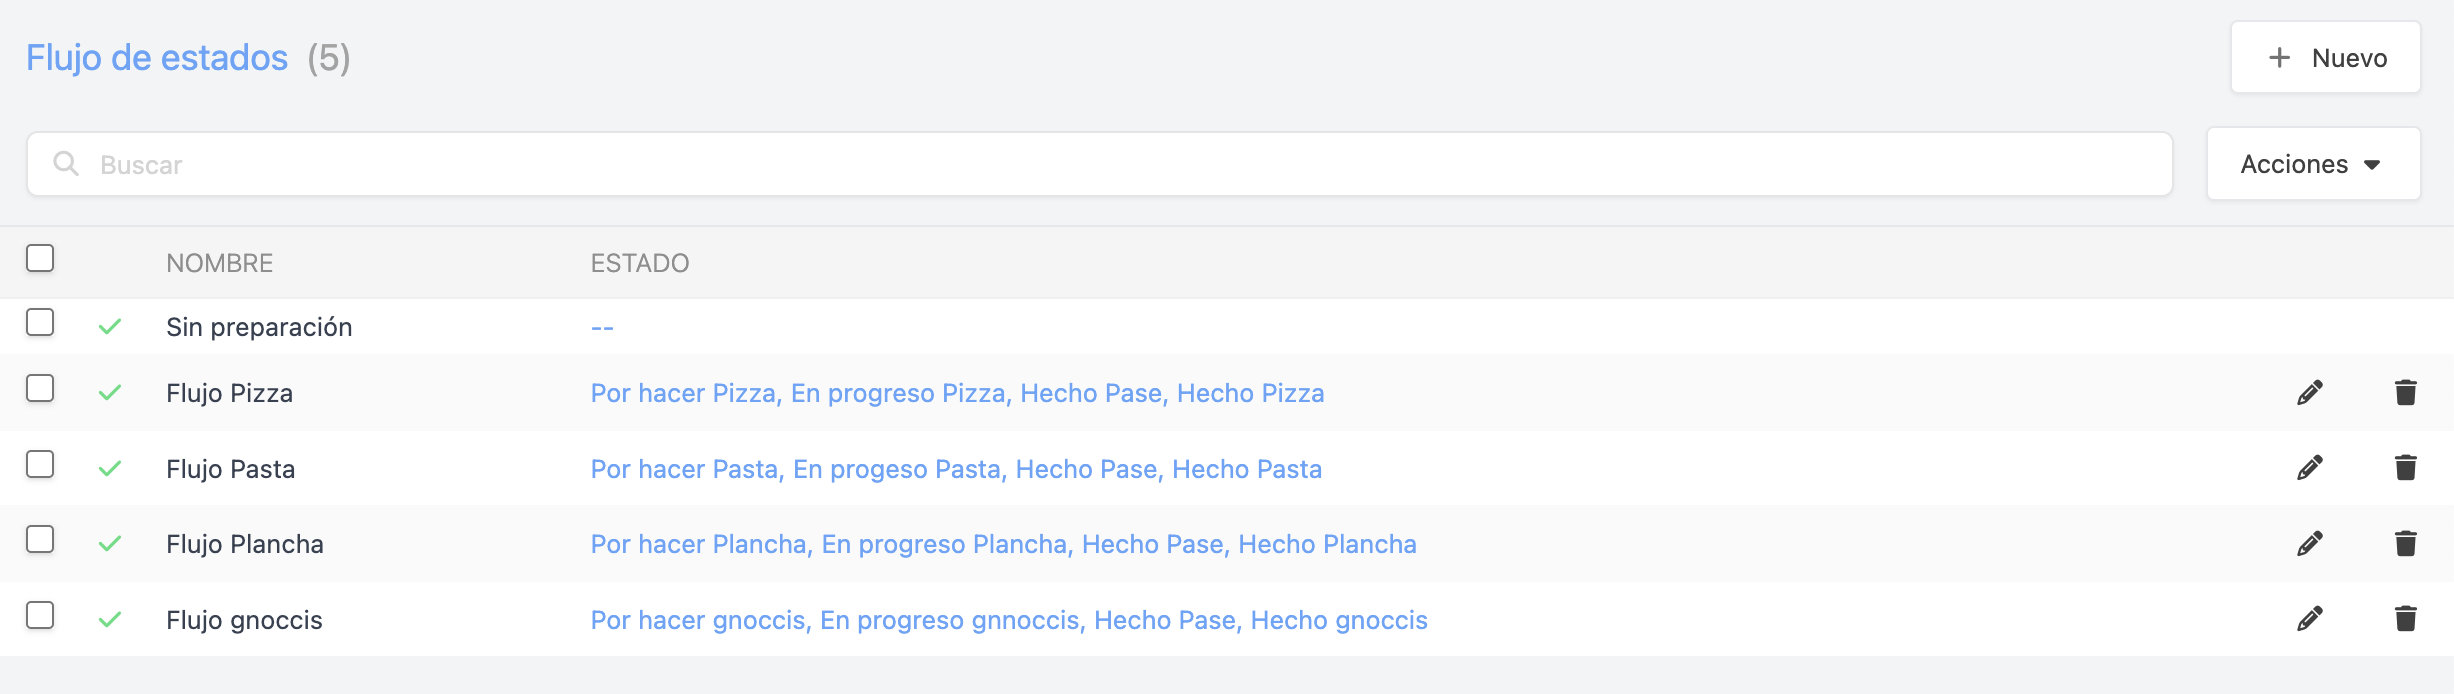
4. STATE FLOW:
In this section, you can create state flows.
A State flow is the defined order of states that your dishes will follow.
As we know, each dish follows its own preparation stages, its own flow, with different timings. But they all have something in common: they are preparations made up of several steps, often carried out in sequence, and they form a composition that, well managed with the help of technology, is designed to achieve better results.
State management is the essence of Cegid Revo's KDS 2, which differs from basic kitchen screens by allowing customisation for each dish, staying true to its preparation processes. This way, you can indicate and display which stage each dish is at, and use filters to see how many and which dishes are at each step of the process.
As mentioned above, in the general configuration you have selected/defined a default flow that all products in your catalogue will follow, but if you want certain products to follow a completely different state flow, that is possible. We explain this below, but first, let's create a state flow. To do so:
1. Click + New.
2. Fill in the following information:
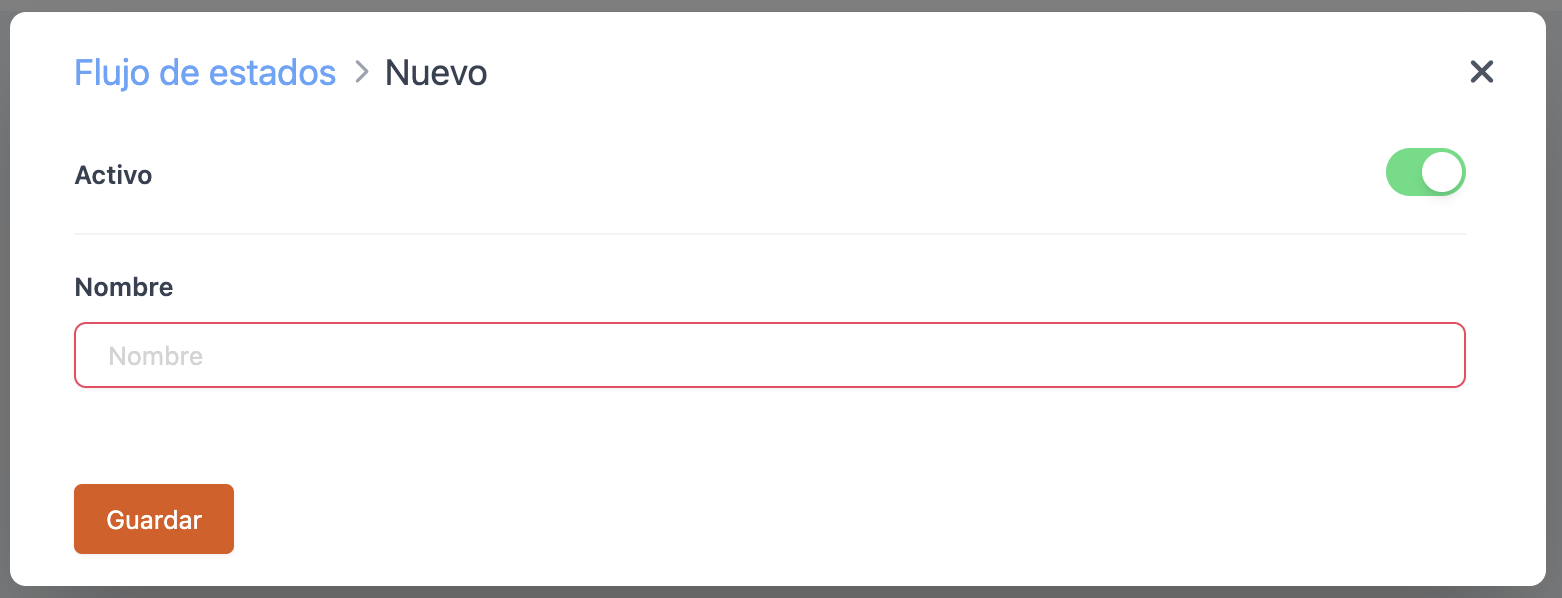
- Active: Enabled.
- Name: Enter the name of the state flow.
3. Click Save.
4. Once the state flow has been created, associate the desired states with your flow.
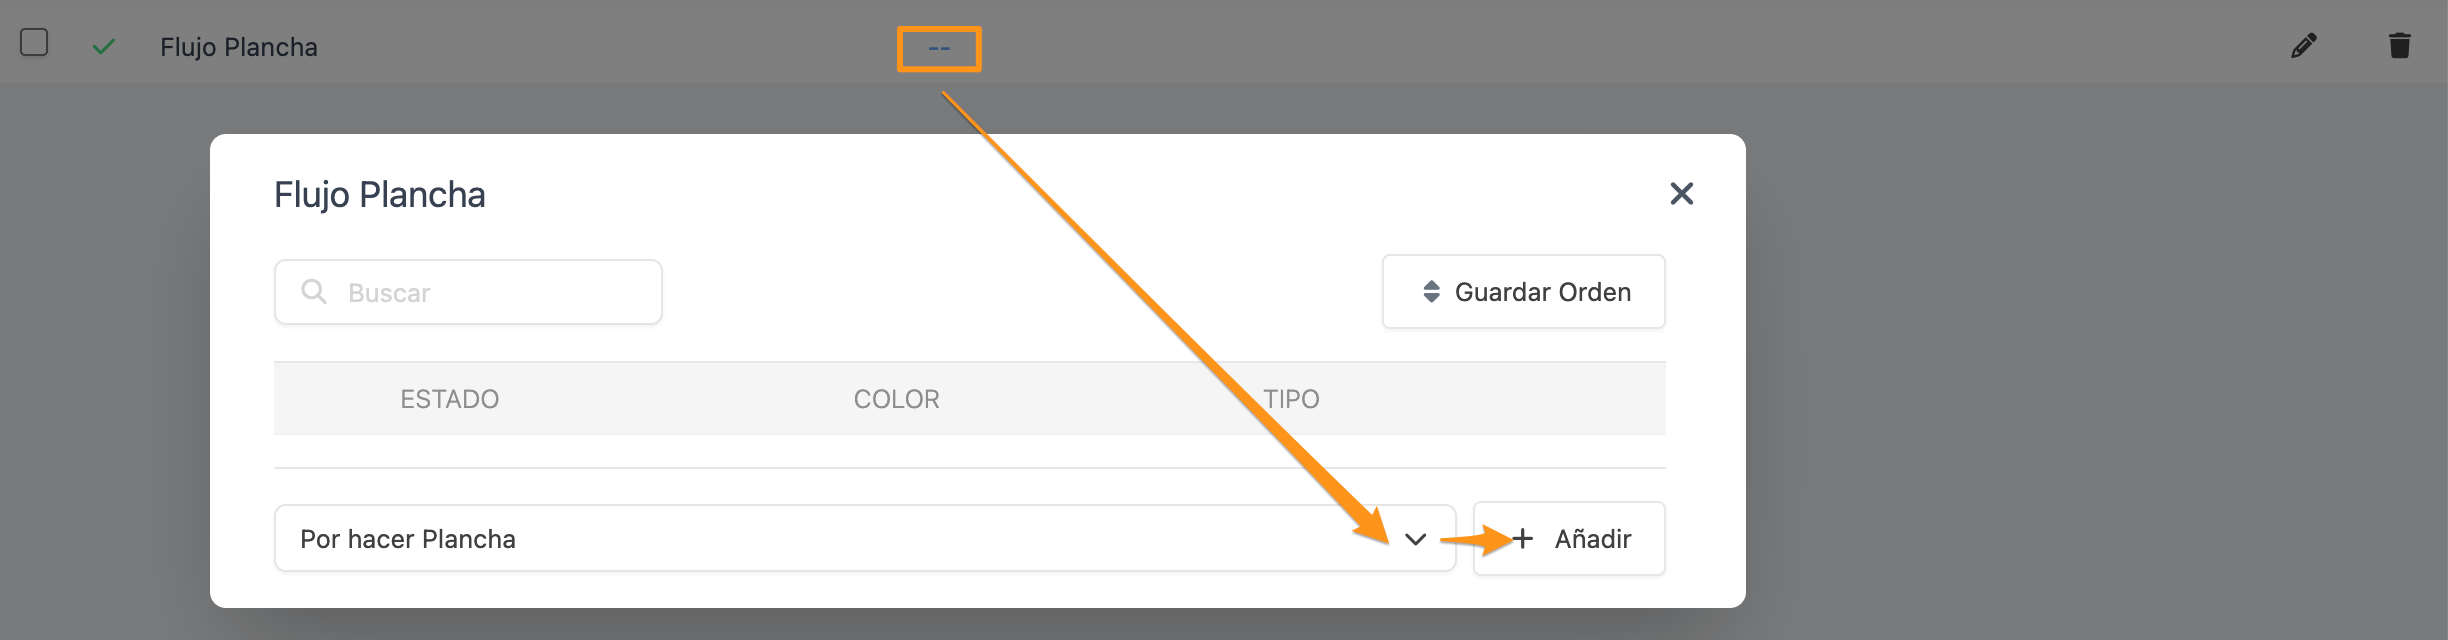
4.1 To do so, click --:
4.2 Select the state.
4.3 Click Add.
4.4 Once the states have been added to the flow, you can also change the order of the states using the following button: .
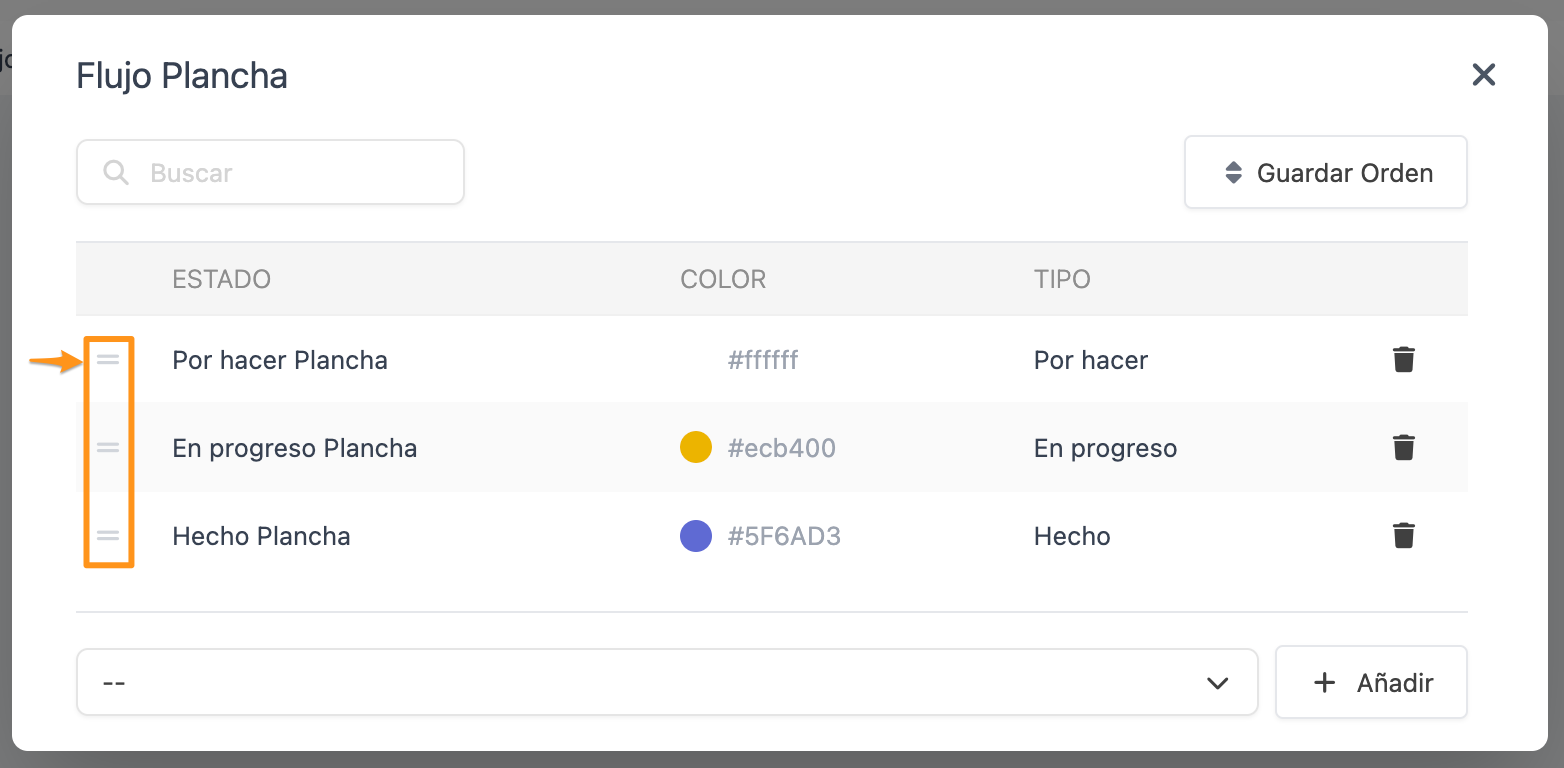
4.5 If you have changed the order of the states, to apply the changes click Save Order.
5. Once your state flow has been created, there are two places where you can assign it:
-
1. In the general configuration. In this case you can change it if you do not want to use the flow defined by Cegid Revo.
-
2. In a group/category/product. In this case, as mentioned above, if you want certain products to follow a completely different state flow from the one in the general configuration, follow these steps:
- 2.1 Go to your Revo XEF catalogue Groups.
- 2.2 Locate the group/category/product where you want to associate the new state flow and Edit by clicking .
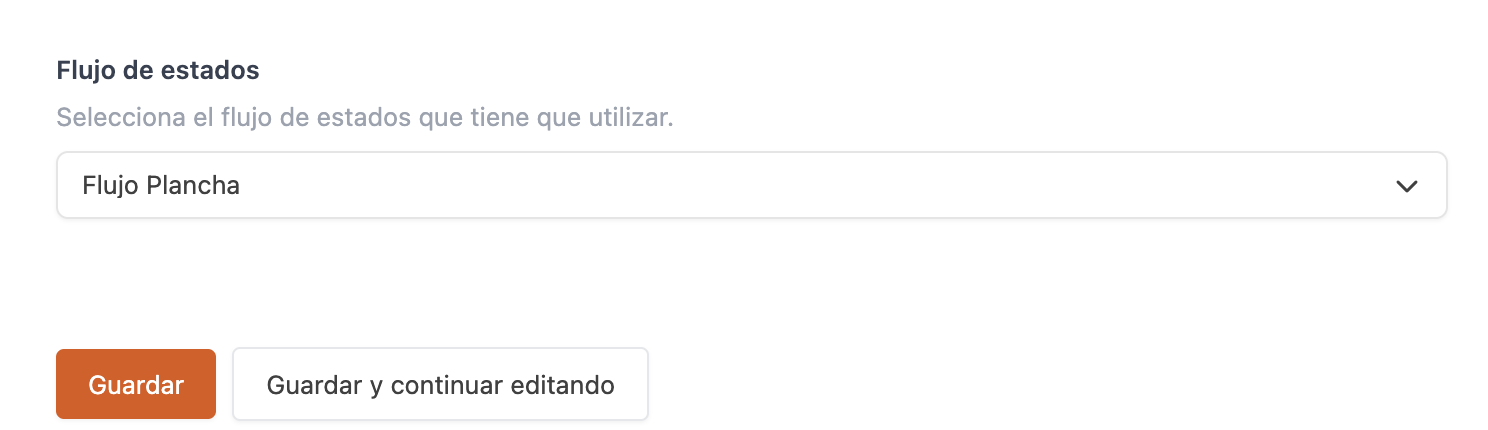
- 2.3 Once the editing window is open, locate the State flow field and select the flow you want to associate with that group/category/product.
- 2.4 Click Save.
When Revo KDS 2 is activated for the first time on a Revo XEF account, two state flows will always be created by default:
- No preparation: This flow contains no states and none should be added. If you associate this flow with a group/category/product, those products will not appear on any Revo KDS 2 device, since by default all catalogue products will use the default flow defined in the general configuration. This is useful when you do not want certain products to appear on the KDS, such as beverages. Think of it as the equivalent of "No Printer" for printers.
- Default: This is the flow selected by default in the Revo KDS 2 general configuration. It contains the three default states defined by Cegid Revo. Never leave this flow without states.
5. KDS BEHAVIOURS:
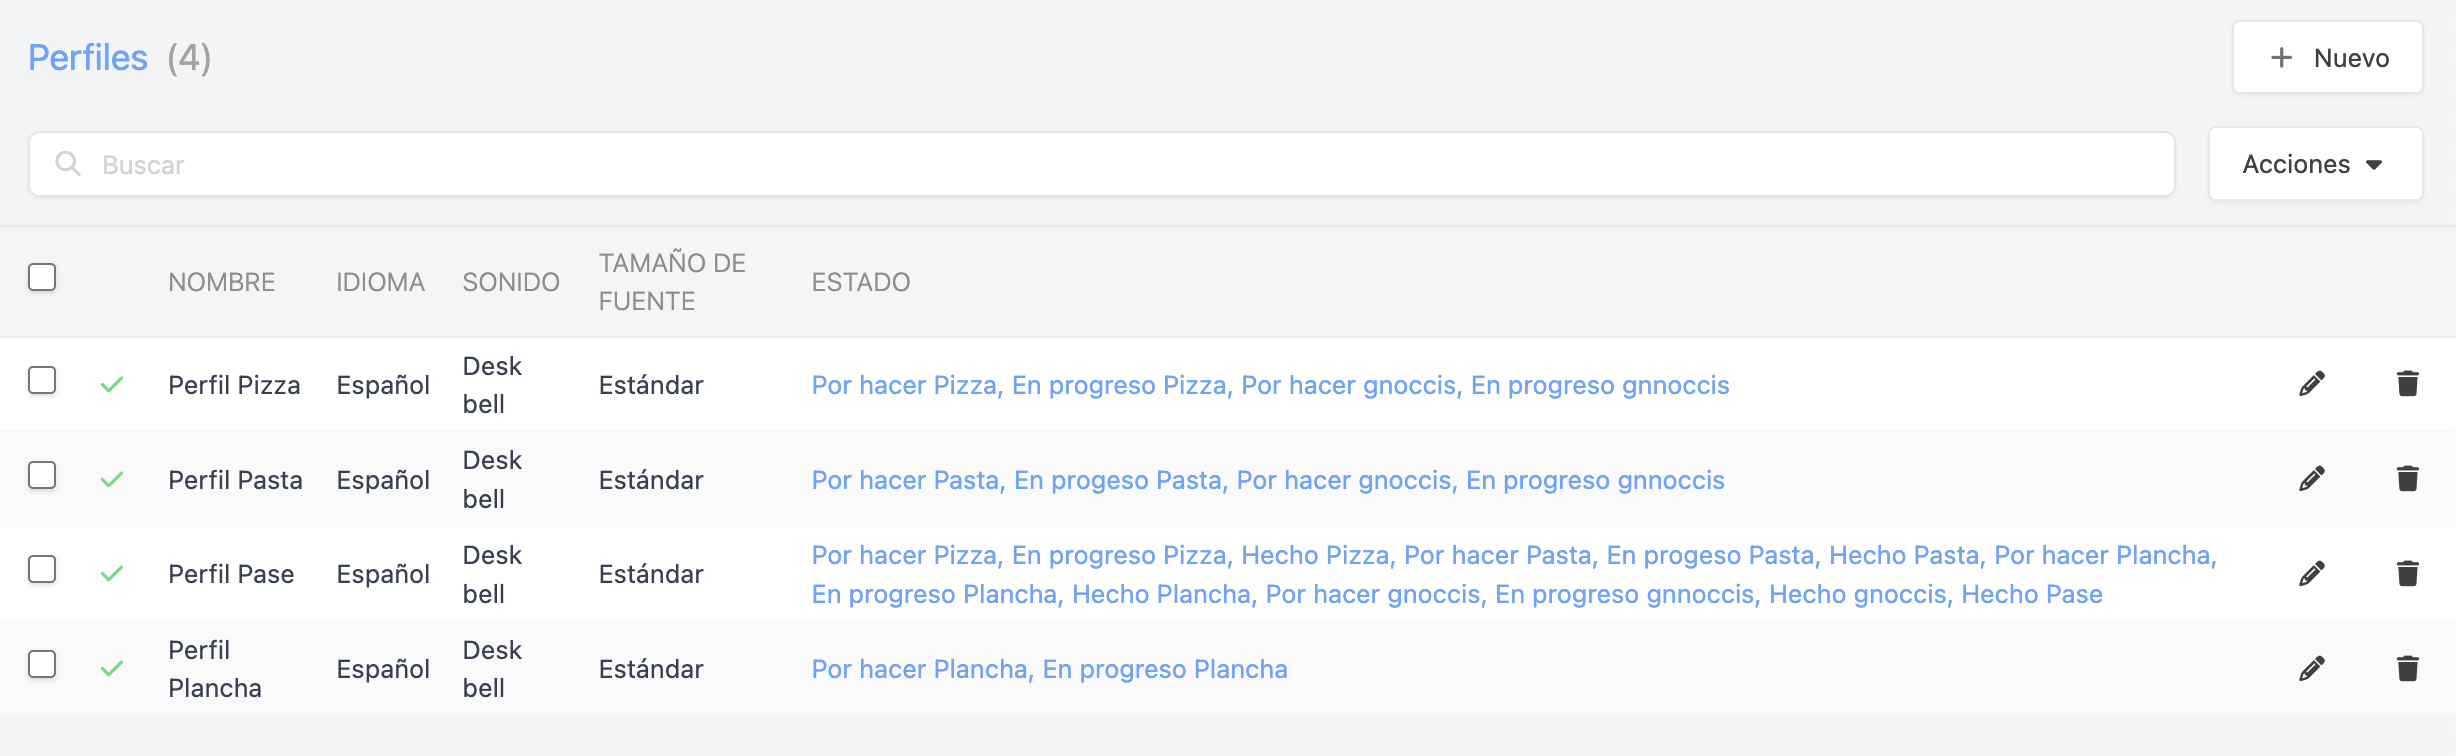
In this section you can create Profiles for Revo KDS 2.
In profiles, you can apply different configurations to each KDS device and set which states to display on each one.
For better operational organisation, you can configure all screens simultaneously, or choose which states to show on each device, adapting to the specific needs of each station (fish, meat, cold starters, hot starters...) and simplifying the daily routine of restaurants operating with multiple sections.
For example, a restaurant with five KDS: one for the cold station, one for the hot station, a pass KDS for waiters collecting dishes from the kitchen, one for drinks at the bar, and a control one for the service manager. Each one can see the states relevant to it: on the cold station KDS, staff can see which dishes are "to prepare" or with "ingredients added", and on the pass KDS, which ones are "ready to serve" and "served".
To create a profile, follow these steps:
1. Click + New.
The following window will appear automatically:
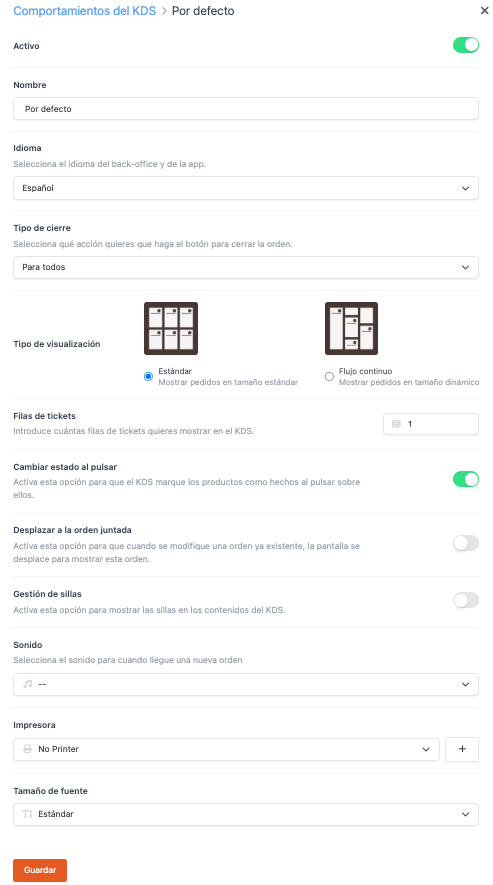
2. In this window, you will find the following fields:
-
Active: Enabled.
-
Name: Enter a descriptive name for the KDS 2 profile.
-
Language: Select the language to use in the app with this KDS 2 profile.
-
Close type: in the KDS behaviour configuration, determines how and who can close an order or mark dishes as done on the KDS screen:
- For all KDS: The KDS screen will be able to close the associated orders. This offers greater flexibility and allows the team to complete orders from any authorised station.
- Only for my KDS: Restricts the close action exclusively to the current screen. In addition to marking the dishes in the order as done, this option allows a bulk action by moving all visible dishes on the screen to the last state configured in the "states" section. It is useful for specialised roles, such as the pass or separate bars, where each KDS controls only its operational scope and directly manages the progression of orders.
-
Display type: Choose between Standard or Continuous flow.

-
Ticket rows: Define how many rows of tickets to display on the KDS 2.
-
Change state on press: Enable so that the KDS 2 changes the state of products when they are pressed.
-
KDS coordination: Enable this option to monitor the status of orders and contents from different kitchen profiles, all from a single view.
-
Scroll to merged order: With this option enabled, when a modification is sent to an open order, the KDS will display the order that has been merged, and will also emit a sound.
-
Seat management: Enable this option to display seats in KDS contents.
-
Sound: Choose the sound for new orders received on the KDS 2. Here is a list of available sounds.
Air Horn:
Desk Bell:
Door Bell:
Japanese Bell:
Metal Gong:
Ship Bell:
- Printer: Select a printer from the list to print pass tickets on the KDS. Can
6. TIME MANAGEMENT:
Revo KDS 2 optimises time management in the kitchen, ensuring greater efficiency and synchronisation. Now, each dish order has a single time management entry, simplifying the process. In addition, multiple ways of starting the preparation time are incorporated, adapting to different workflows. The calculation based on the product time and its modifiers is maintained, improving accuracy and organisation.
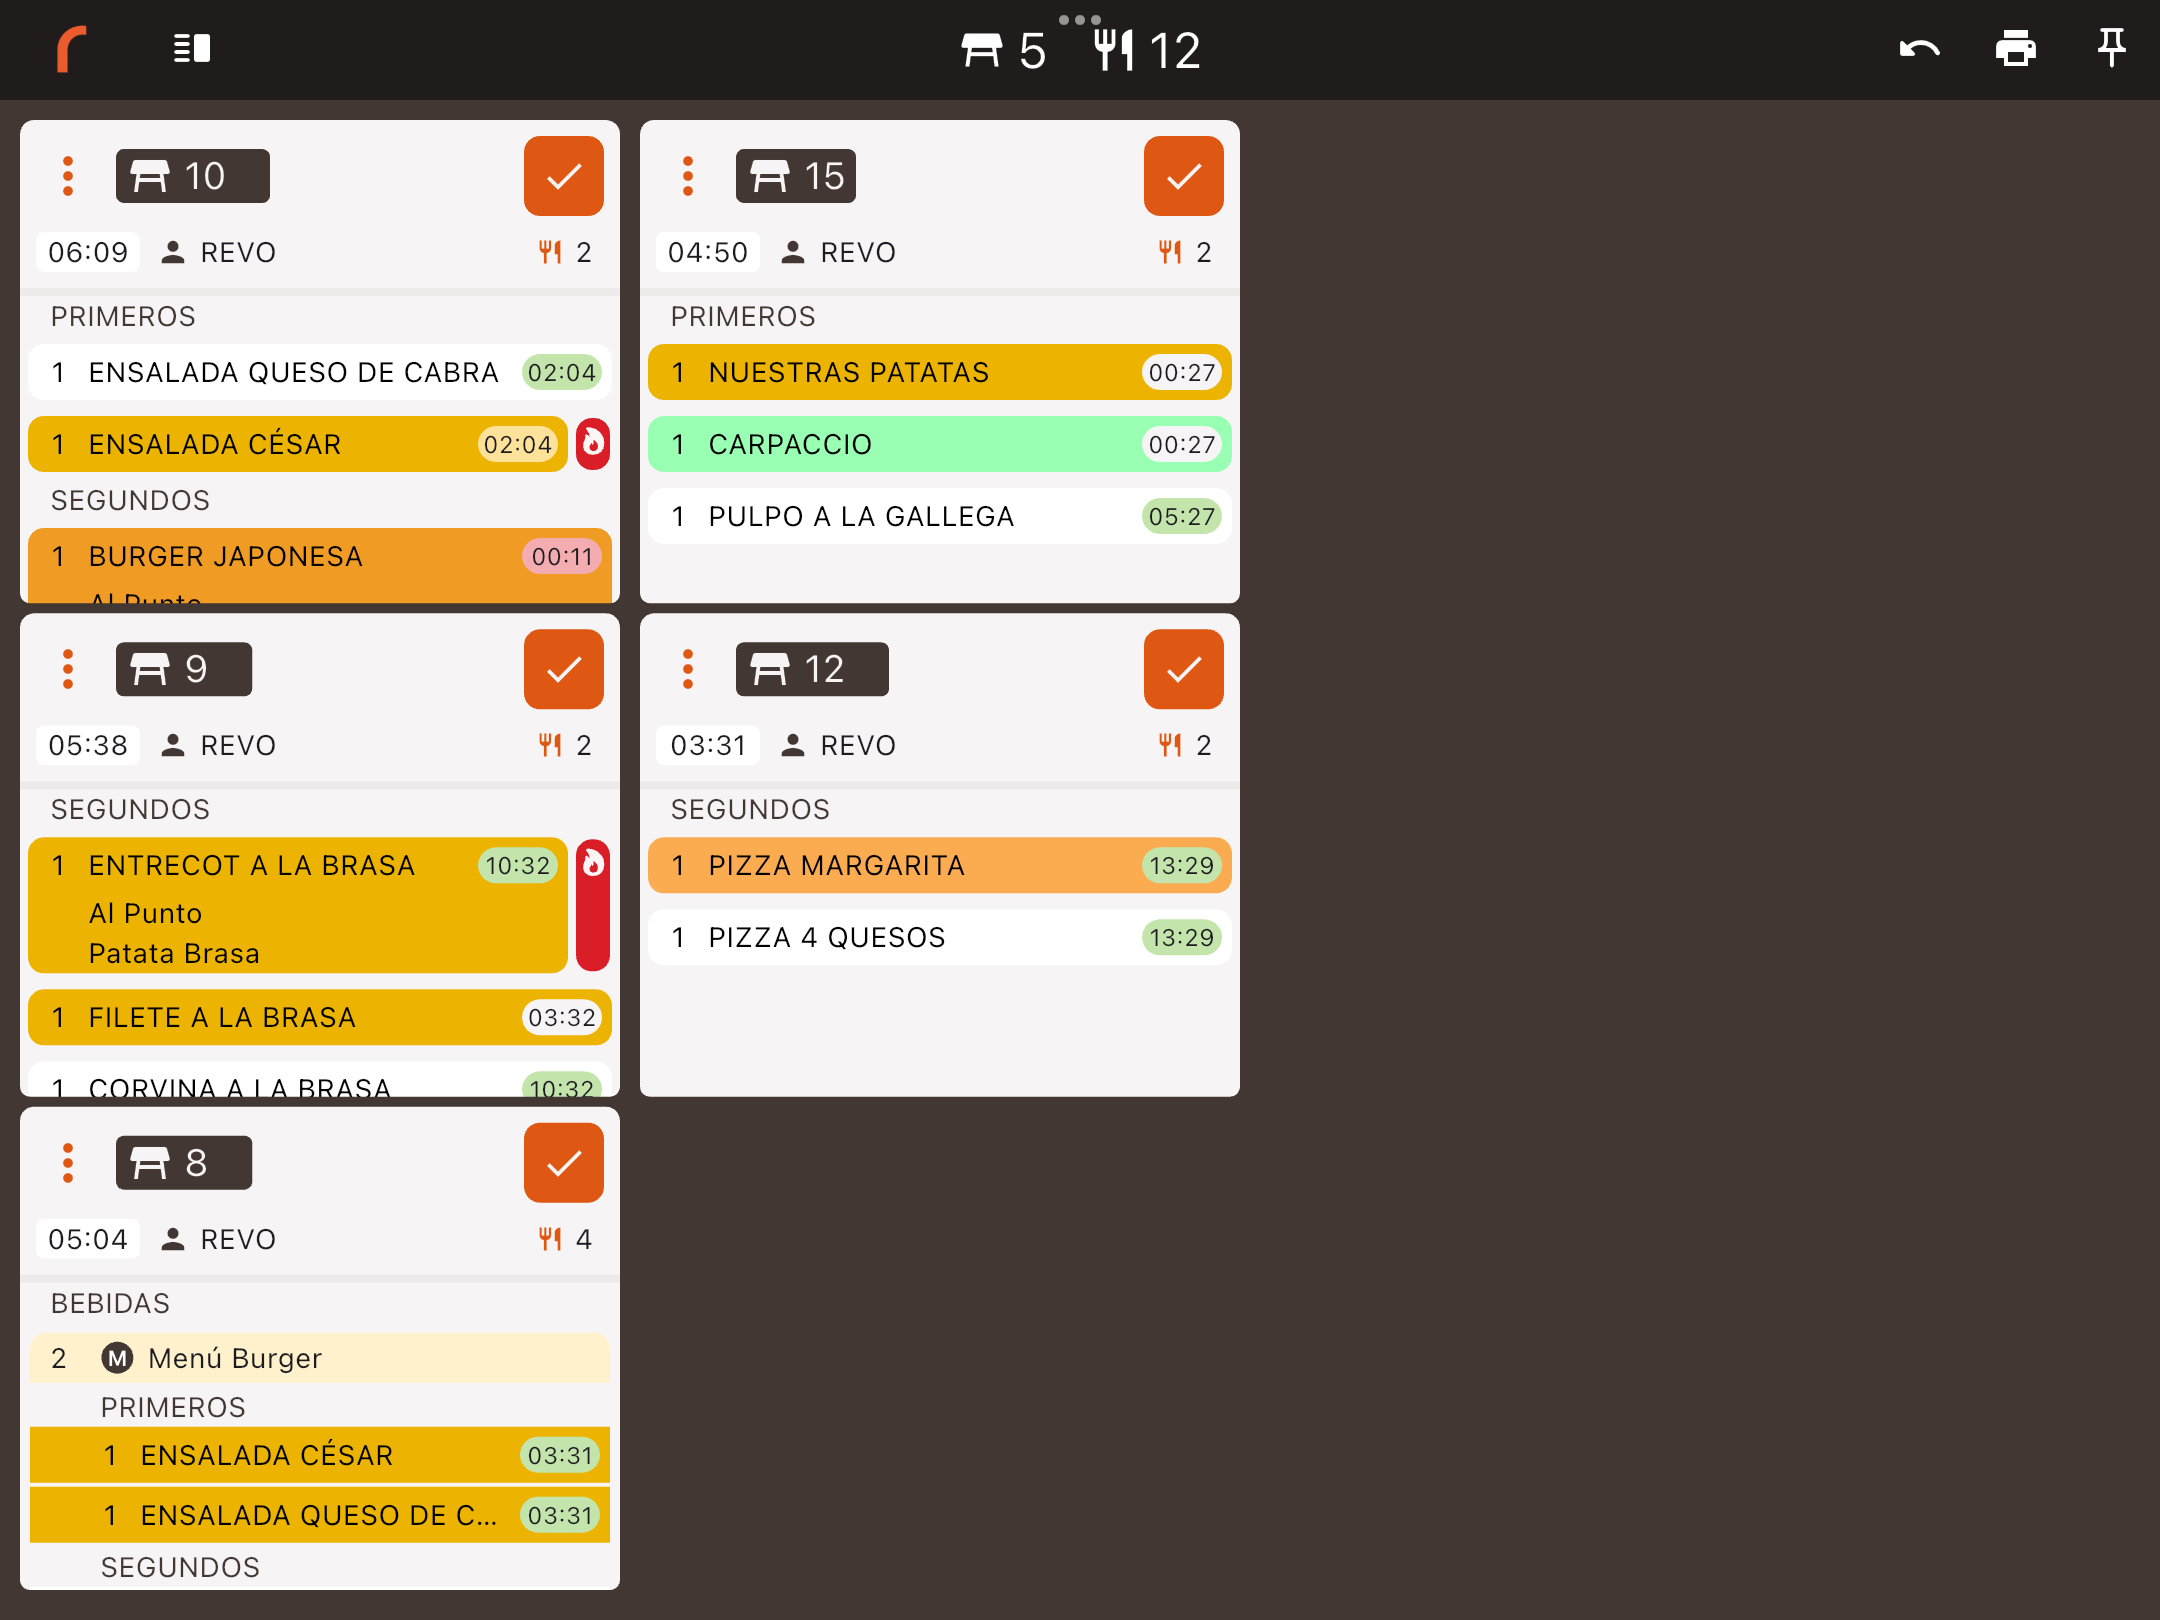
- Green: The dish should be in preparation.
- Yellow: Only a few seconds remain before the dish is ready.
- Red: The dish has exceeded its preparation time.
- Light grey: The time remaining before starting to prepare the dish.
CONFIGURATION:
Products
First, specify the preparation time for products and modifiers. These times can be configured in the product and modifier card. Enter the time in seconds. Example 180:
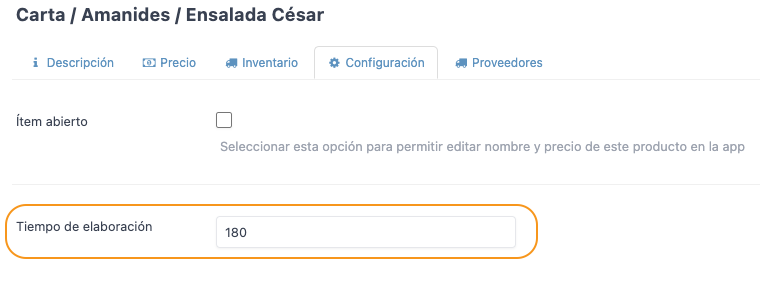
If you do not want to track the time for a product, simply leave it at zero.
Time management
Time management is linked to a Dish order and can be configured in the Time management section within the KDS 2 area of the Revo XEF back-office.

-
Active: Enabled.
-
Dish order: The dish order to which the configuration is linked.
-
Start:
- Automatically on arrival: The timer starts when the order is received in the kitchen.
- On fire: The timer starts when a dish is fired.
- When set to in progress: The timer starts when a product is set to in progress.
-
By completing the previous dish order: The timer starts when the previous dish order is fully complete.
Note: You can configure more than one selection at a time. This gives you multiple ways to start the preparation time.
-
Warning threshold: Configured as a percentage. The warning will appear when a certain percentage of the total preparation time remains. Example: If the threshold is set to 10% and the total time is 5 minutes (300 seconds), the warning will appear when 30 seconds remain. If the total time is 2 minutes (120 seconds), the warning will appear when 12 seconds remain. This change allows the warning to adjust proportionally to any preparation time.
-
Time management type:
- Start together: The timers for each dish start at the same time.
- Finish together: The timers for each dish start at the precise moment so that they all finish at the same time.
Click Save to apply the configuration.
Note: Only one entry per dish order can be created.
7. KDS NOTIFICATIONS
The KDS Notifications screen in Revo XEF allows you to manage how alerts related to the different KDS events are displayed and announced. Thanks to these options, each kitchen can adapt the way it receives information according to its work pace and operational needs.
These are the steps to configure notifications:
1. Access the configuration menu in the Back-office and go to KDS 2 → Notifications.
2. Enable or disable the functions according to your kitchen's needs:
- Banner: to display the alert on screen.
- Sound: to activate the audio alert.
- Notification centre: to log each event.
- Show notification: to choose when to display the notification.
3. Once the configuration is set, click Save to apply the changes.
-
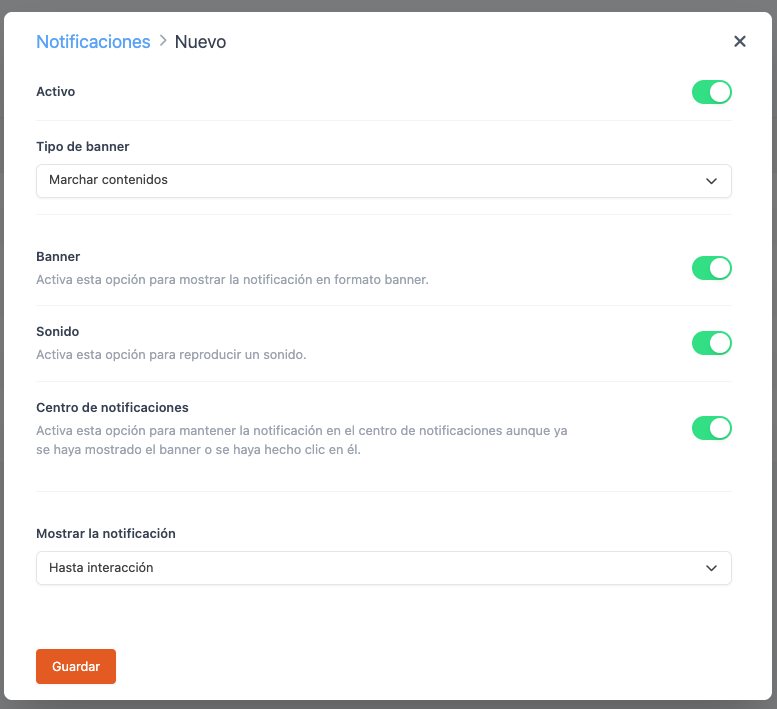
Active: Enabled.
-
Banner type:
- Fire contents: Displays notifications when a content is fired.
- Fire dish orders: Displays notifications when a dish order is fired.
- Table change: Displays notifications when the table of an order is changed.
- Order changes: Displays notifications when changes are made to the contents of an order.
- Cancellations: Displays notifications when an order is cancelled.
- Merge orders: Displays notifications when an order or table is merged with another.
- Move contents: Displays notifications when content is moved from one order to another.
- New order: Displays notifications when a new order is received.
-
Banner: Enable this option to display notifications as a small visual banner on the KDS screen.
-
Sound: Plays a sound when a notification appears. Useful for alerting staff even when they are not looking at the screen. Check this option to activate the audio alert.
-
Notification centre: Saves each notification in a dedicated panel. This allows you to review them even after the banner has disappeared or been interacted with. Enable the option to log all alerts in the centre.
-
Show notification:
- Until interaction The notification will remain visible on screen until the user performs an action (for example, clicking). Ideal for ensuring the alert does not go unnoticed.
- Short time (5s) The notification will remain visible on screen for 5 seconds.
- Medium time (15s) The notification will remain visible on screen for 15 seconds.
- Long time (30s) The notification will remain visible on screen for 30 seconds.
Additional information
- If there are no records, the message "No records" will appear.
- You can create a new configuration or entry by clicking New.
This screen improves alert management in the kitchen, ensuring that all relevant information reaches the team efficiently and adapted to the workflow of each establishment.
Note: Sound is configured individually per profile, so you can assign different sounds to each KDS 2 device.