order journey — complete configuration and usage guide
Order Journey is the operational order management system built into Revo XEF that guides your team step by step throughout the entire service — from the moment a guest is seated to when they pay and leave. It eliminates confusion, standardises processes, and keeps everyone in sync in real time.
1. WHAT IS ORDER JOURNEY
2. BENEFITS AND REQUIREMENTS
3. BACK-OFFICE CONFIGURATION
3.1. GUIDES
3.2. ACTIONS
3.3. ACTION TYPES
4. HOW IT WORKS ON THE POS / TABLET
5. TROUBLESHOOTING COMMON ISSUES
1. WHAT IS ORDER JOURNEY
With Order Journey, you move away from disorganised processes to an intelligent management system that guides your team step by step. Order Journey doesn't just track orders — it standardises and optimises every stage of service, adapting to each context and to your business's specific needs.
Order Journey takes control of your order workflow: from the moment the guest orders to delivery and payment, managing every stage with precision and clarity. Connected to Revo XEF's point of sale software, it ensures every member of your team knows exactly what to do at every moment.
2. BENEFITS AND REQUIREMENTS
✅ BENEFITS
- Standardised operations: Full control over processes, minimising errors and unnecessary costs.
- Synchronised team: Smooth communication across all areas of the restaurant.
- Operational clarity: Every team member knows exactly which step to carry out at any given moment.
- Adaptability: Customised workflows by time slot, day, role, and special event.
- Error reduction: Visual guides that minimise oversights and confusion during peak hours.
- Optimisation: Improved service times and guest experience quality.
🔧 REQUIREMENTS
- Order Journey licence enabled on your Revo XEF account.
-
KDS2 (Kitchen Display System v2): Required for full functionality of the following actions:
- Wait time exceeded
- Order duration exceeded
- Serve dish
IMPORTANT: Order Journey is configured entirely from the back-office of Revo XEF. Once configured, guides and actions appear automatically in the app based on context (time slot, day, user role).
3. BACK-OFFICE CONFIGURATION
Log into the back-office of revo XEF and locate the ORDER JOURNEY section in the left-hand menu.
3.1. GUIDES
A Guide is a set of steps (actions) your team must follow to process an order. You can have different guides for different contexts: time slot, day of the week, service type, or special event.
Example: A restaurant might have two guides:
- Weekday Lunch: 4 fast steps (take order → kitchen → serve → charge).
- Weekend Dinner: 10 detailed steps (welcome → menu → starters → main → dessert → bill...).
HOW TO CREATE A GUIDE
1. In the ORDER JOURNEY section, go to Guides and click + New.
2. Fill in the form fields:
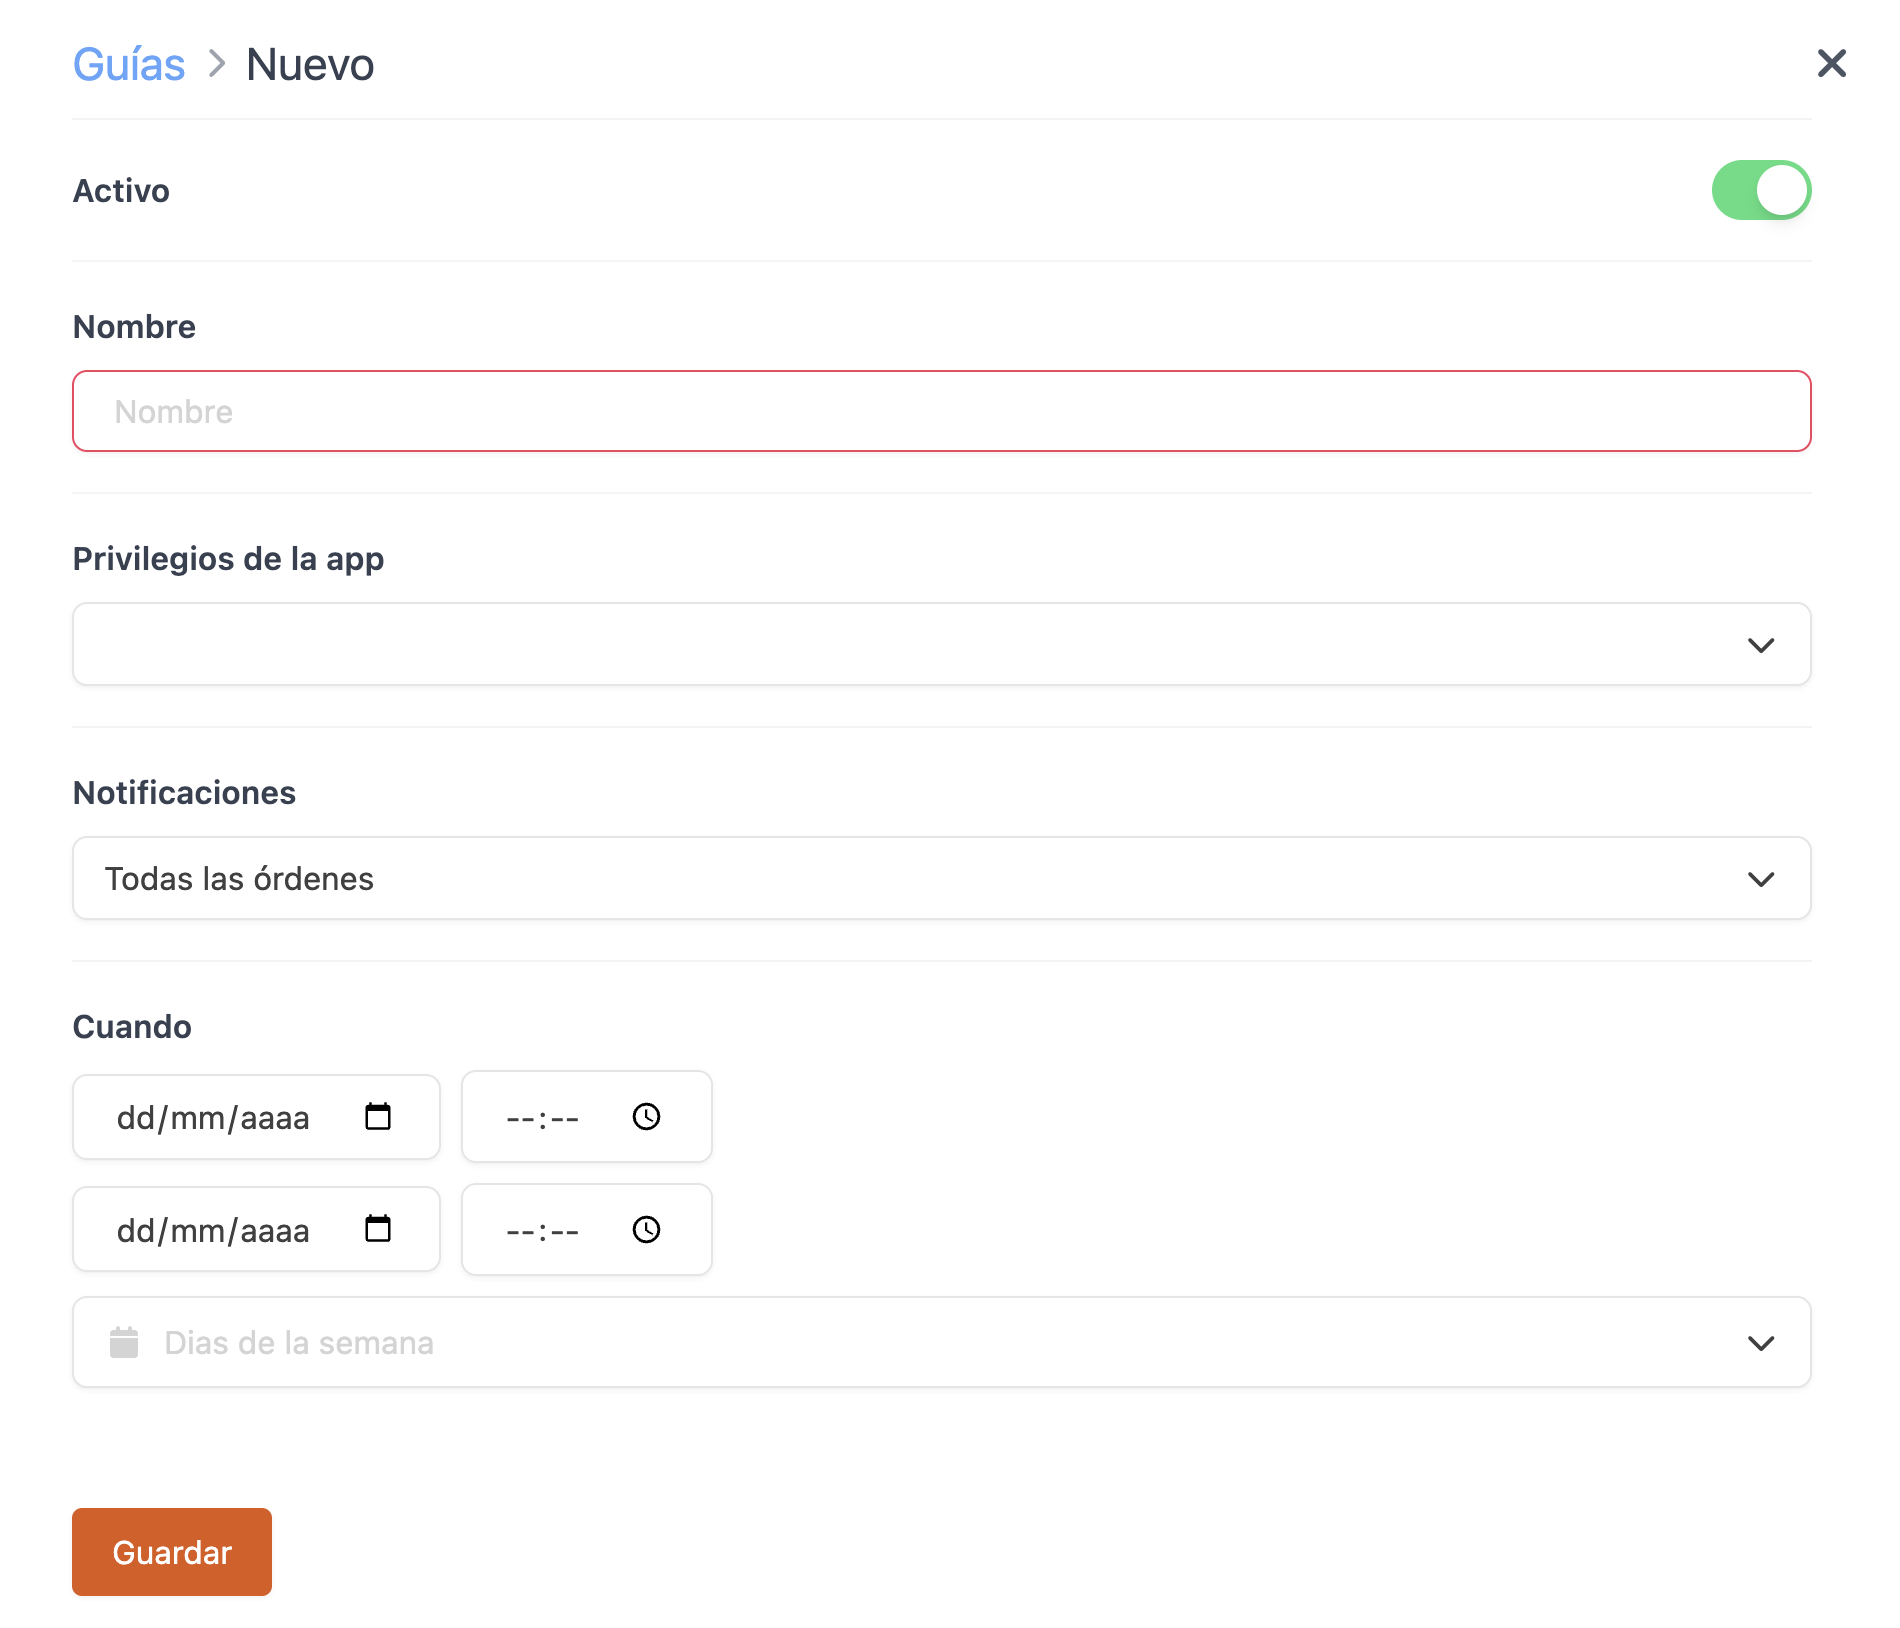
- Active: Toggle on for the guide to be live.
- Name: Enter a descriptive name (e.g. "Weekend Dinner", "Quick Lunch").
ROLE RESTRICTIONS (OPTIONAL)
- App privileges: Select the roles that can view and use this guide.
IMPORTANT: If you leave this field empty, all roles can use the guide.
TIME RESTRICTIONS (OPTIONAL)
Leave empty for the guide to apply at all times.
-
When: Date range during which the guide is active.
-
Example — Summer Menu: From
01/06/2025to30/09/2025
-
Example — Summer Menu: From
-
Start time / End time: Times of day when active (HH:MM, 24-hour format).
-
Example — Lunch: From
12:00to15:00
-
Example — Lunch: From
- Days of the week: Check the days the guide applies.
3. Click Save.
4. Once the guide is created, add the Actions that make it up (see next section).
3.2. ACTIONS
An Action is an individual step in the order workflow: "Take Order", "Serve Starters", "Bring the Bill", etc.
HOW TO CREATE AN ACTION
1. From the Guides list, click on the number of actions next to the guide you want to configure.

2. The Actions screen for that guide opens.
3. Click + New to create a new action.
4. Fill in the fields:
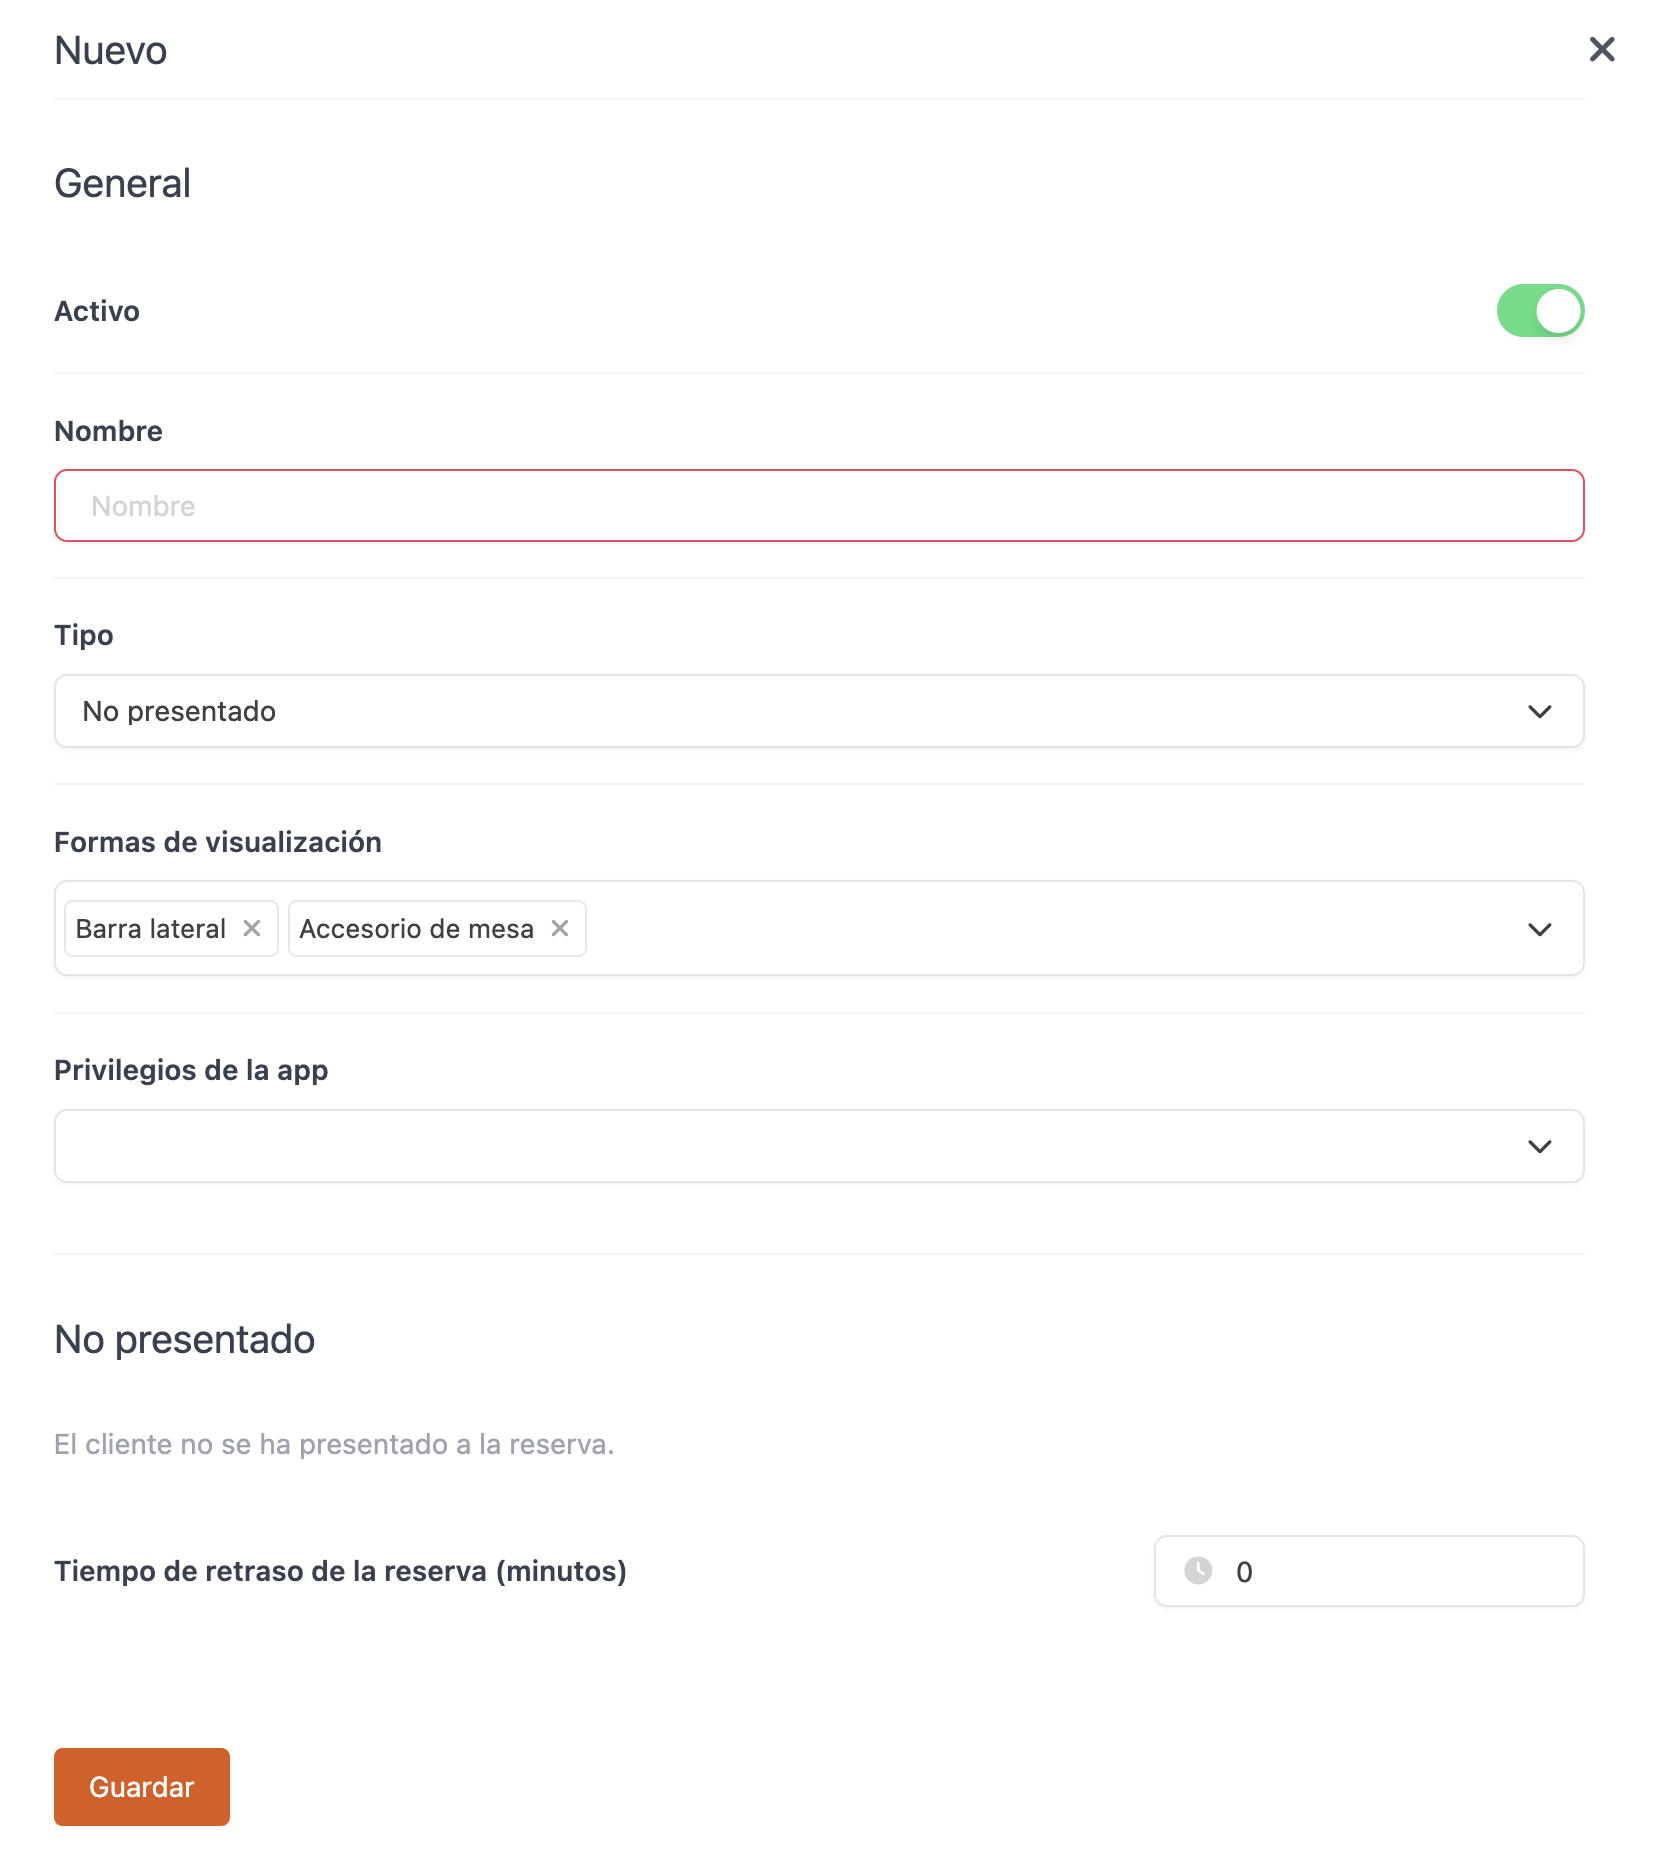
- Active: Toggle on so the action shows on the POS.
- Name: Clear, descriptive name for the step (e.g. "Take Order", "Charge Guest").
- Action type: Select which type of alert or event triggers this action (see section 3.3).
- Display modes: Define where the button appears in the app (sidebar, table accessory, or both).
ROLE RESTRICTIONS (OPTIONAL)
- App privileges: Define which roles can execute this specific action.
IMPORTANT: If no roles are defined on the action, it inherits the roles from its parent guide.
VALIDATION RULES (OPTIONAL)
Define conditions that must be met before the action can be executed (minimum time since an event, previous course served, etc.).
5. Click Save.
3.3. ACTION TYPES
The Action type defines which event triggers the alert and under what conditions. There are eight types available:
1. NO-SHOW
Alerts when a guest with a booking has not shown up after a set time since the reservation.
- Triggers: When X minutes have elapsed since the reservation time and the table still has no open order.
- Parameter: Minutes since reservation.
- Example: With 15 minutes set, if a table booked at 2:00 PM is still empty at 2:15 PM, the server receives an alert.
- Requires: Flow integration active.
2. WAIT TIME EXCEEDED
Alerts when guests have been sitting for too long without having their order taken.
- Triggers: When X minutes pass after the order is opened without any dish being recorded.
- Parameter: Minutes since guests were seated.
- Example: With 10 minutes set, if a table sits down at 8:00 PM and no dish is recorded by 8:10 PM, the server receives an alert.
- Requires: KDS2 active.
3. NEW DISH ORDER
Alerts the server to take the next course order once the previous one has been served for a set time.
- Triggers: When X minutes have passed since a specific course was served.
- Parameters: Previous course served + Course to order + Minutes since previous course.
- Example: 5 minutes after serving starters, an alert to take the main course order.
4. BRING THE BILL
Alerts the server to bring the bill once a set time has passed since the last course was served.
- Triggers: When X minutes pass after serving the last configured course.
- Parameters: Last course served + Minutes since that course.
- Example: 15 minutes after serving desserts, an alert to bring the bill.
5. CHARGE
Alerts the server to collect payment when the bill has already been printed and the guest has been waiting.
- Triggers: When X minutes pass after the receipt is printed at that table.
- Parameter: Minutes since the bill was printed.
- Example: With 10 minutes, if the bill was printed at 9:45 PM and payment has not been collected by 9:55 PM, the server receives an alert.
6. ORDER DURATION EXCEEDED
Alerts when a table has had its order open for too long.
- Triggers: When X minutes pass since the order was opened at that table.
- Parameter: Minutes since the order was opened.
- Example: With 120 minutes, if a table has been open for more than 2 hours, the floor manager receives an alert.
- Requires: KDS2 active.
IMPORTANT: This action is especially useful for managing table turnover during high-demand services.
7. REMOVE DISH ORDER
Alerts the server to clear plates from a course once enough time has passed since they were served.
- Triggers: When X minutes pass since a specific course was served.
- Parameters: Order to remove + Minutes since that Order was served.
- Example: 20 minutes after serving starters, an alert to clear the plates and prepare the table for the next course.
8. SERVE DISH ORDER
Alerts the server to bring a course to the table that is already ready in the kitchen (per the KDS) and whose previous course has already been cleared.
- Triggers: When the KDS indicates the course is ready AND the previous course has been cleared from the table.
- Parameters: Order to serve + Previous Order cleared (if not applicable, select "None").
- Example: When the KDS marks mains as ready and starters have been cleared, an alert to serve the main course.
- Requires: KDS2 active.
IMPORTANT: This is the action most tightly integrated with KDS2. Without KDS2 active, the "dish ready" condition cannot be evaluated and the action will not work correctly.
4. HOW IT WORKS ON THE POS / TABLET
Once guides and actions are configured in the back-office, Order Journey appears automatically in the revo XEF app on each iPad. Synchronisation is automatic — updates arrive in seconds with no need to restart the app.
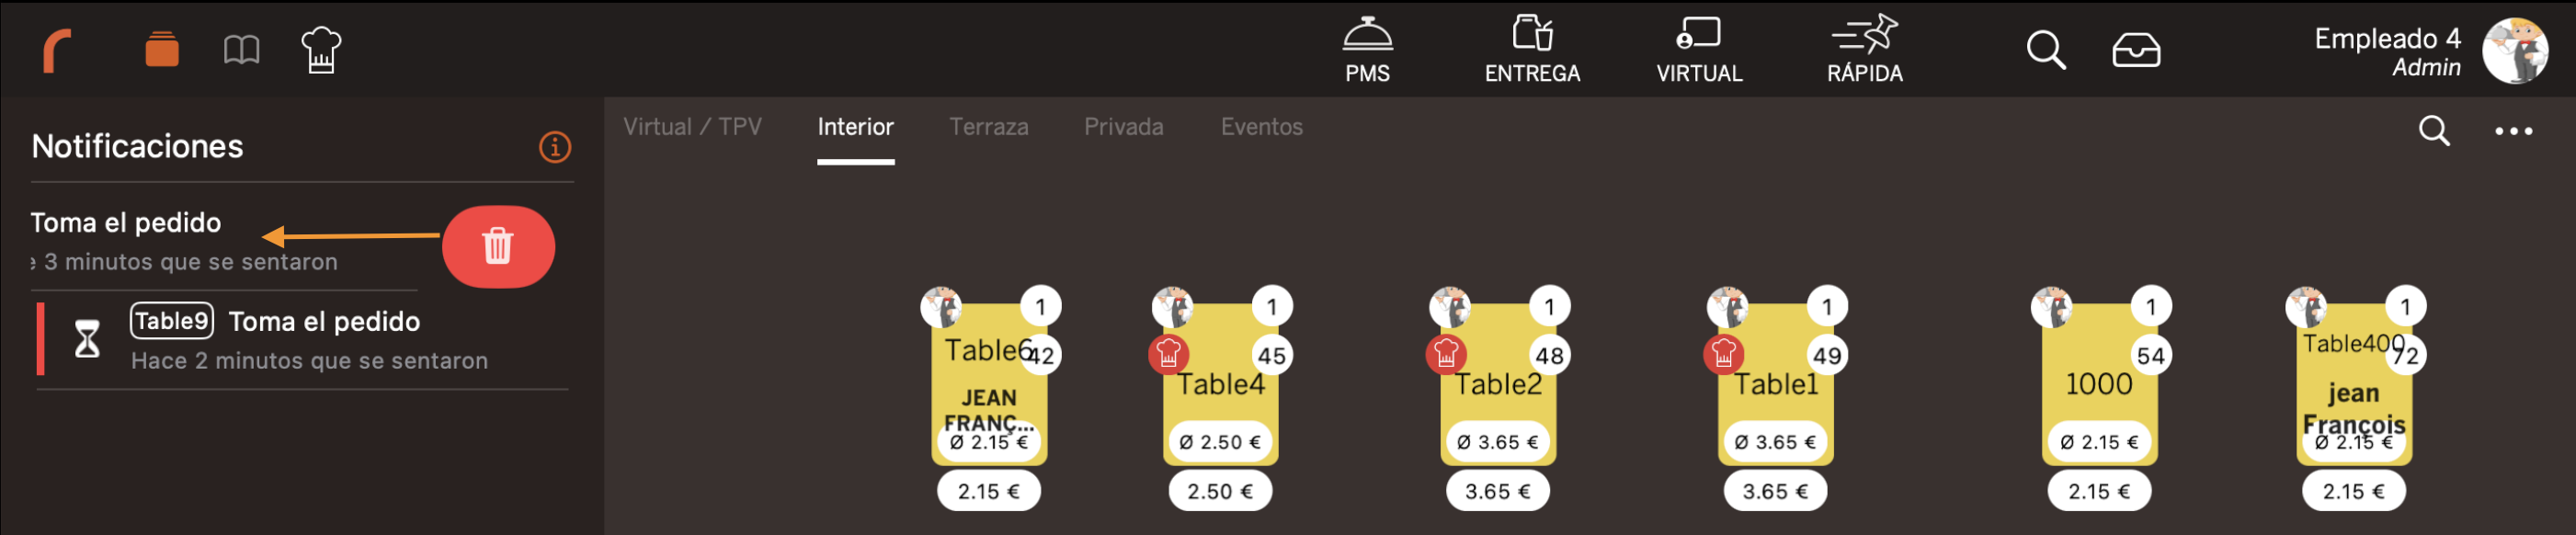
4.1. SIDEBAR
The sidebar is Order Journey's main panel on the POS. Access it via the Order Journey icon in the top bar.
From here, you see at a glance all active alerts for the service: which tables need attention, what action is required, and how long it has been pending.
- Each alert shows the table number, the action type, and the time elapsed since it was triggered.
- If the guide is configured for it, each server only sees the alerts for their own tables.
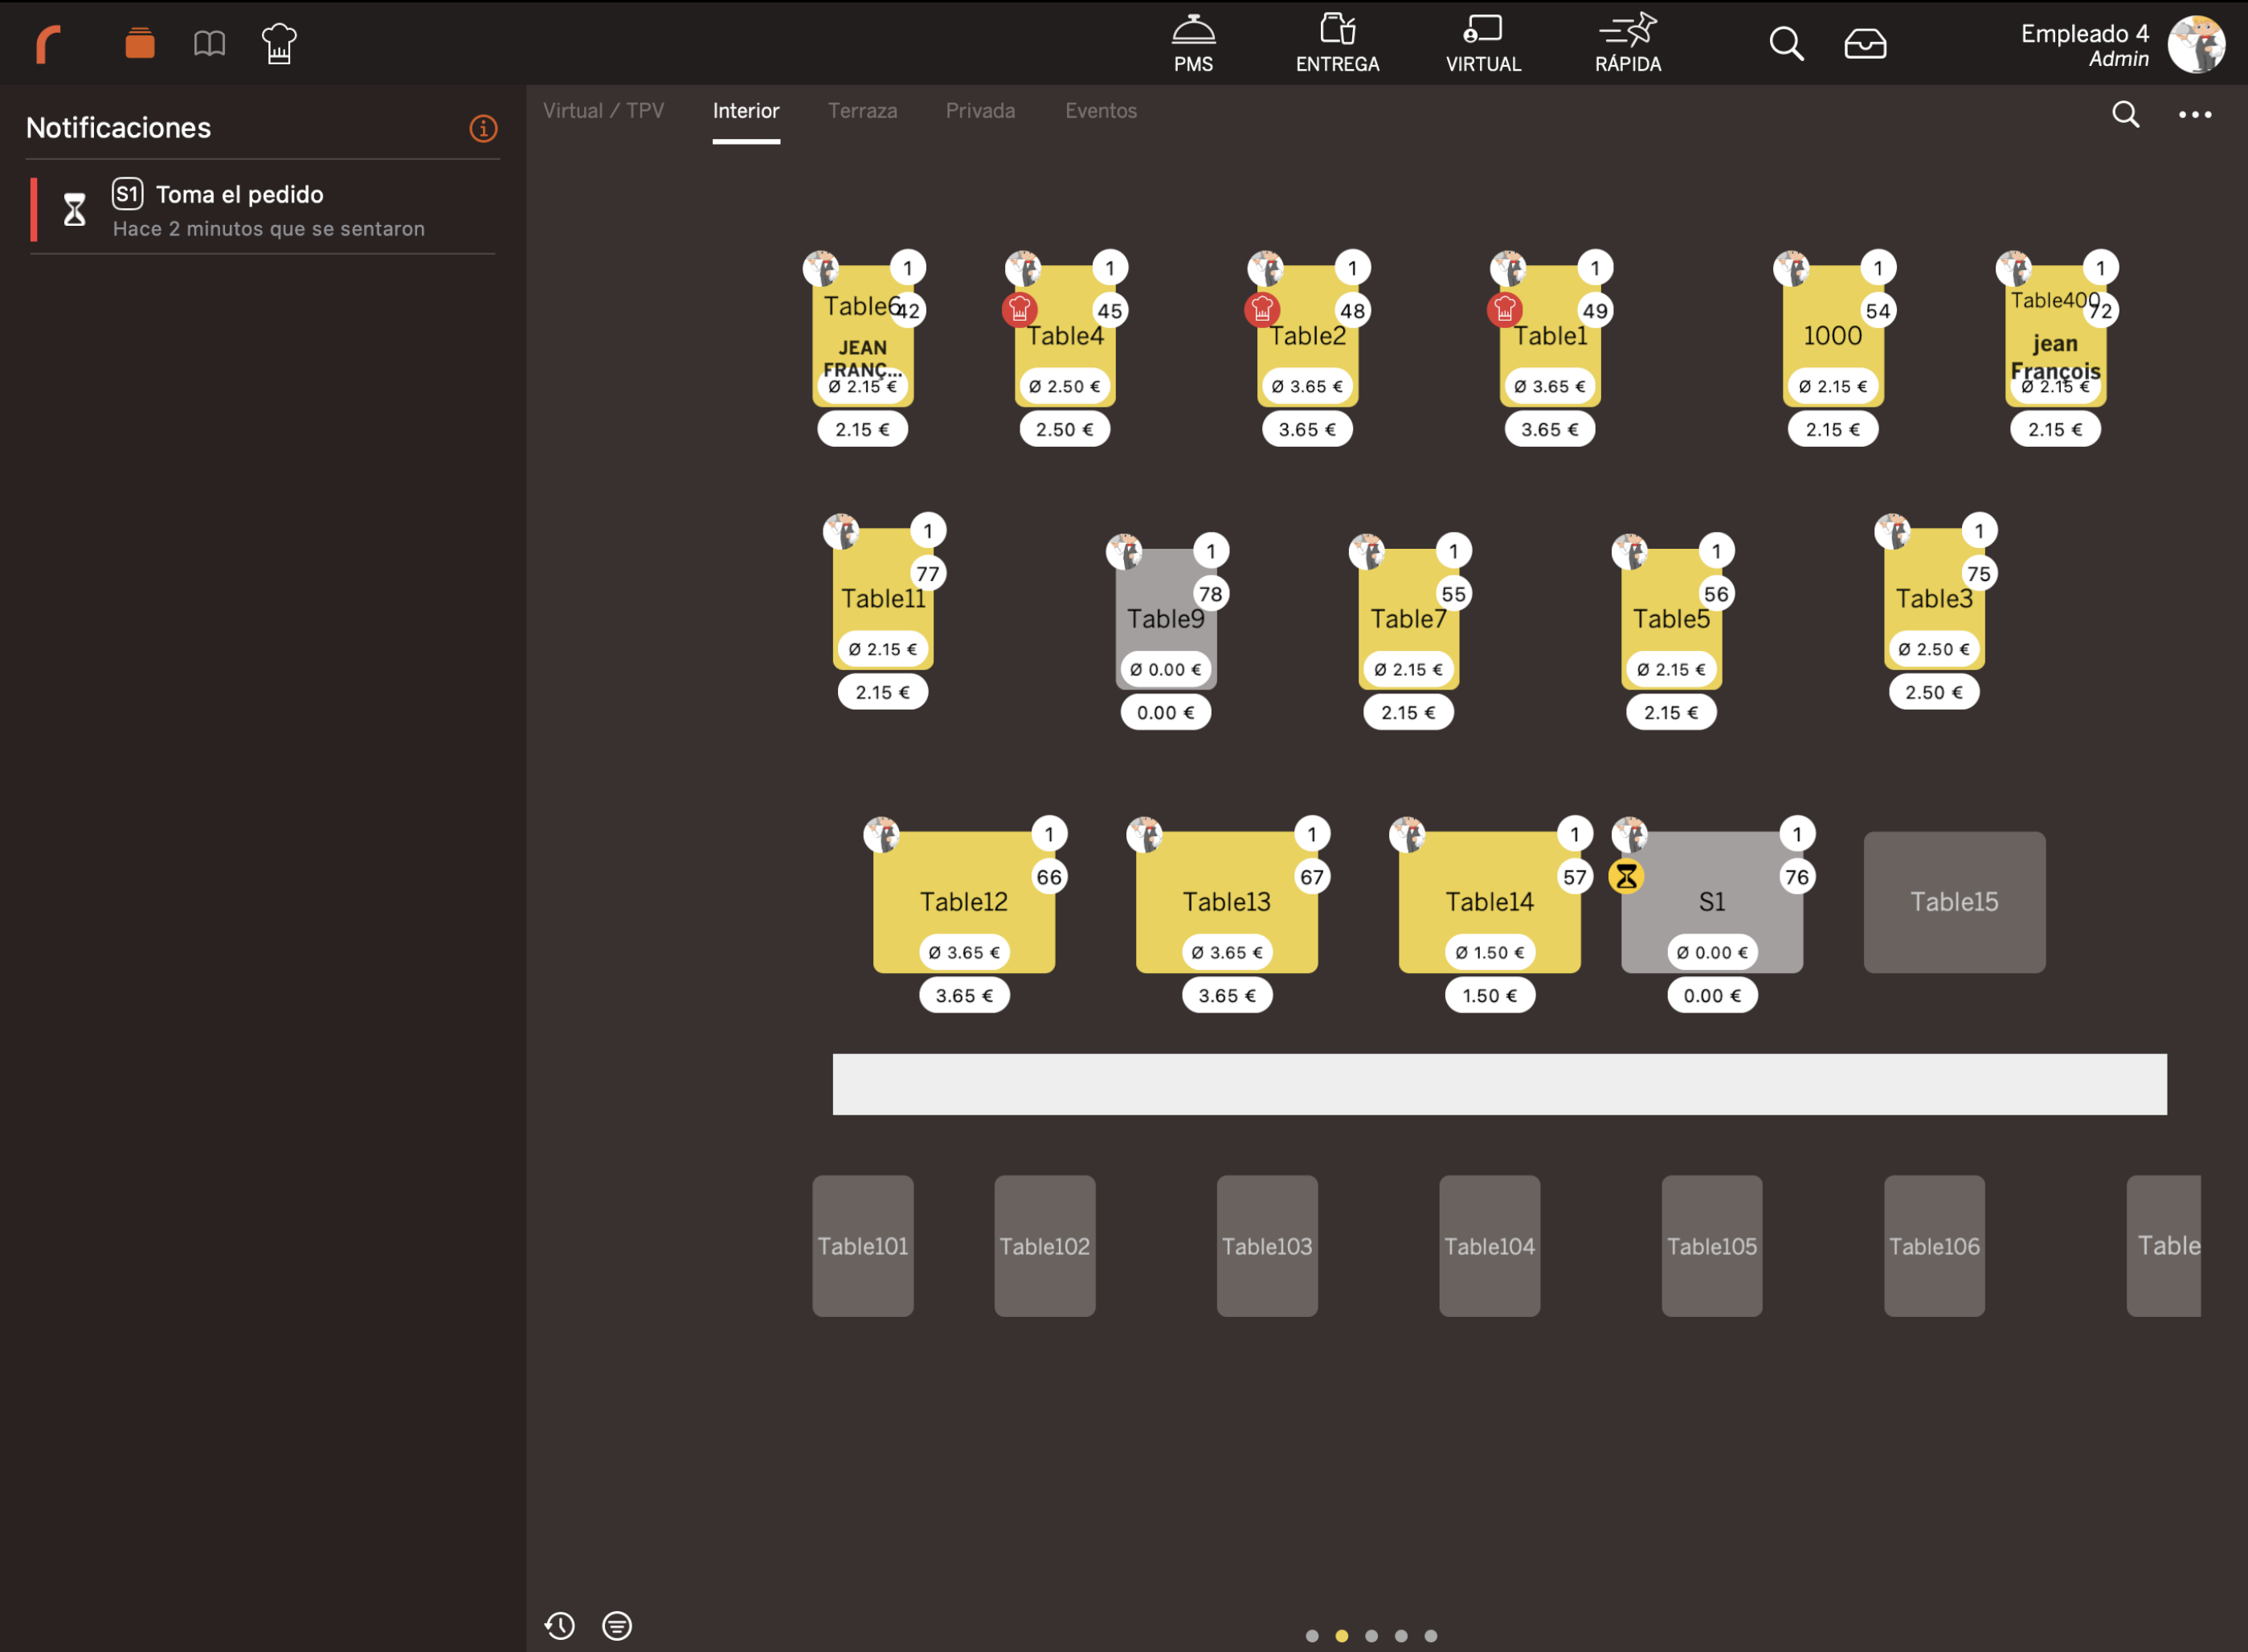
You can also view an alert from the floor plan: tables with active alerts display a visual indicator when the action has the table accessory enabled.
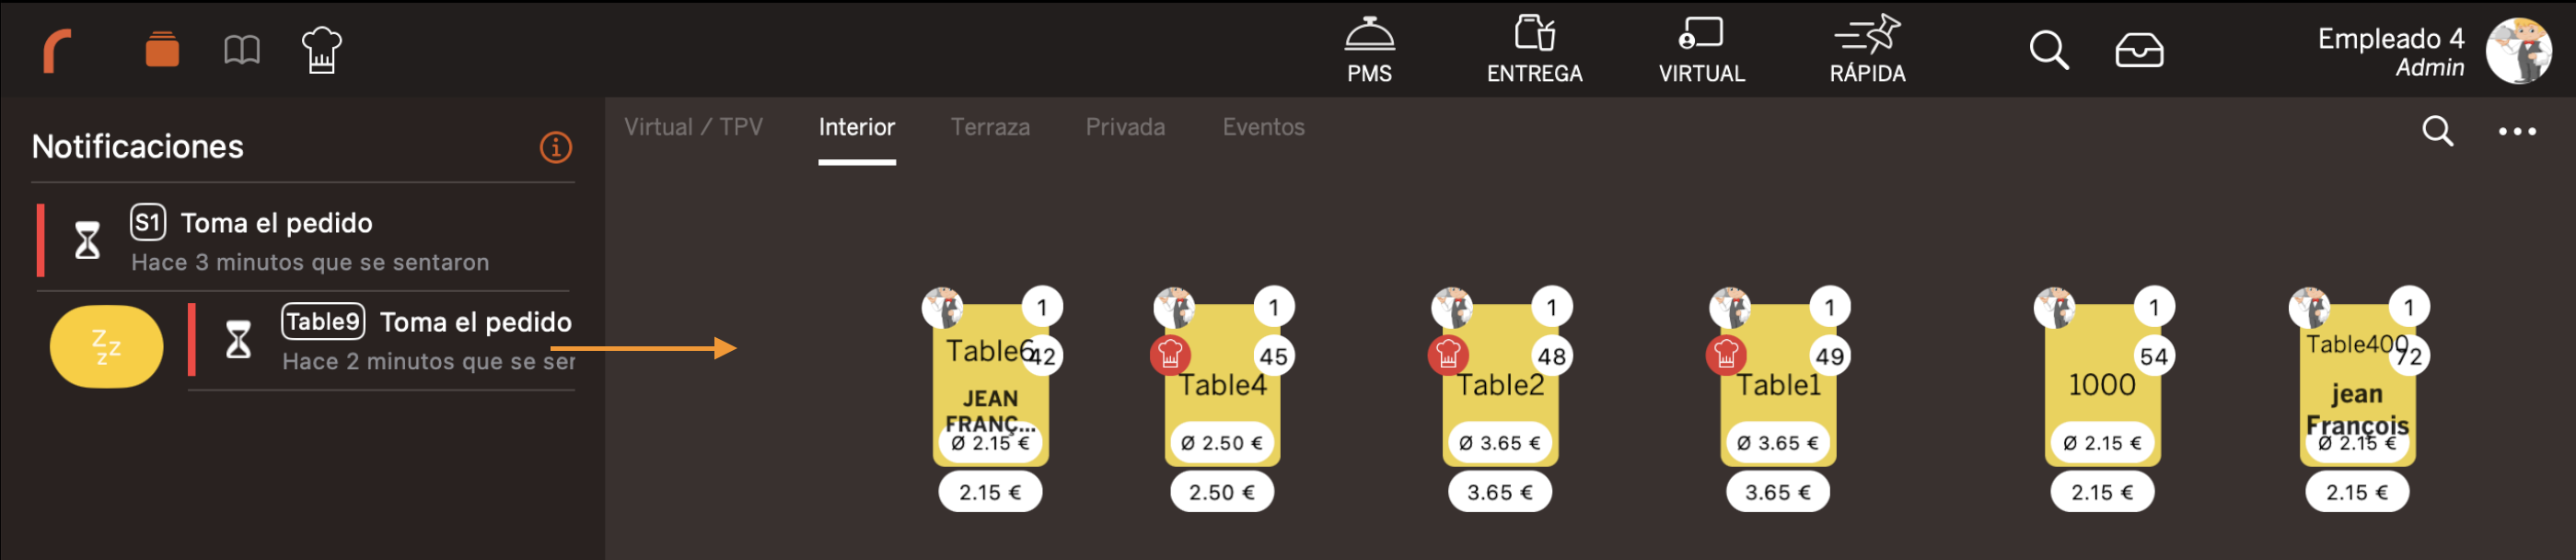
4.2. SWIPE ACTIONS
From the alert list, swipe horizontally on each item to access quick actions:
- Snooze: Delays the alert for a set time. Useful if the table is being attended to but the step can't be completed yet.
- Mark as done: Removes the alert from the list once the action has been carried out.
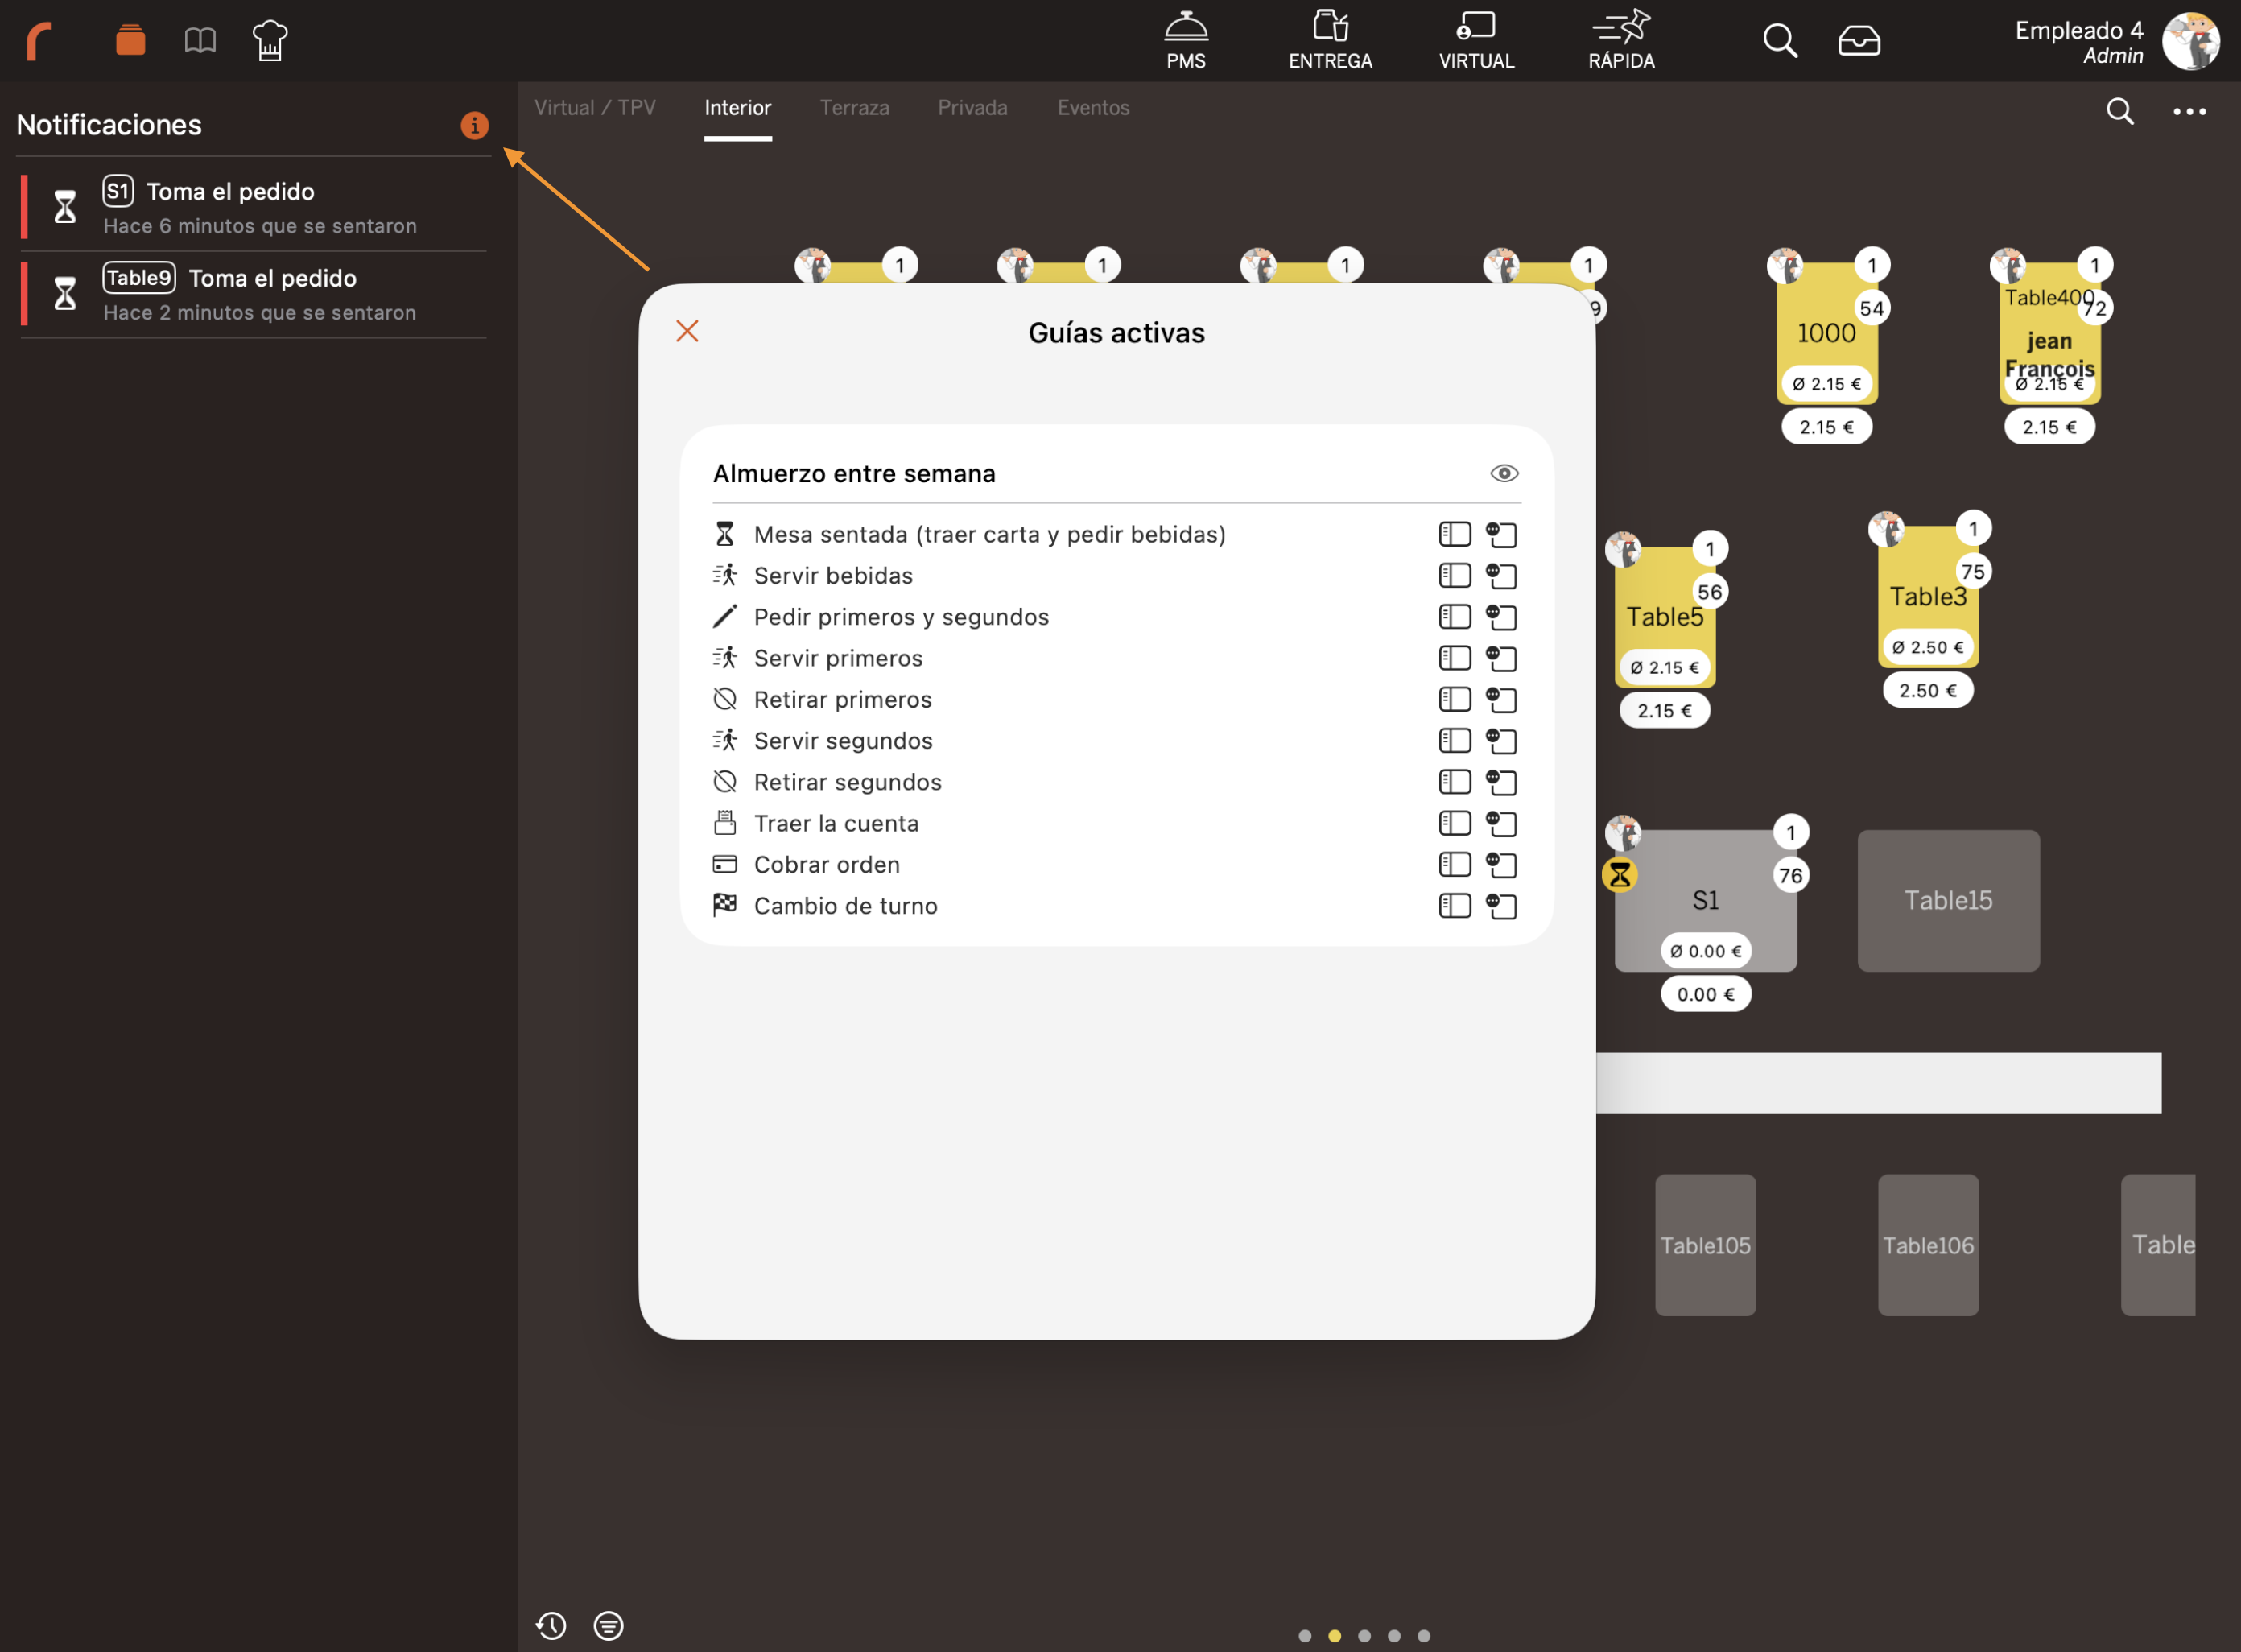
4.3. INFORMATION SCREEN
Tapping a specific alert opens the information screen for that order, showing:
- The active guides and actions with the steps to carry out at that moment.
4.4. TAPPING A NOTIFICATION
When you tap an Order Journey notification:
1. The app navigates directly to the corresponding order.
2. The pending action that triggered the alert is displayed.
3. Execute the action with a single tap or dismiss it if it has already been handled.
IMPORTANT: Order Journey is strictly informational. Alerts are notifications, not blockers of the sales process. You can continue operating normally even if an action is not executed.
5. TROUBLESHOOTING COMMON ISSUES
THE ORDER JOURNEY SECTION DOESN'T APPEAR IN THE BACK-OFFICE
1. Check that the Order Journey licence is enabled on your Revo XEF account.
2. Check that the feature is enabled on your account (contact support if needed).
THE POS ISN'T SHOWING ORDER JOURNEY ALERTS
1. Check that active guides with active actions exist in the back-office.
2. Force a manual sync from the iPad app.
3. Check that the employee's role is included in the guide's App privileges (or that the field is empty to allow all roles).
4. Check that KDS2 is active if the failing action is of type No-show, Wait time exceeded, Order duration exceeded, or Serve dish.
AN ACTION DOESN'T APPEAR FOR CERTAIN SERVERS
1. Check the guide's App privileges — if roles are defined, only those roles see the guide.
2. Check the action's App privileges — if not empty, only the specified roles can execute that action.
3. Remember: if no roles are defined on the action, it inherits the roles from its parent guide.
A 403 ERROR APPEARS WHEN SAVING A GUIDE
1. Check that your back-office user has the Order Journey permission with a sufficient level (Edit or Full).
2. Check that the licence is active and contact support if the problem persists.